EcoBIM 387/4
The EcoBIM 387/4 add-in allows you to calculate the electricity consumption of lighting, according to method 1 of the SIA 387/4 norm.
The add-in calculates the limit and target values so that you can verify if your lighting project complies with the norm.
A calculation report can be exported, in a .PDF format, listing the
following:
- Spaces and their electricity consumption
- List of illuminated spaces and their characteristics
- List of non-illuminated spaces
You can use this report for your building permits when the local regulation requires it.
The values of electricity consumption are calculated from the following elements:
- Spaces areas
- Spaces categories
- Ceiling height
- Workplane height
- Luminaires height
- Windows
- Luminaires characteristics
EcoBIM 387/4 uses dummy luminaires, only existing in the add-in. Hence, it is not required to have drawn luminaires in your Revit model to use EcoBIM 387/4.
The following parameters are taken from the Revit model:
- Geometrical characteristics of spaces: area, volume, perimeter, ceiling height
- Geometrical characteristics of windows: area, lintel height
The physical properties of the windows must be directly entered in EcoBIM 387/4, namely:
- The frame percentage
- The light transmission of the glazing
Furthermore, EcoBIM 387/4 is not yet able to automatically detect the overhang length in front of a window. You have to manually enter them, at the Templates level or individually, in each window parameters screen.
Info
Skylights are currently not taken into account in the calculation and will be included in a future version.
EcoBIM 387/4 is not intended to calculate the electricity consumption of the exterior lighting.
Preparing Your Model and Managing Revit options
Creating Spaces
EcoBIM 387/4 makes use of the existing spaces in your Revit model. It is thus necessary that you define the spaces that you want to see in the EcoBIM interface beforehand.
More generally, it is recommended to create all the spaces of the model before using the EcoBIM add-ins as defined in the official documentation.
Info
Once the spaces are created, it is recommended to name them from the Revit interface so that you can quickly identify them in the EcoBIM interface. It is however possible to name the spaces from the EcoBIM interface and to use the display feature to locate these spaces in the model.
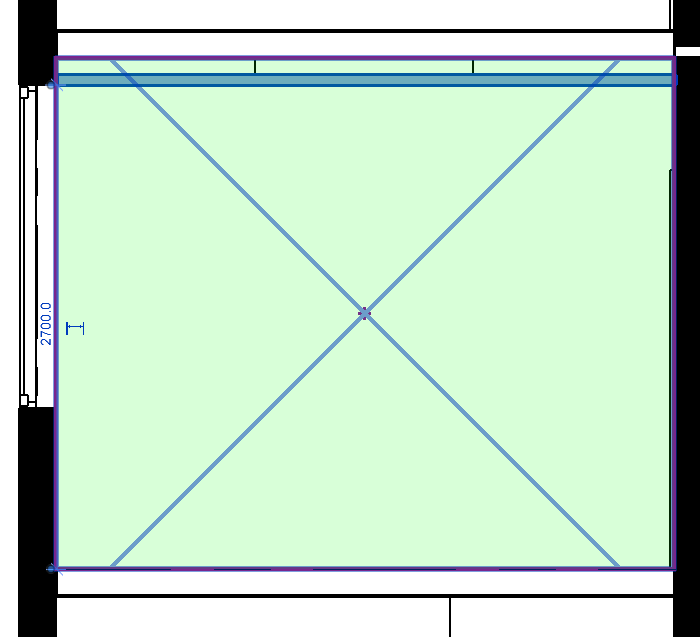
Volumetry of spaces
EcoBIM 387/4 uses space contours to define several quantities used in the calculation:
- Average space height, characterized by the space volume divided by its area
- The windows lintel height
The SIA 387/4 norm assumes that the height under the slab corresponds to the low level of the balcony. The lintel height is also calculated as the difference between the height under the slab and the top of the window.
For the calculation to comply with the SIA 387/4 norm, it is therefore necessary that the space volume is defined up to the ceiling tile. If a false ceiling exists, the space volume must include it:
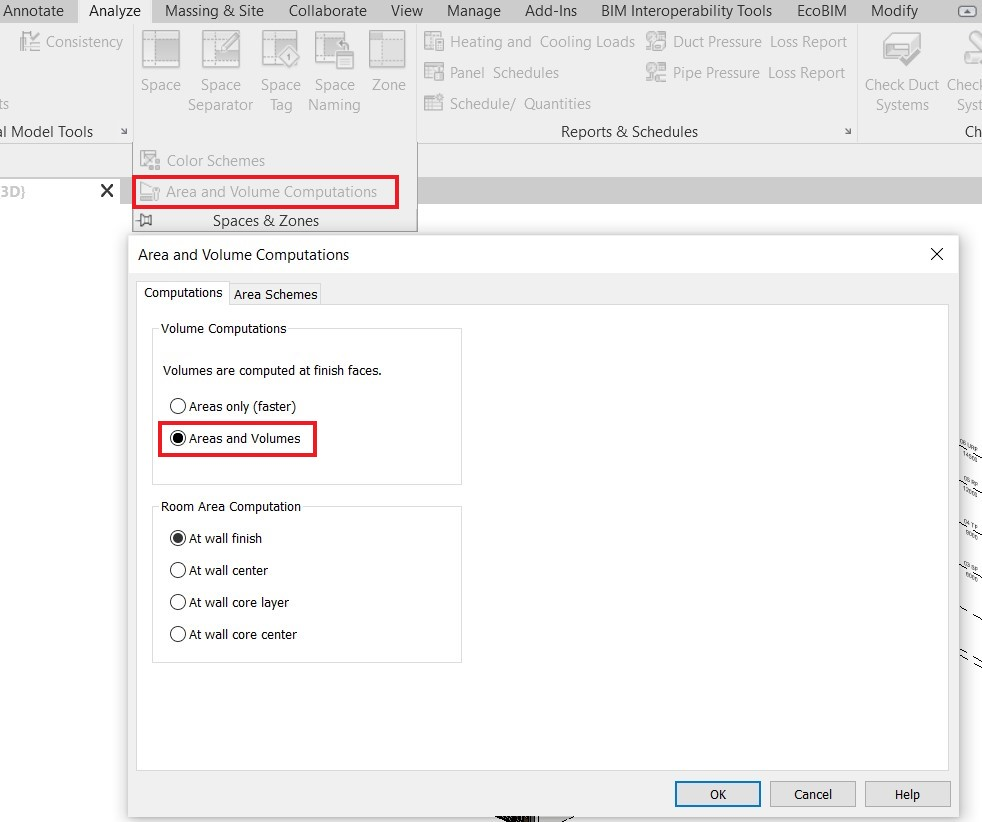
Areas and Volumes Display Options
To use EcoBIM 387/4, you must activate the volume calculation option.
For this information to display correctly, you must enable volume computation
available from the tab Analyze >Spaces and Zones >
Area and Volume Computations:
Using EcoBIM 387/4
Preparing Your Zones And Spaces
For basic controls and features that relate to EcoBIM add-ins, refer to the Base features.
Info
Launching EcoBIM 387/4 displays the zones and spaces of your model, as well as their stored data. If your model does not have any zones, you can create them from the add-in.
Create as many zones as necessary, according to your need (for instance by
category, storey, or luminaire type). When exporting the results, the
spaces in the Remaining spaces will appear in the list of unilluminated
spaces. Therefore, the spaces outside of the Energy Reference Surface (ERS),
or the housing spaces can be in this list.
To define characteristics for zones and spaces, select one or the other to display the properties frame.
Warning
When your rename a zone or space from EcoBIM, such an element gets instantly renamed in Revit. On the other hand, if the zone or space is renamed from Revit, the element is not updating in the EcoBIM add-in, for the parameters are initialized when displaying the main interface. Therefore, if you want to see these changes, you have to close then reopen EcoBIM. We recommended renaming zones and spaces directly from EcoBIM for simplicity.
Templates
In EcoBIM 387/4, you can create Templates, representing reference elements
that are attached to your building elements. Modifying a template also modifies
the properties of the elements that are attached to the model (hereinafter
referred to as sub-elements). Using templates allows you to quickly
characterize your building elements. You can create as many templates as
necessary.
You can create Space, Luminaires and Windows templates. Space templates
can also inherit luminaires and windows templates
You can define these templates at the zone, space, luminaire, or window level. A hierarchy is defined so that the characterization of building elements is quick and flexible. For instance, if a zone inherits a space template, all the spaces of the zone will inherit the template properties. However, it is possible to make changes at the building level to override the properties of the template. This operation requires vigilance and knowing which elements have been manually modified. If an element property has been manually defined, selecting a template will not overwrite this entry.
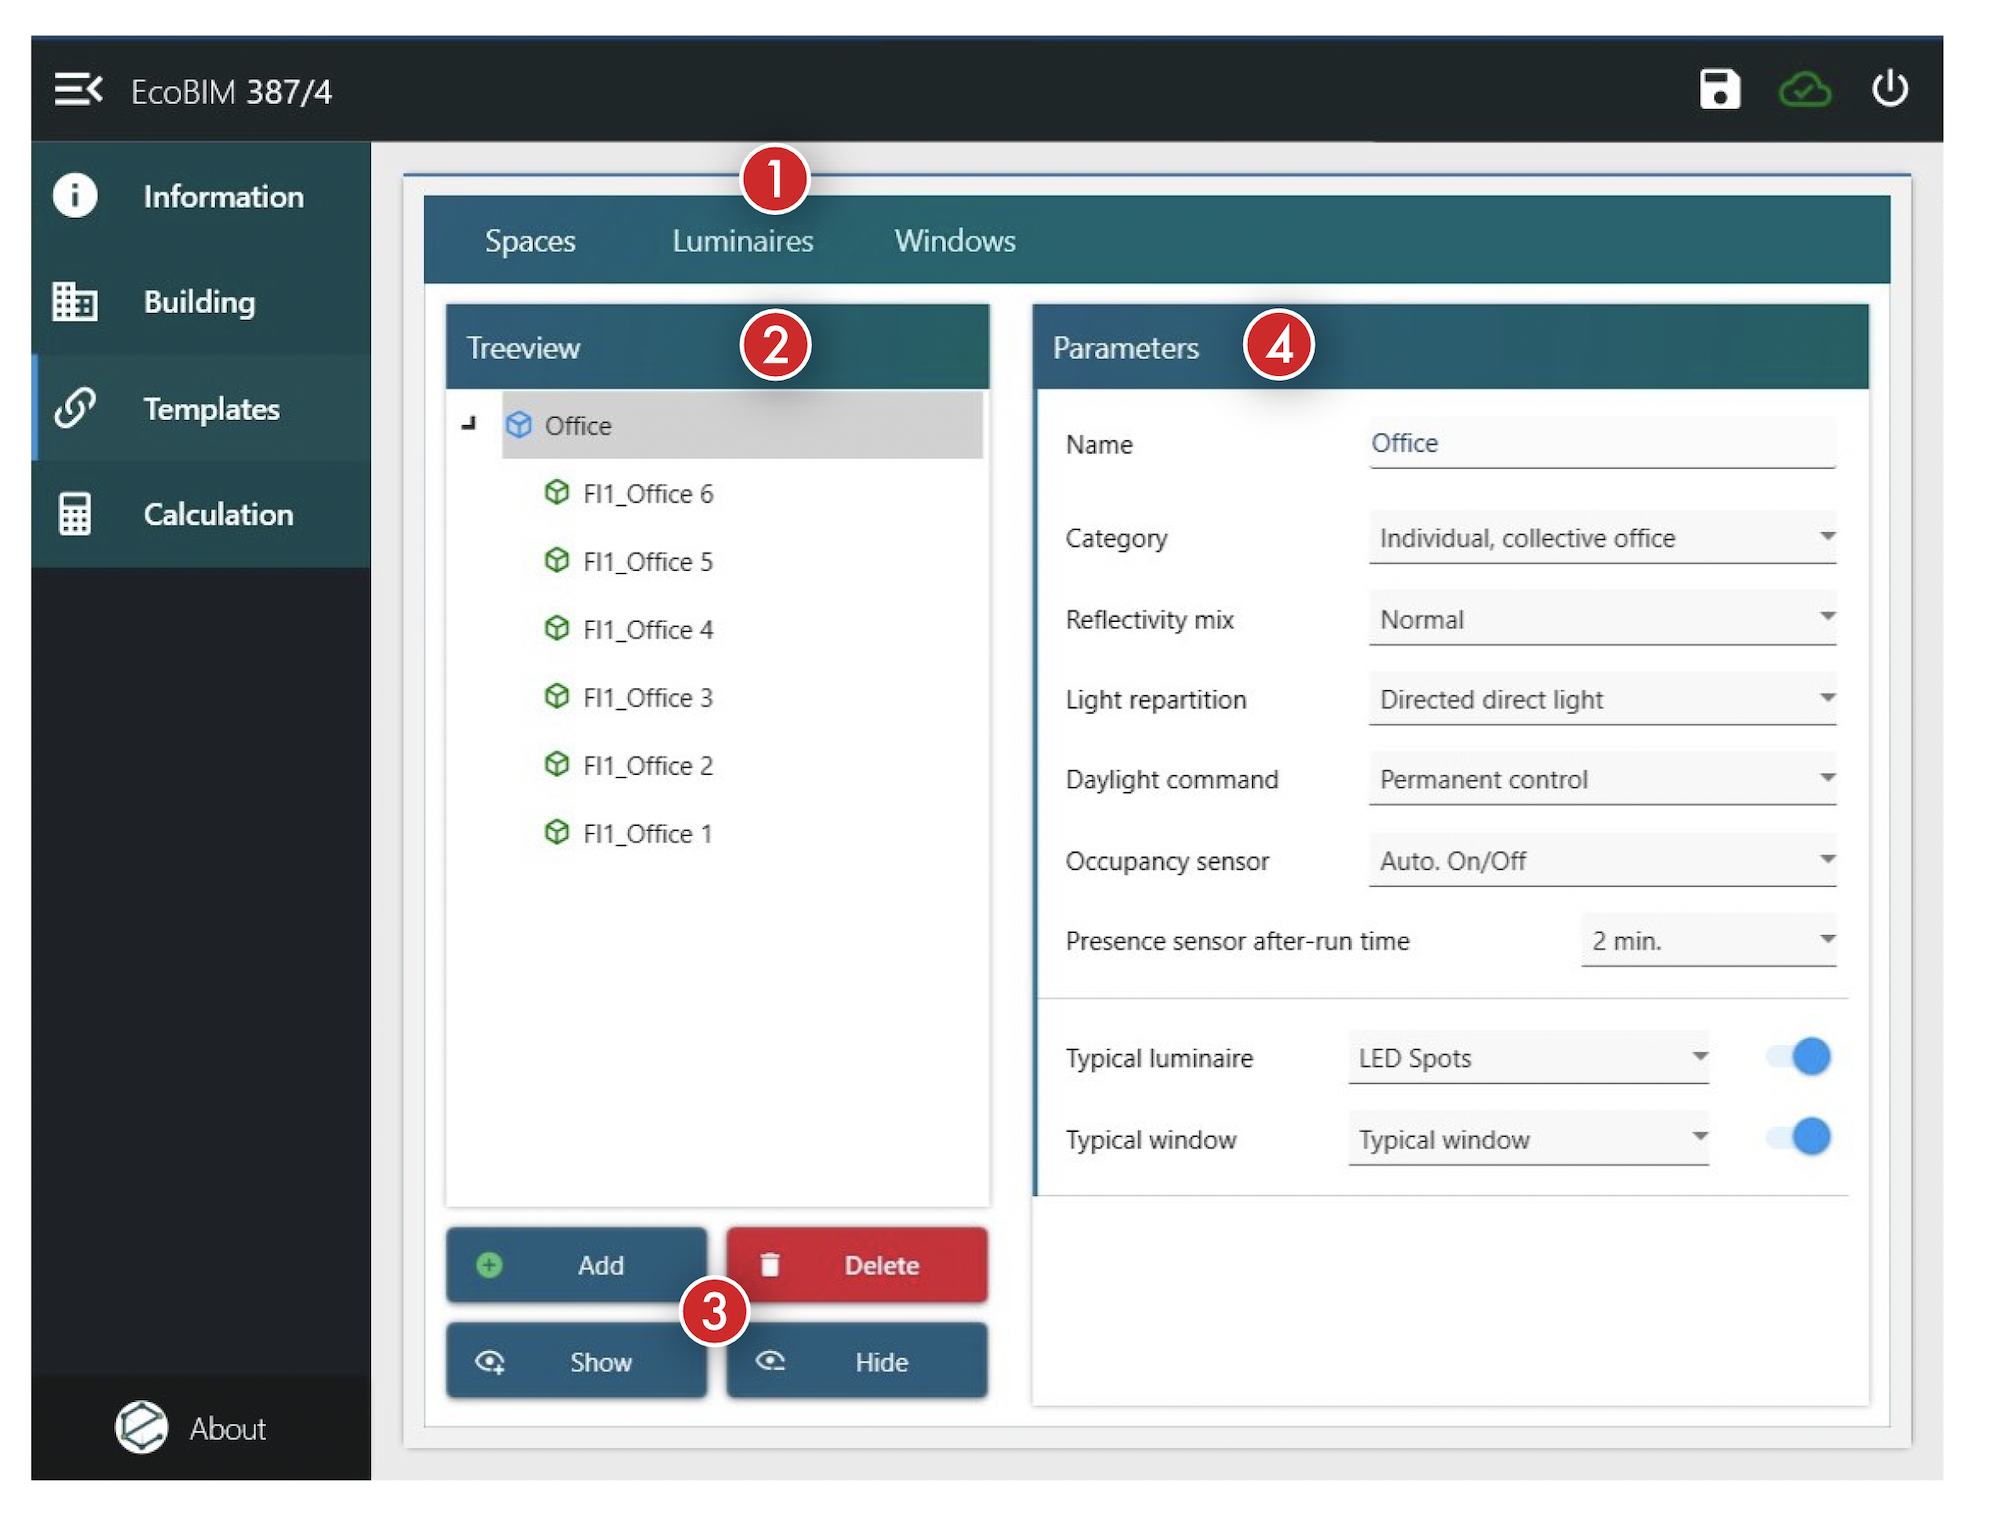
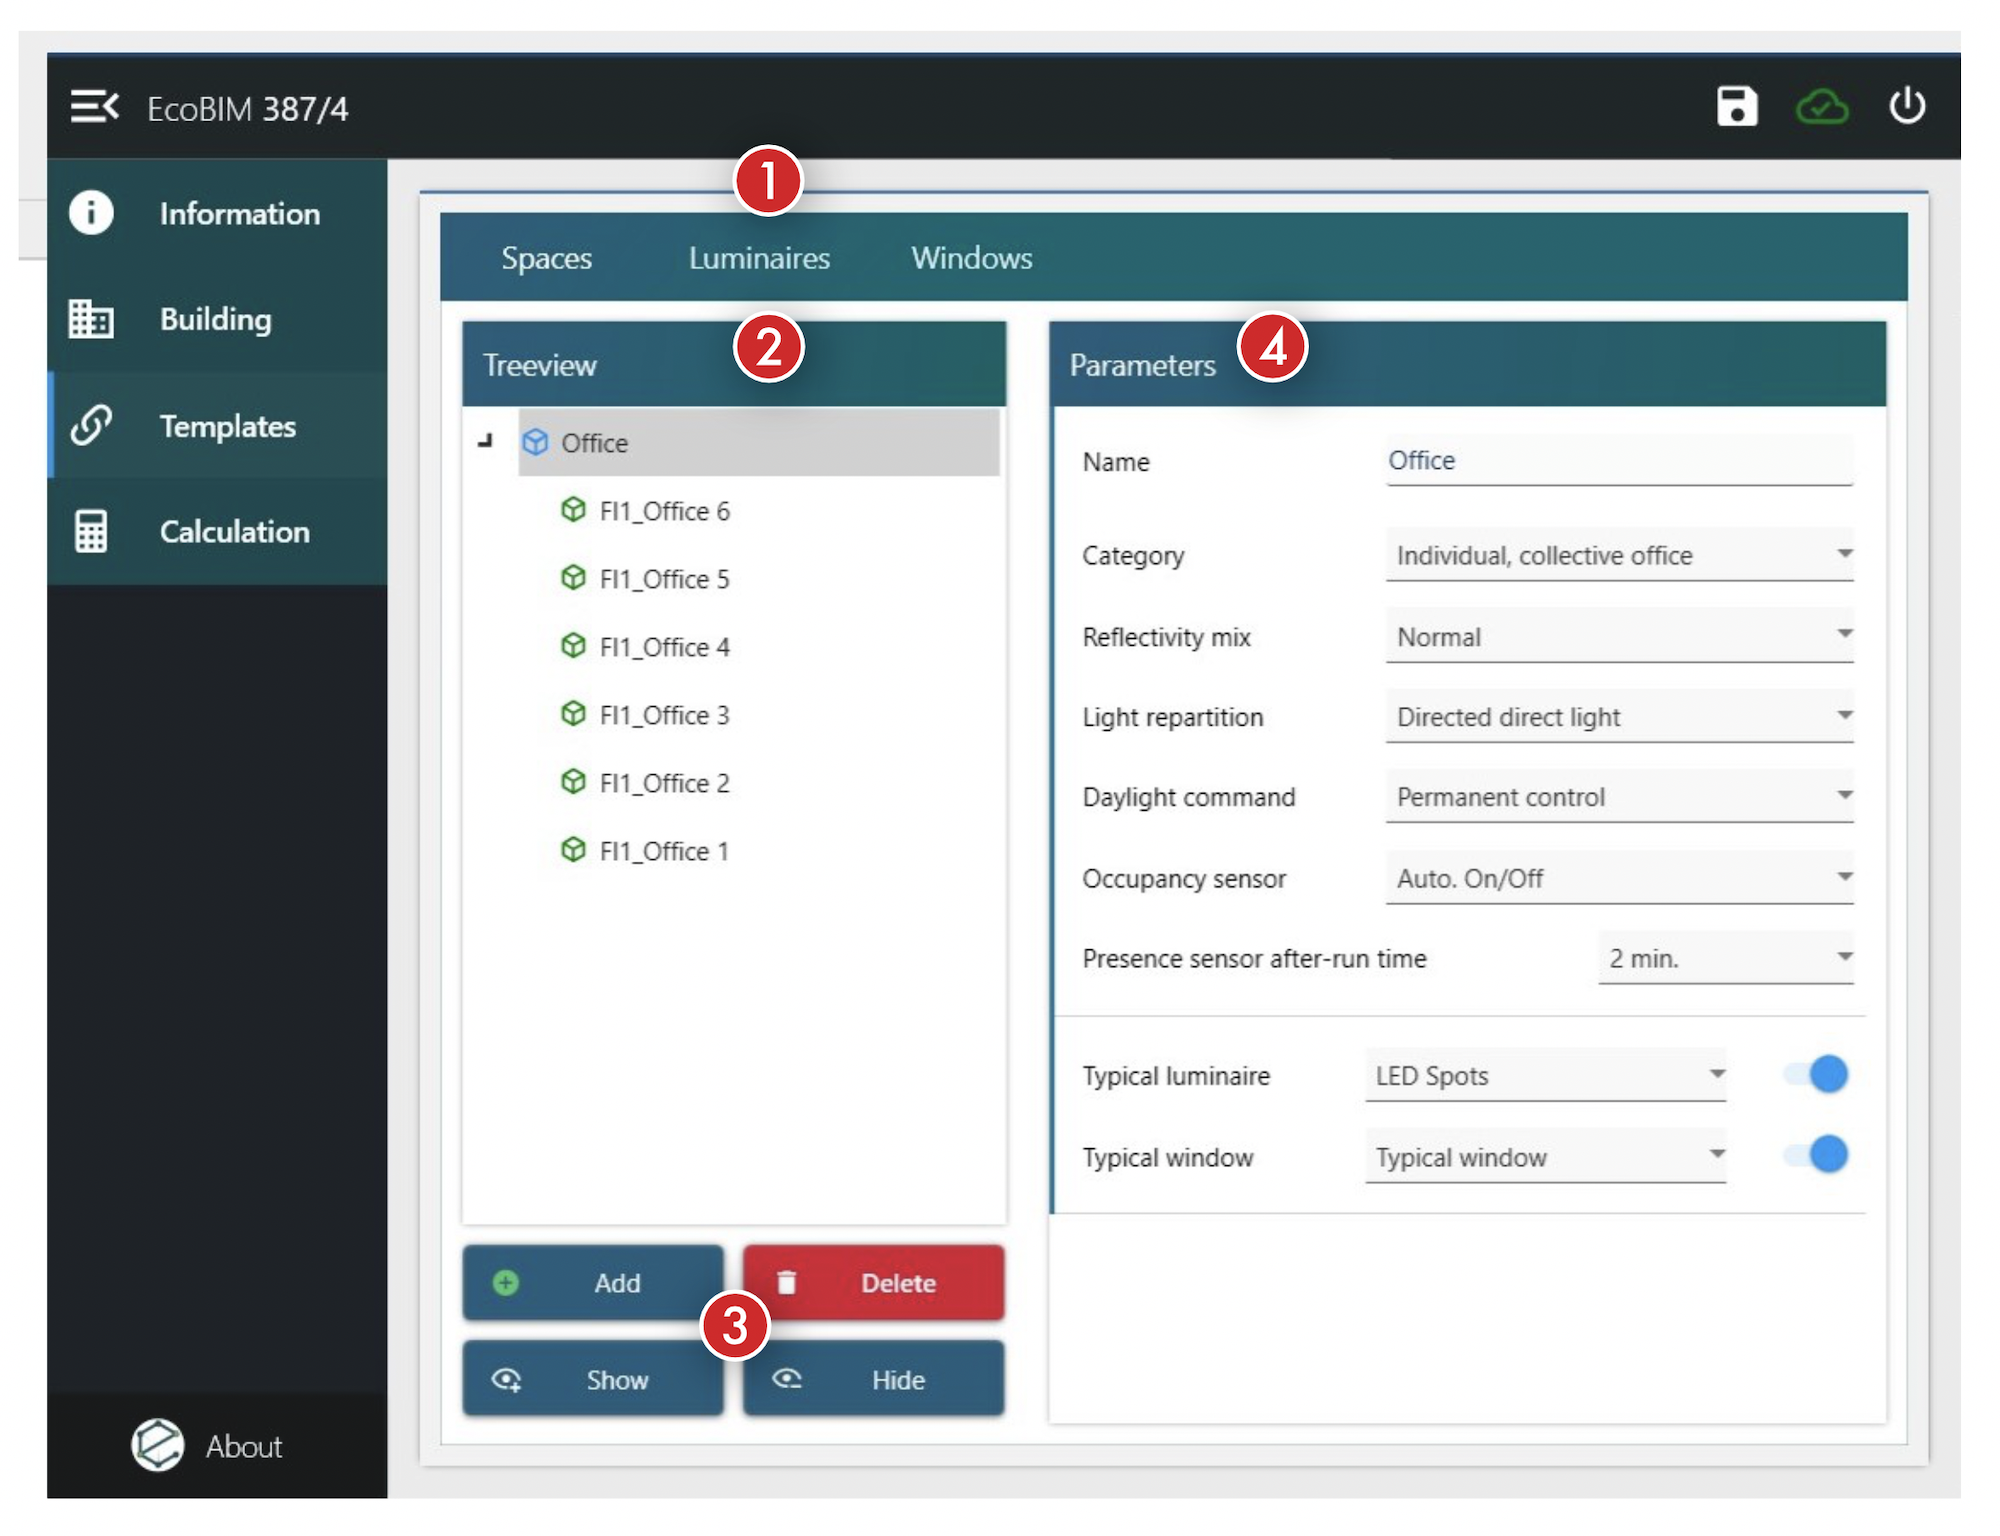
The Templates window consists of the following items:
- The three following tabs:
Spaces,Luminaires, andWindows - For each tab, a tree view panel listing existing templates and their sub-elements
-
A button bloc allowing the following actions:
- Creating a new template
- Deleting a template
- Displaying of templates' sub-elements. By selecting the template, all the sub-elements are displayed. For luminaire templates, the sub-elements correspond to the spaces in which the luminaires are. If a sub-element is selected, only this sub-element is displayed.
- Hiding sub-elements, if they have been displayed with the previous button.
-
A setting screen that is linked to the template. You cannot modify the sub-elements settings from that view.
The following section presents in detail the settings for each of the templates type.
Space Template
The Space templates screen has the following features:
- Template name
- Category, according to the SIA 2024 Technical Standard
- Reflectivity mix, according to the SIA norm 387/4, section 3.2.5.3
- Luminaire light repartition, according to the SIA norm 387/4, section 3.2.5.4
- Lighting control, according to the SIA norm 387/4, section 3.3.2.4
- Occupancy sensor after-run time. This field is deactivated if the aforementioned lighting control does not have an occupancy sensor.
- Luminaire template linked to this space template, available if you have activated this feature with the toggle button located at the right of the field.
- Window template linked to this space template, available if you have activated this feature with the toggle button located at the right of the field.
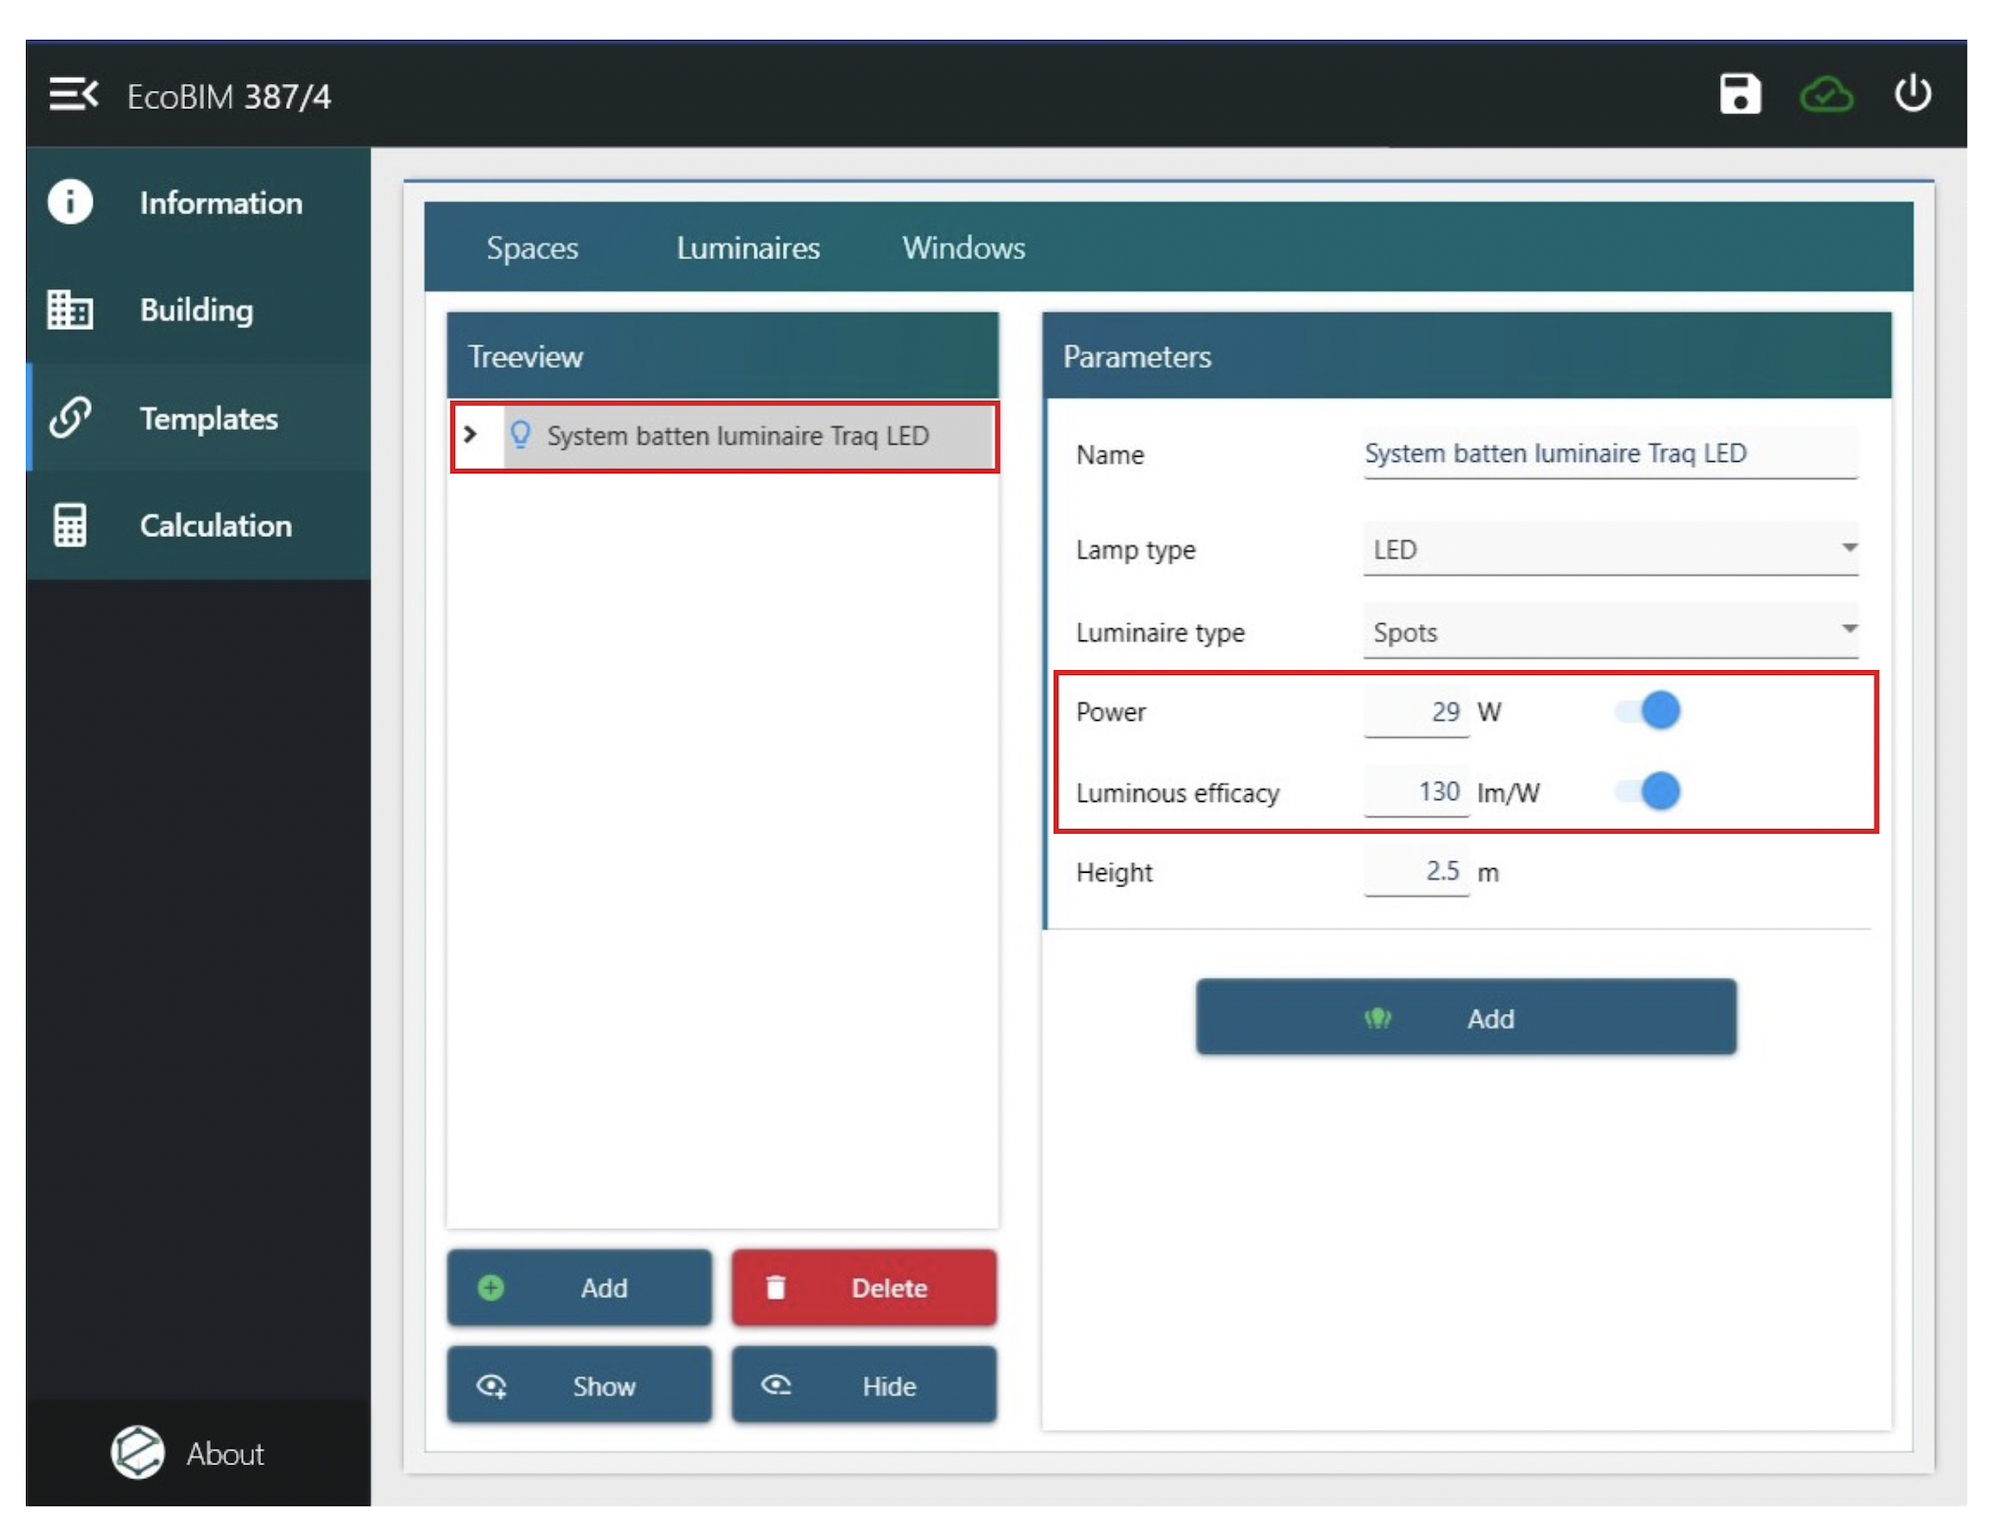
Luminaire Template
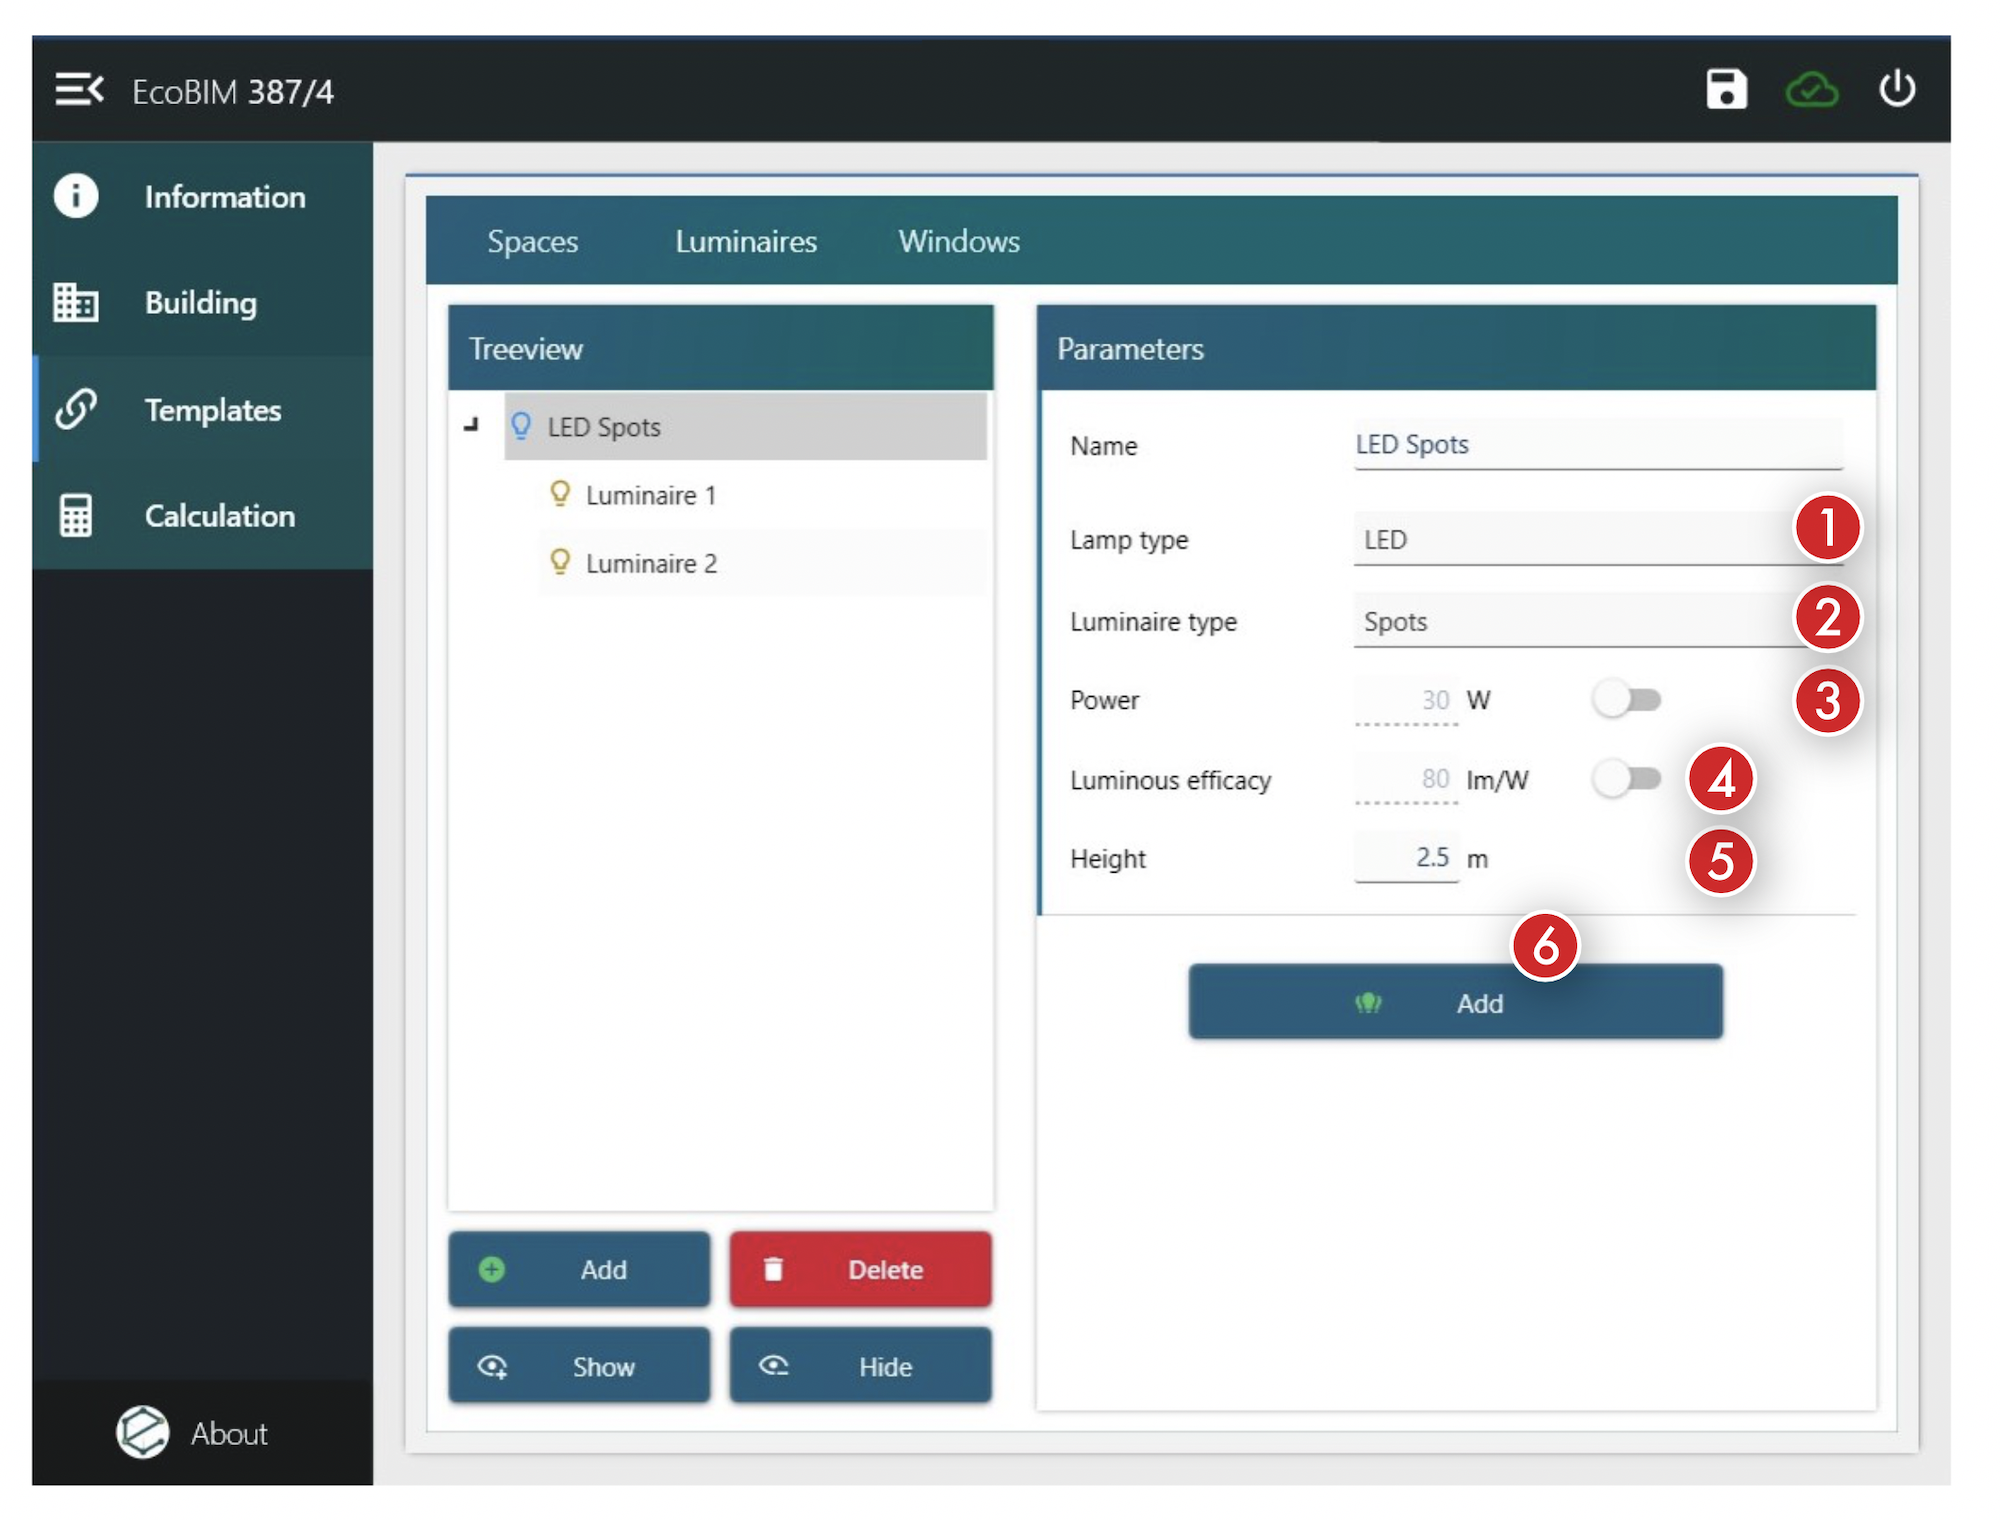
The Luminaire templates screen has the following features:
- Template name
- Lamp type, according to the SIA norm 387/4, table 3
- Luminaire type, according to the SIA norm 387/4, table 3. The luminaires that are listed depend on the type of lamp that has been previously chosen.
- Luminaire power (in
W), according to the SIA norm 387/4, table 3. Click the toggle button at the right of the field to overwrite this value. The value must be comprised between 0 and 200. - Luminaire luminous efficacy (in
lm/W), according to the SIA norm 387/4, table 3. Click the toggle button at the right of the field to overwrite this value. The value must be comprised between 0 and 200. - Luminaire height (in
m), concerning the finished floor level. The value must be comprised between 0.5 et 20.
Accessing the Luminaires Database
EcoBIM 387/4 version 1.4.0 includes a new database that contains many
luminaire references from several manufacturers. This database allows you to
define the characteristics of your luminaires, such as power or luminous flux,
using real data. The database is a rich and powerful tool that provides a
variety of information as defined by the new GLDF standard
conjointly developed by DIAL and RELUX. The GLDF standard allows the embedding
of a set of luminaire characteristics in a modular and flexible format.
With this database, you can manage the lighting in your models with greater accuracy and better completeness. Previously, you would manually input the characteristics of your luminaires, such as power, luminous flux, or luminaire type. Combined with the use of luminaire templates, this database allows you to model and characterize your spaces in an efficient way.
This database is fully integrated with the add-in and allows you to browse and consult thousands of luminaires produced by the following manufacturers:
- Regent
- XAL
- iGuzzini
- Zumtobel
To date, the database contains over 49,000 references:
| Supplier | Number of luminaires |
|---|---|
| Regent | ~ 330 |
| XAL | ~ 27 000 |
| iGuzzini | ~ 13 000 |
| Zumtobel | ~ 7,600 |
You access this database from the luminaire templates view. Click the Add
button to open the database.

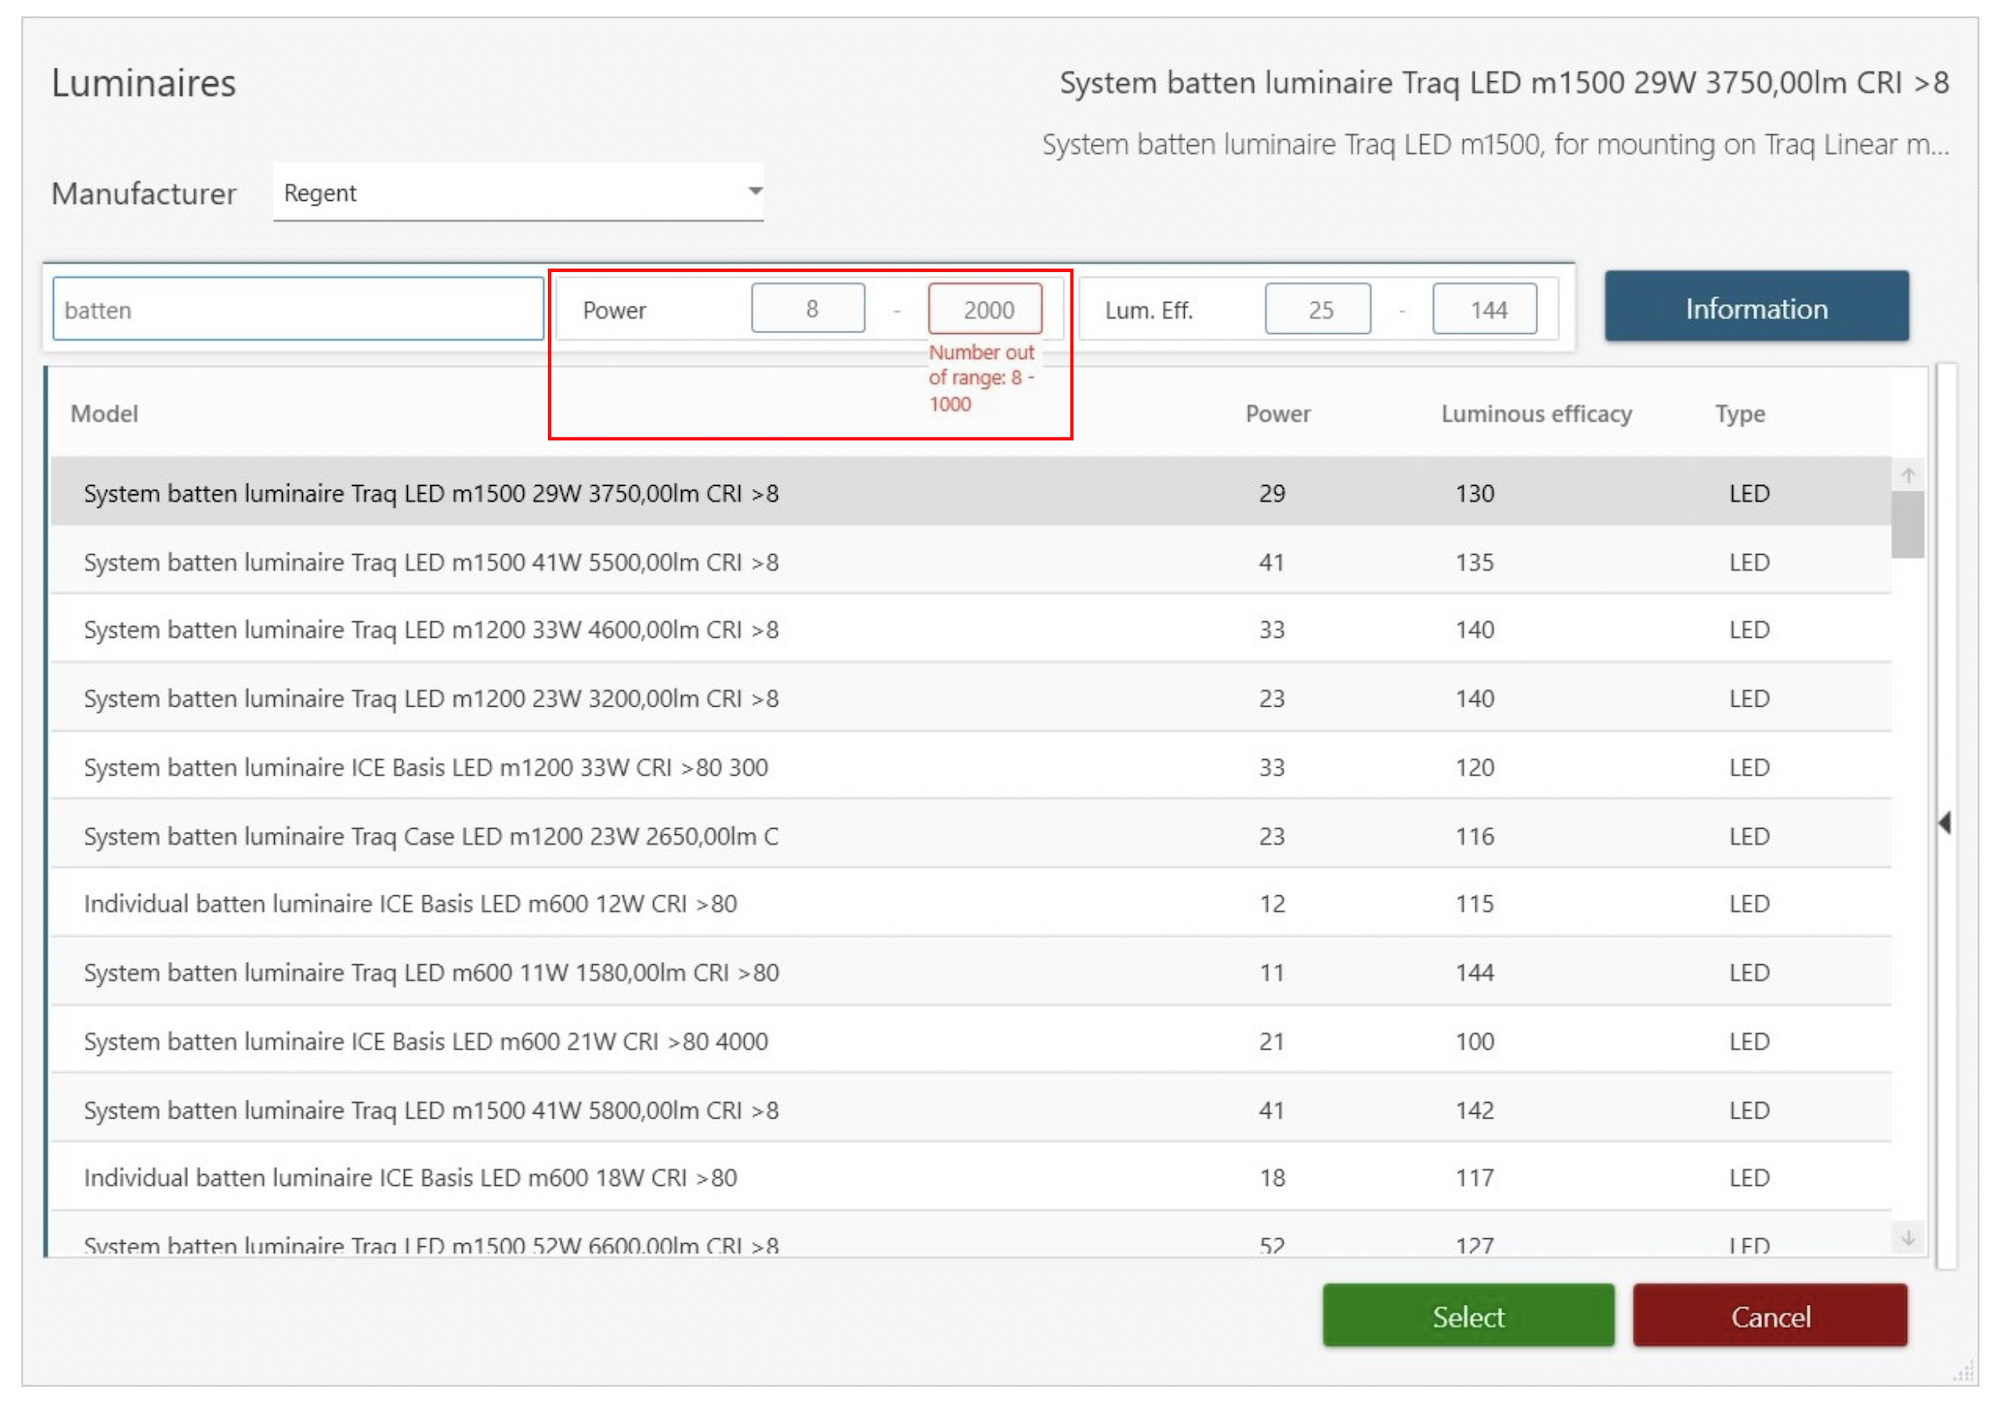
The interface is comprised of the following features:
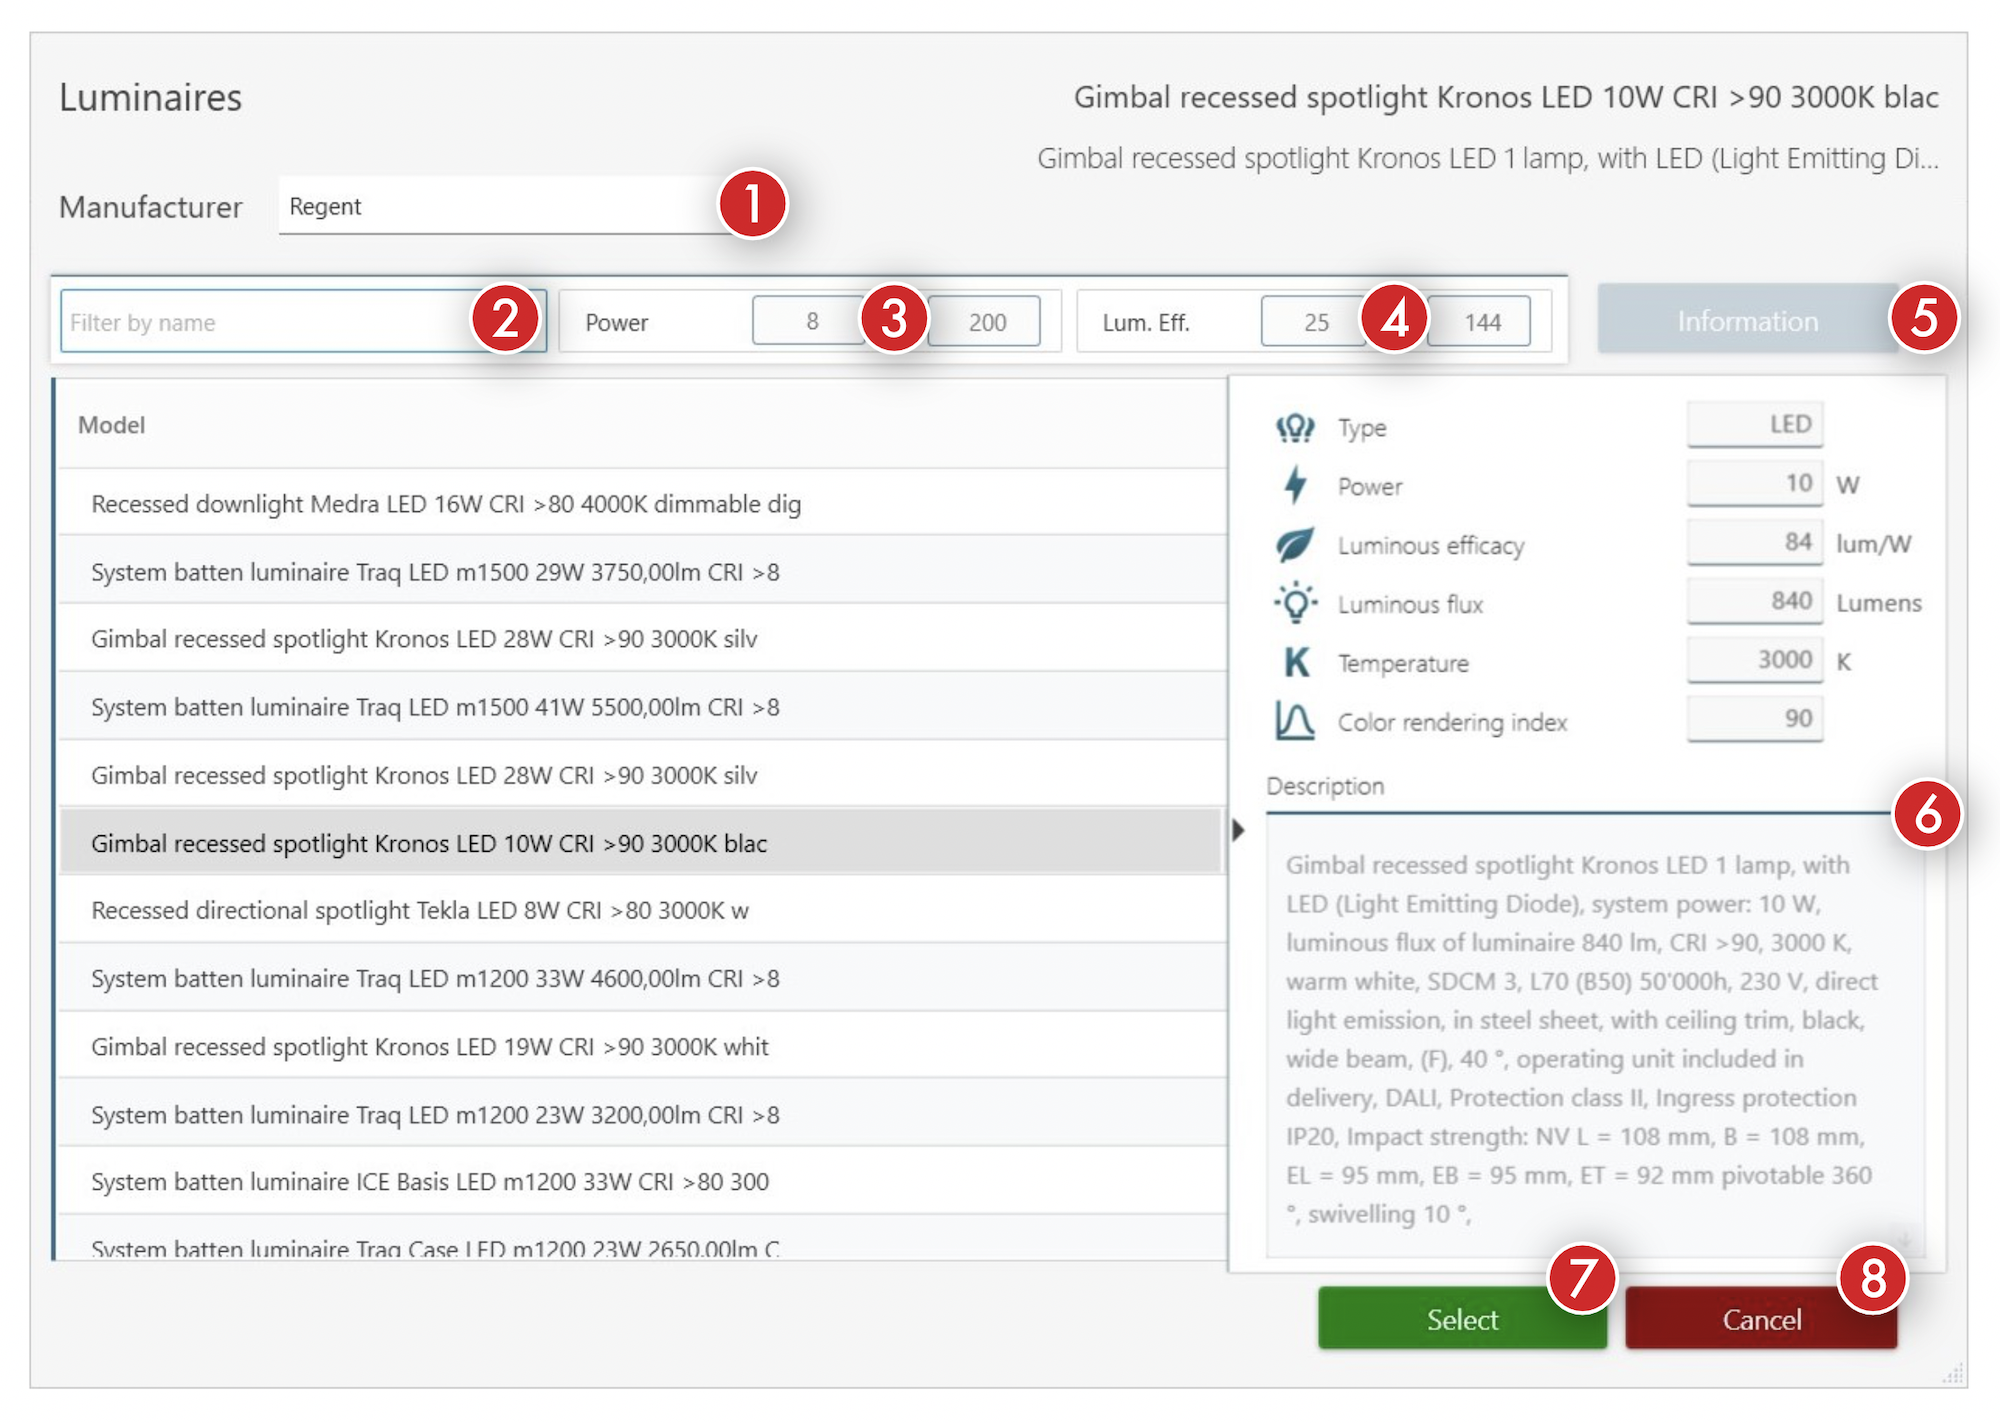
- A drop-down list to select the manufacturer.
- A Filter to run a search based on selected manufacturer.
- Fields to filter models by power. The initial values that are set vary
depending on the manufacturer that you select.
- The left field allows you to filter models according to a minimum power.
- The right field allows you to filter models according to a maximum power.
- Filter for luminous efficacy. The initial values depend on the manufacturer
that you select.
- The left field allows you to filter models according to a minimum luminous efficacy.
- The right field allows you to filter models according to a maximum luminous efficacy.
- Button to display the panel that describes the characteristics of a selected reference.
- Panel that displays various characteristics for a selected model. The
information that is shown depends on the manufacturer, and may include:
- A type of luminaire (LED, halogen, fluorescent, xenon, etc.)
- Power (in watts) of the model
- Luminous efficacy (in lumens/watt)
- Luminous flux (in lumens)
- Temperature (in Kelvins)
- Color rendering index
- A description
You can close this panel at any time by clicking the arrow on the left of the panel.
The filter bar contains various fields to filter and chose what to display. The search field on the left filters the selected database in real time according to your search. This allows you to quickly consult a range of luminaires for a given manufacturer.

The power filter allows you to filter models based on a minimum and maximum power rating. A warning is displayed if the values that you enter are outside the allowed range. That range depends on the manufacturer that you select via the dropdown located at the top of the window.
Similar to the filter for power values, you can filter you models by luminous efficacy.
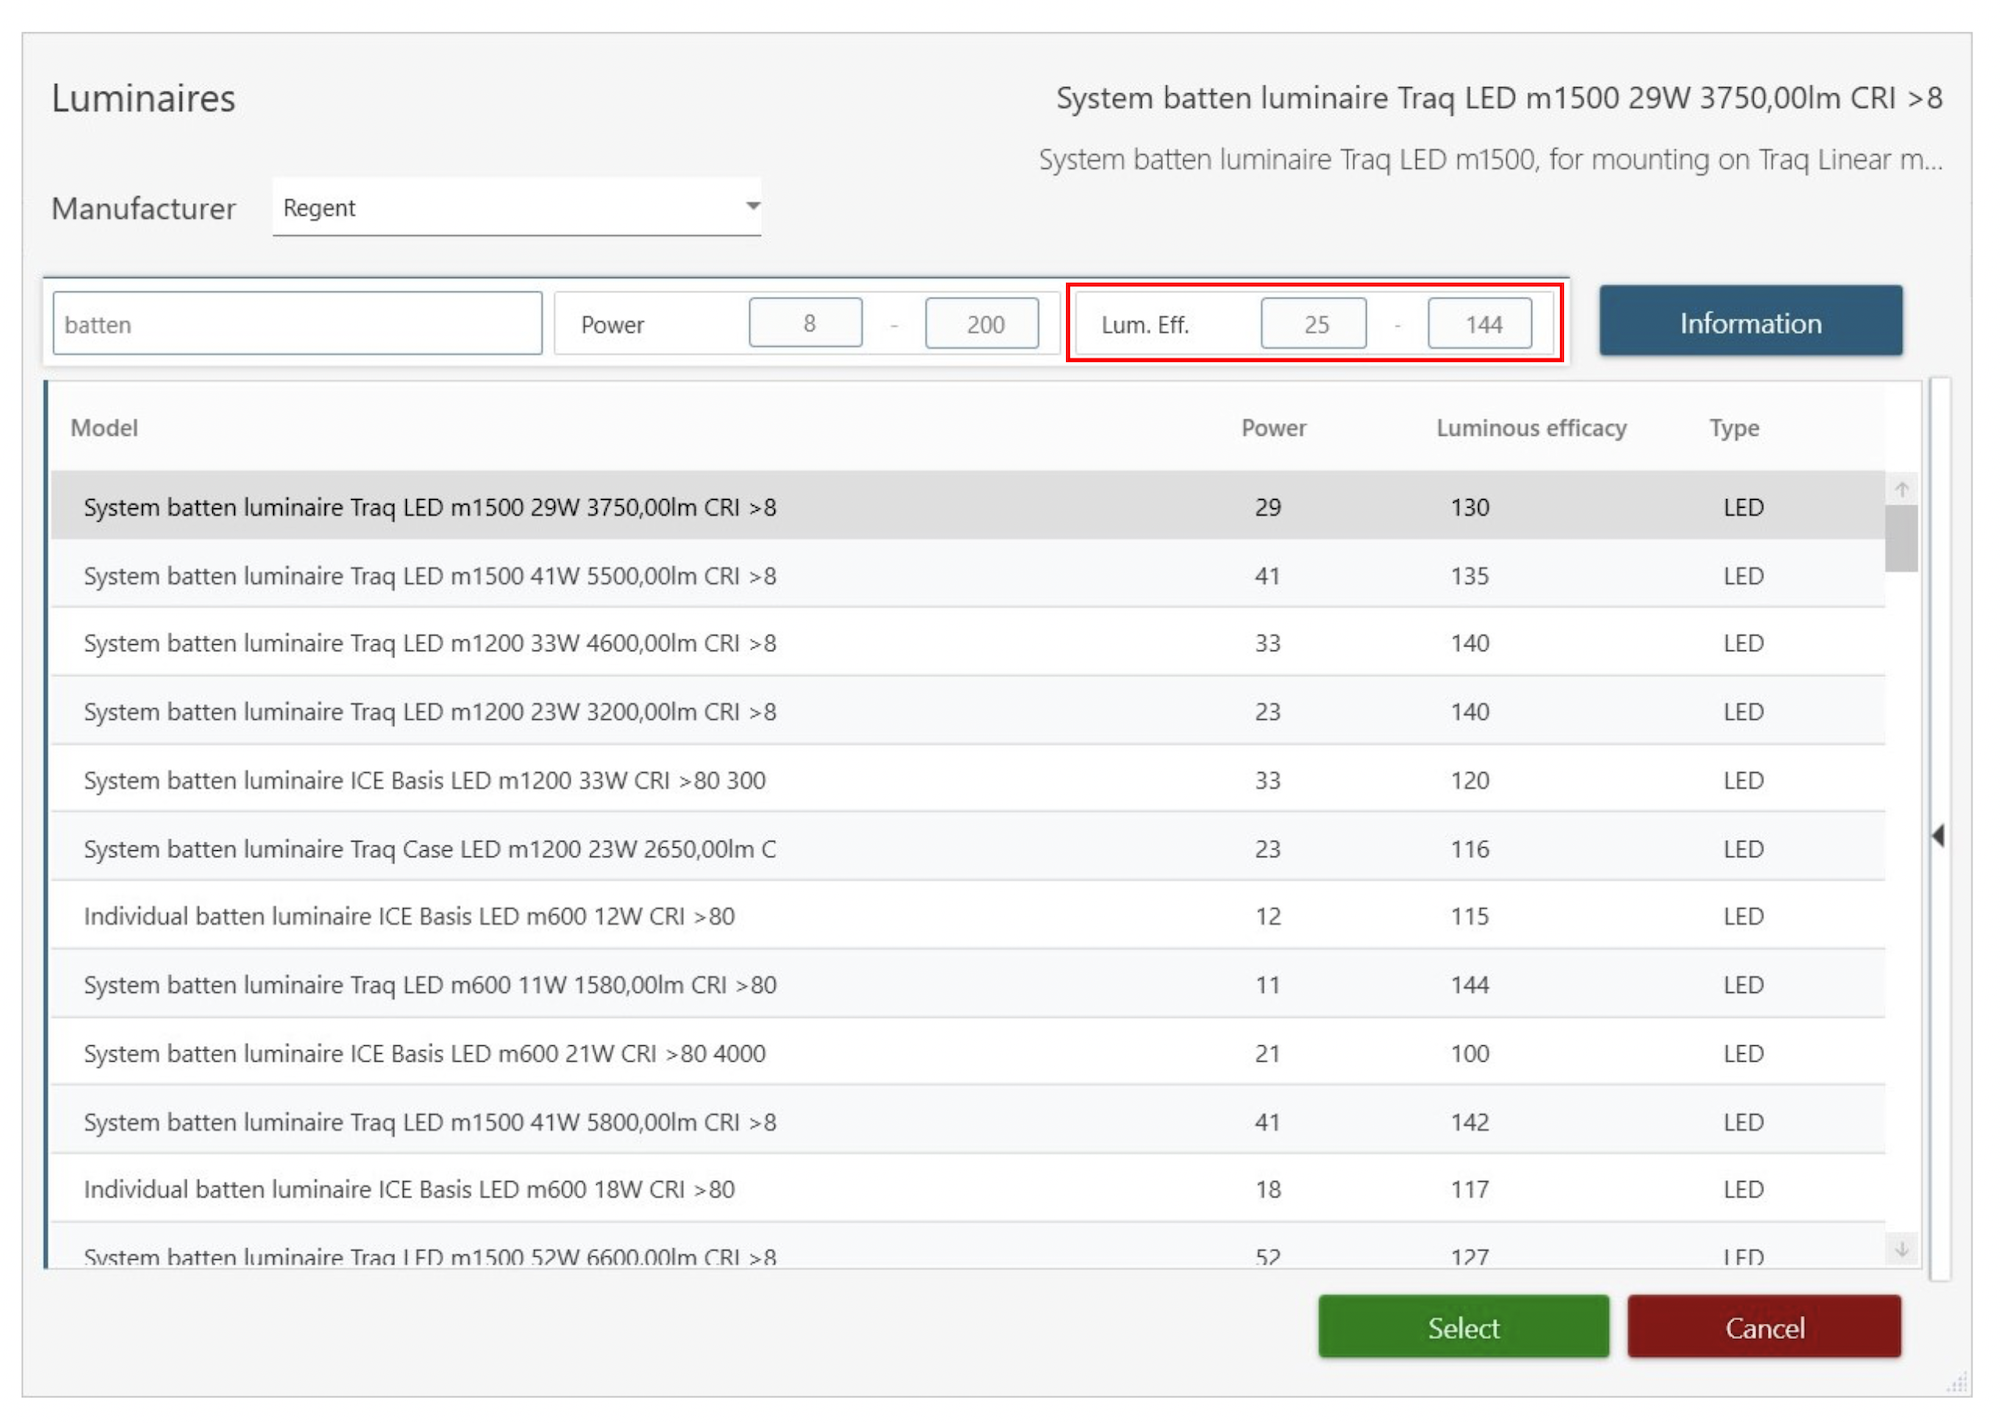
Info
The minimum and maximum values are initialized when selecting a manufacturer. If you enter new values for a category (power or luminous efficacy), the values for the other filter remain unchanged.
Once you have selected your model, click the Select button to define your
model as the base model for your luminaire template.
The characteristics of your template will automatically adjust based on that
model that you select. Notice that once the data is imported, toggles for
overriding values get automatically disabled.
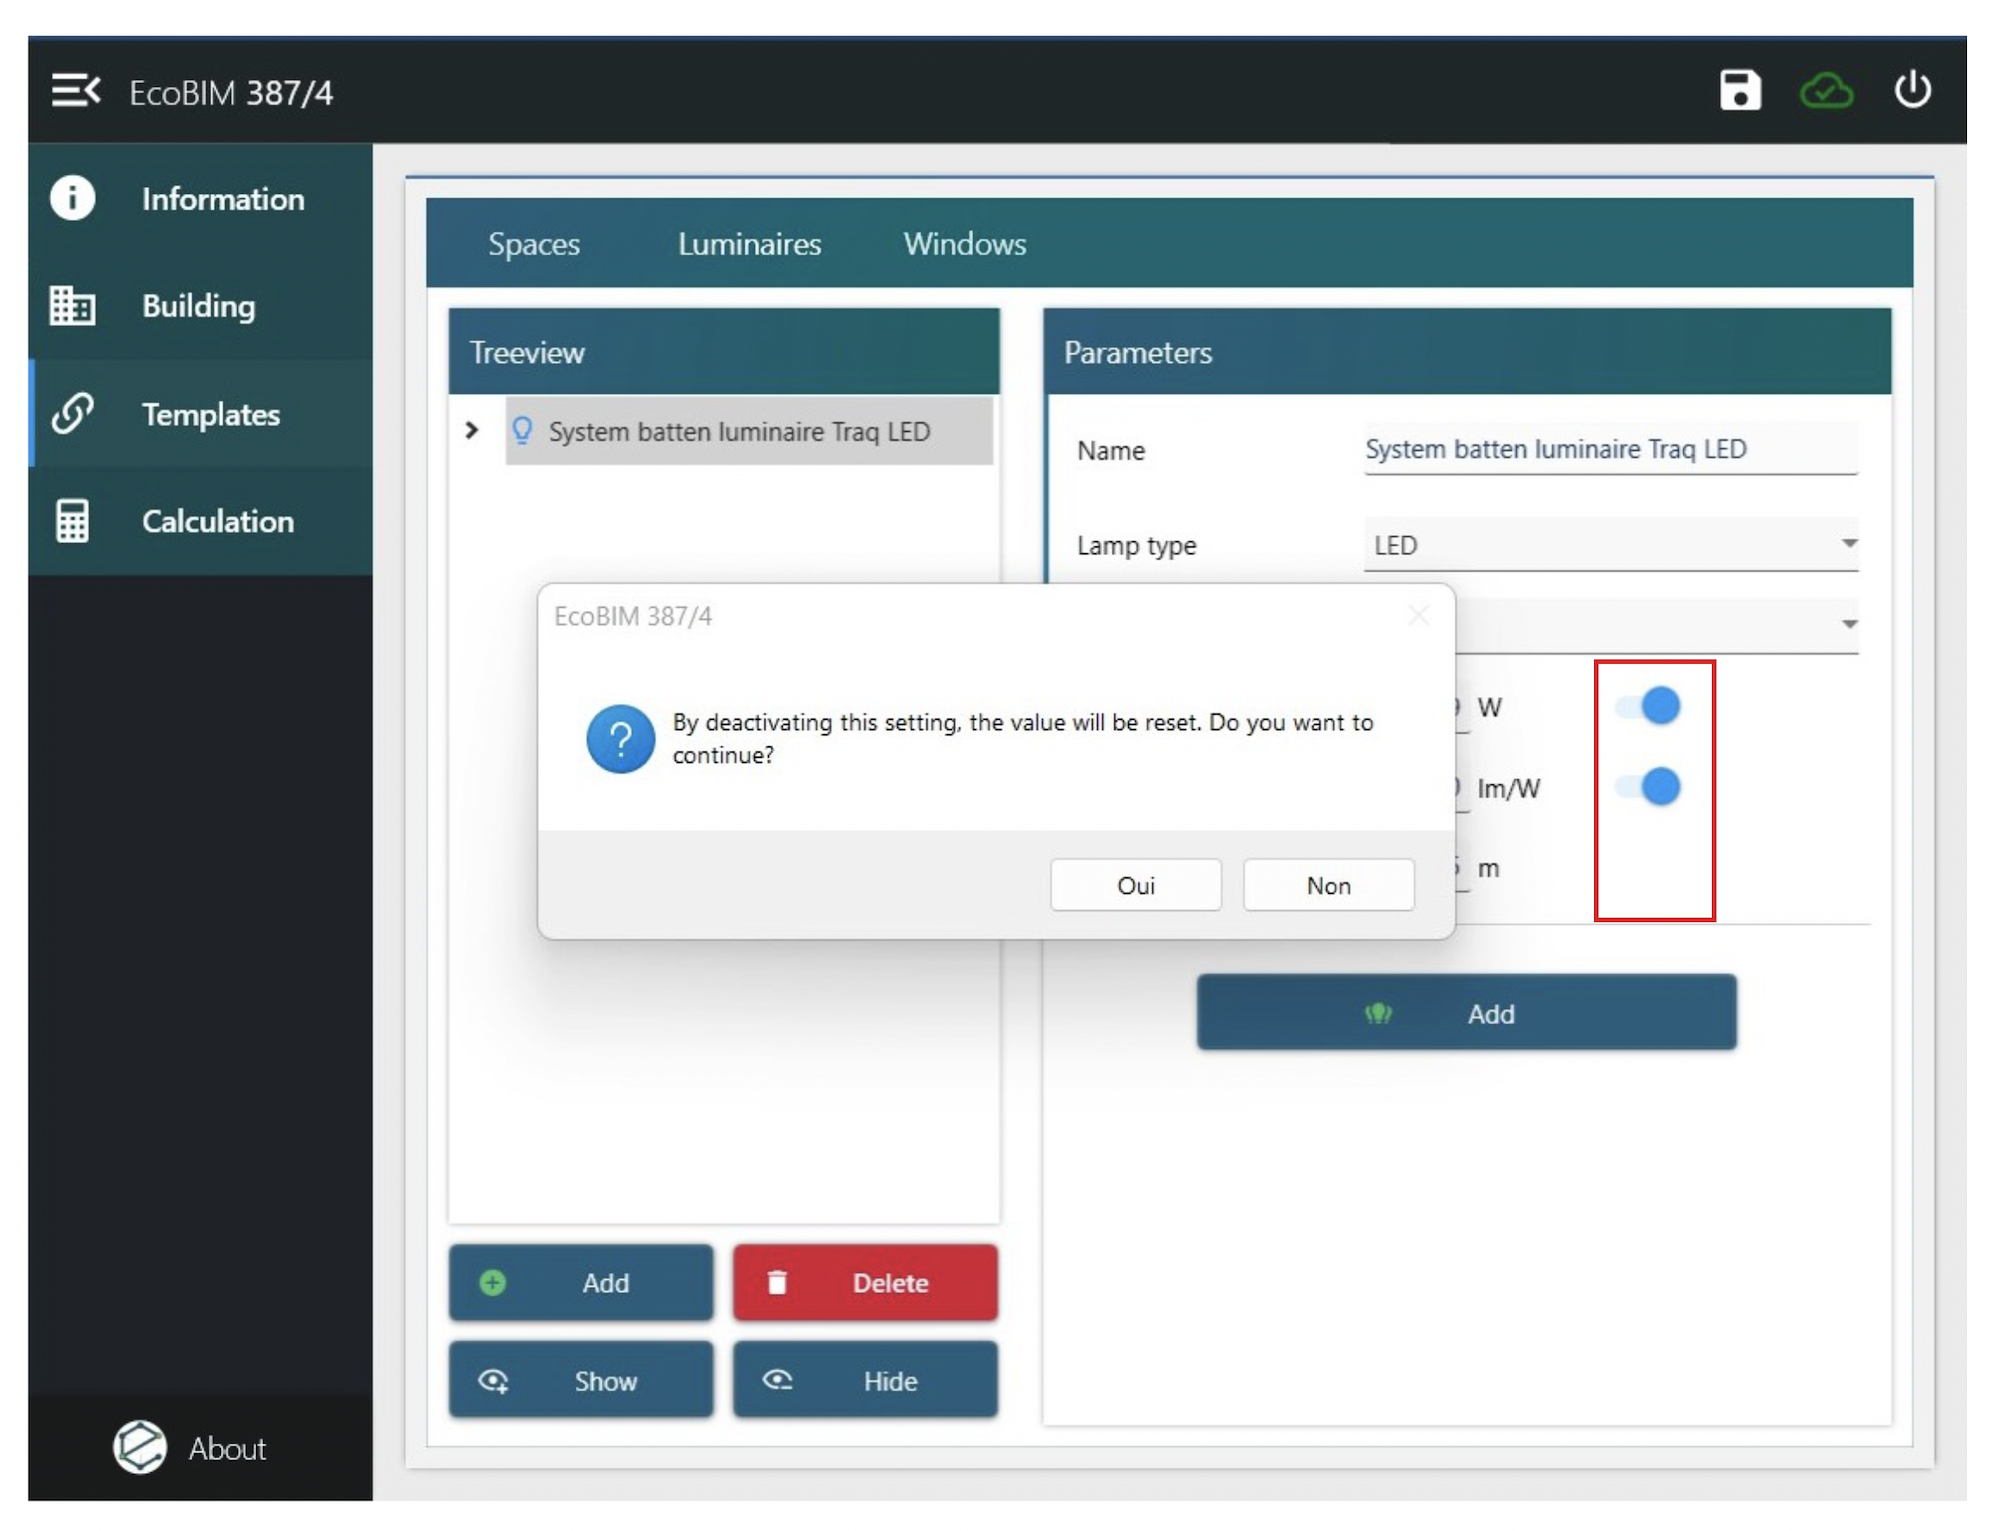
You can however at any time overwrite the values set from your luminaire selection. To do so, click the toggle buttons for power and luminous flux. When clicking the toggles, a warning displays to indicate that the previously set values will be overwritten. After closing the warning, you can set your custom values. You can also reopen the database and select another luminaire reference for your template.
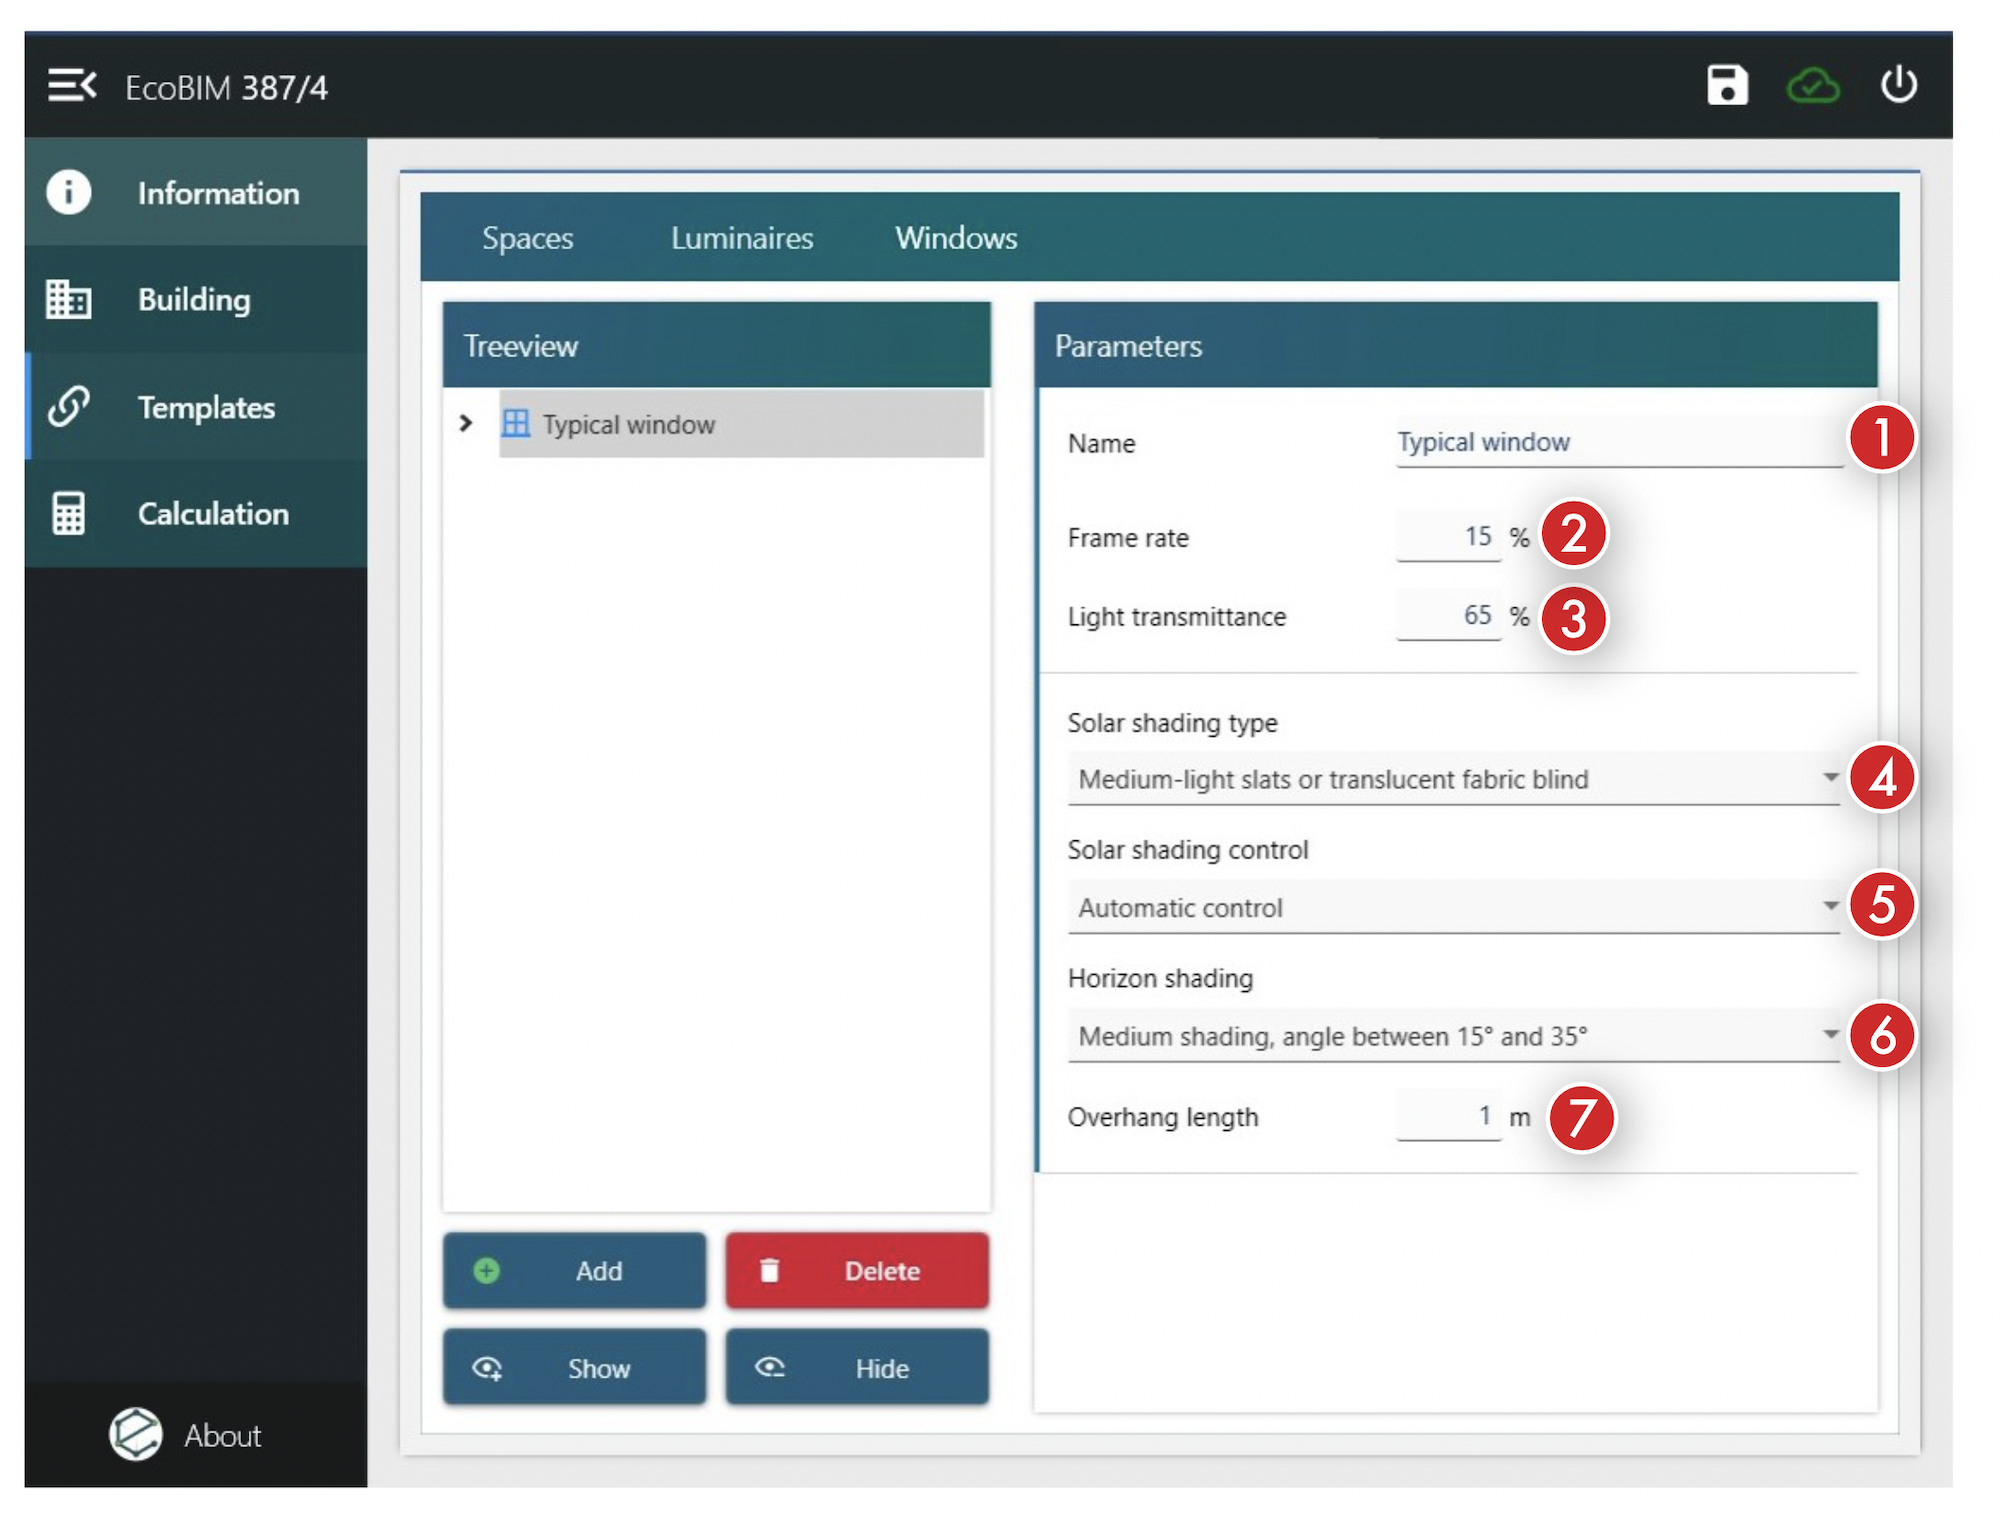
Window Template
The Window Templates screen has the following features:
- Template name
- Frame percentage (in
%) - Light transmission of the glazing (in
%) - Solar shading type, according to the SIA norm 387/4, section 3.3.2.9
- Solar shading control type, according to the SIA norm 387/4, section 3.3.2.9
- Horizon shading, according to the SIA norm 387/4, section 3.3.2.10
- Overhang length (in
m). In the case of a variable-length overhang, you must enter the average length.
Info
If your window does not have solar shadings, you must enter the following
properties: Solar shading type Clear slats or translucent fabric blinds
with deflection systems, and Solar shading control Automatic slat control
and guidance.
In the calculation, these properties give the same results as a window
without solar shadings. Indeed, the calculation uses weighting factors,
which values are 1 with such properties.
Zone Settings
The Zone screen has the following features:
- Name: Name of the zone that corresponds to the name displayed in Revit.
- Total area: The area that corresponds to the sum of the areas from the spaces. This value is automatically updated when you add or remove spaces from a zone.
- Space template: This field is activated if the toggle button on the right of the field is activated. Selecting a space template assigns the template characteristics to all spaces in the zone whose fields are not entered manually.
- Luminaire template: This field is activated if the toggle button on the right of the field is activated. Selecting a luminaire template assigns the template characteristics to all the luminaires in the zone whose fields are not entered manually.
- Window template: This field is activated if the toggle button on the right of the field is activated. Selecting a window template assigns the template characteristics to all the windows in the zone whose fields are not entered manually.

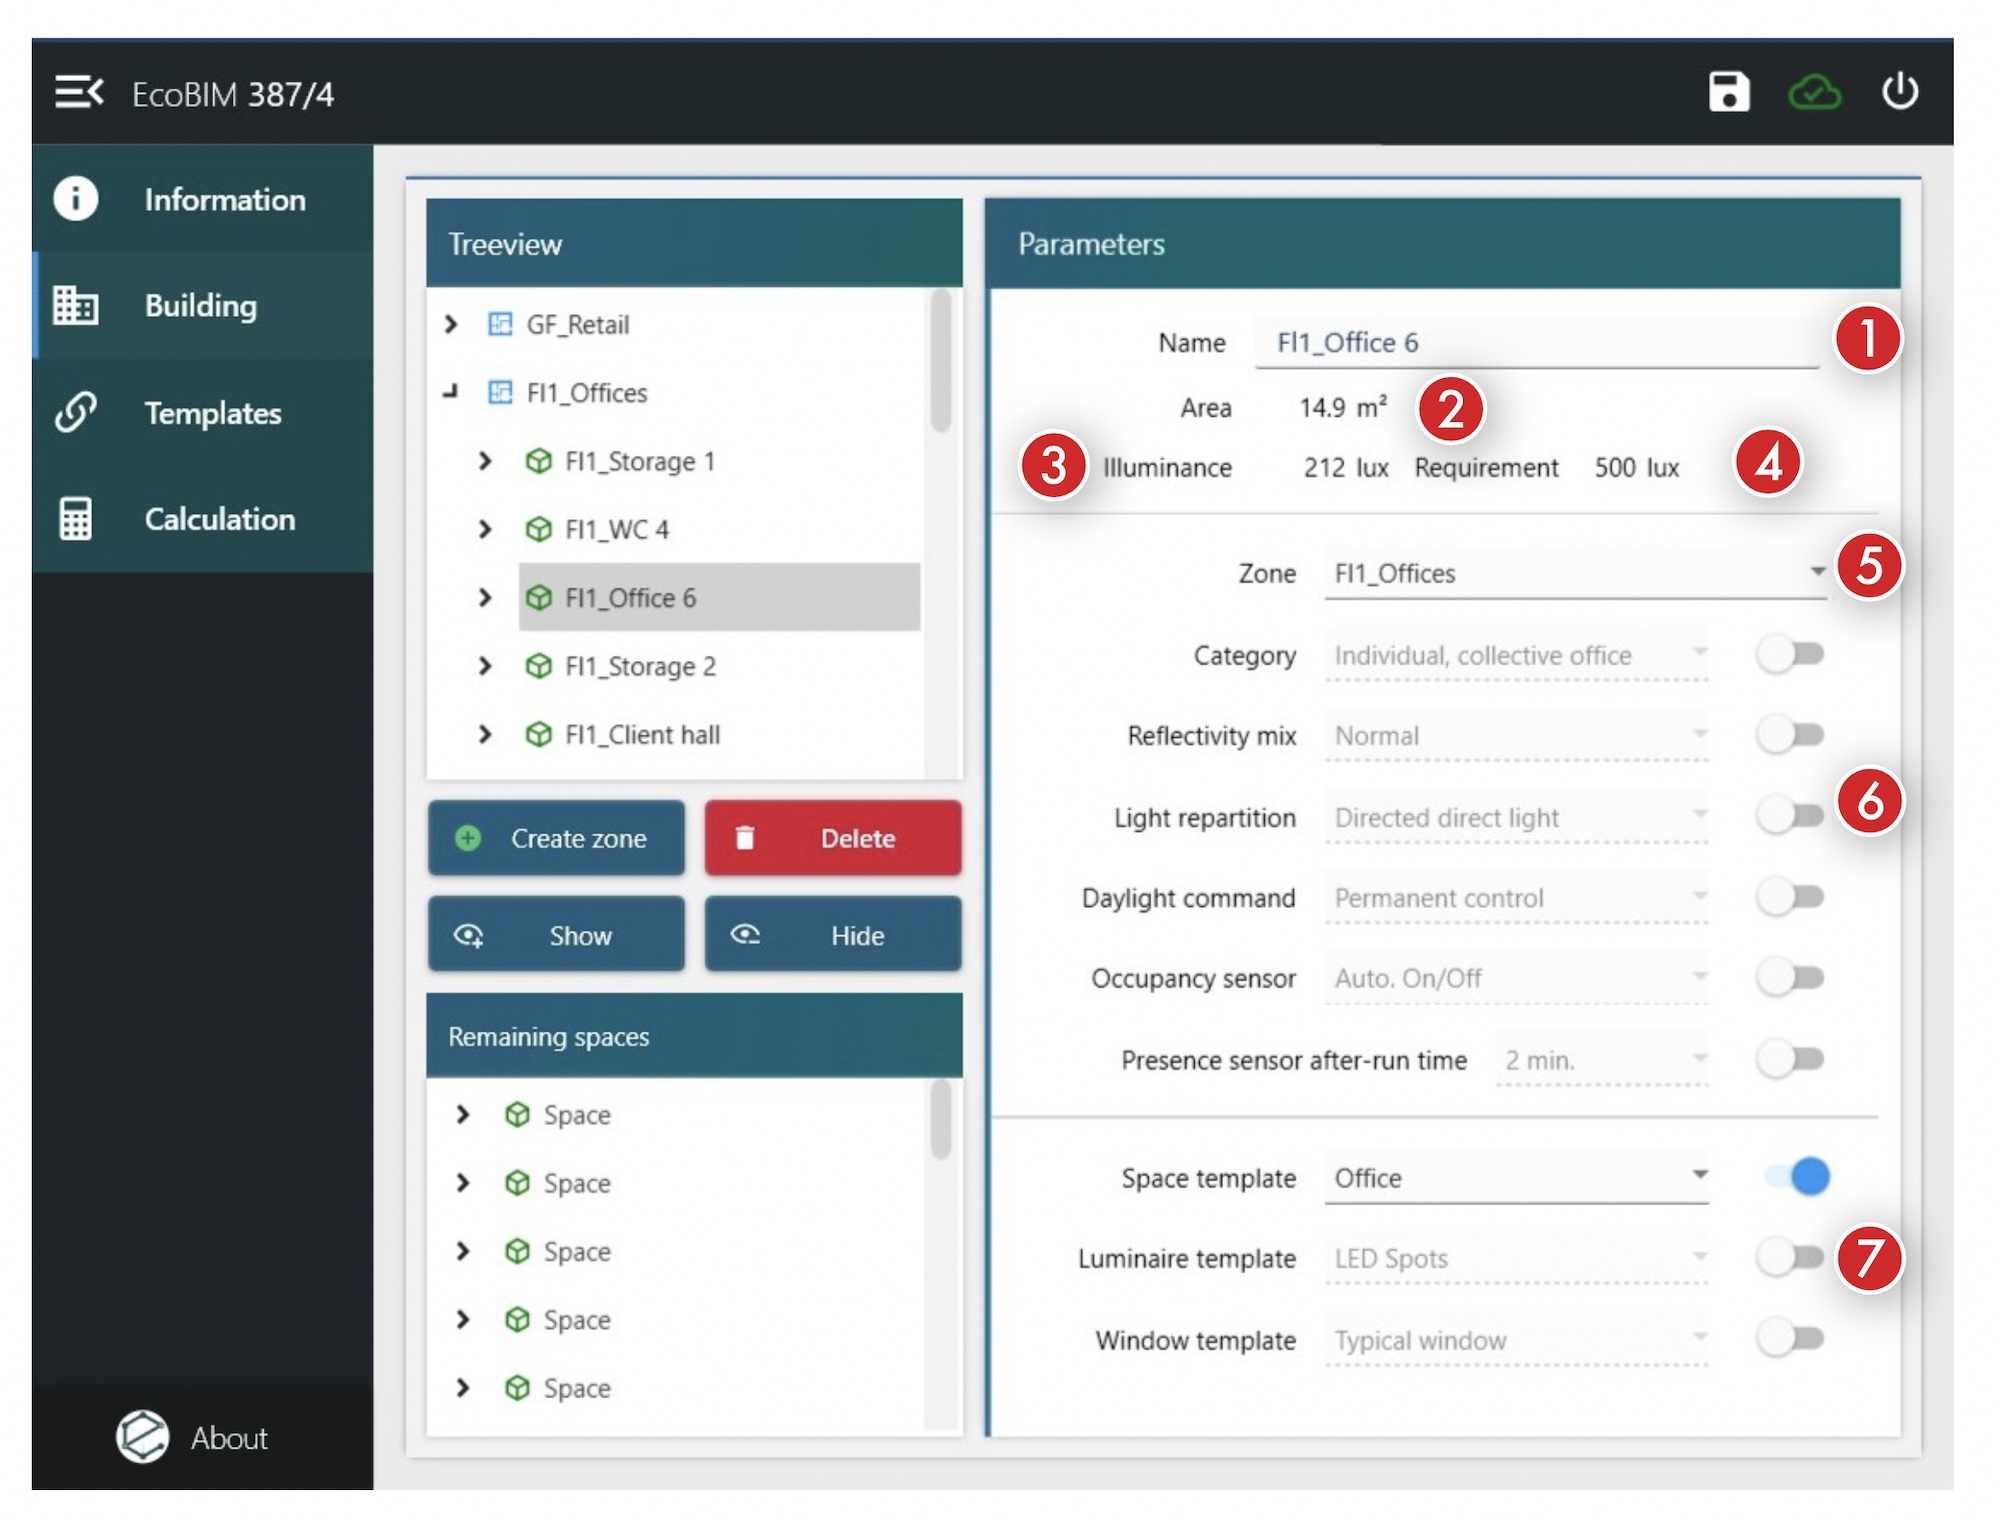
Space Settings
The Space screen has the following features:
- Name: Name of the zone that corresponds to the name displayed in Revit.
- Area: Space area
- Illuminance (in
lux): Illuminance obtained in the space with the intended luminaires. - Requirement (in
lux): Illuminance requirement according to the SIA 387/4 norm. - Zone: Zone in which spaces reside. Changing the zone assigns the space to that zone.
- Space parameters, inherited from the Space template. You can manually override each of these fields by clicking on the toggle button at the right of each field.
- Space template. If the space template has a luminaire and window template, they will be automatically entered.
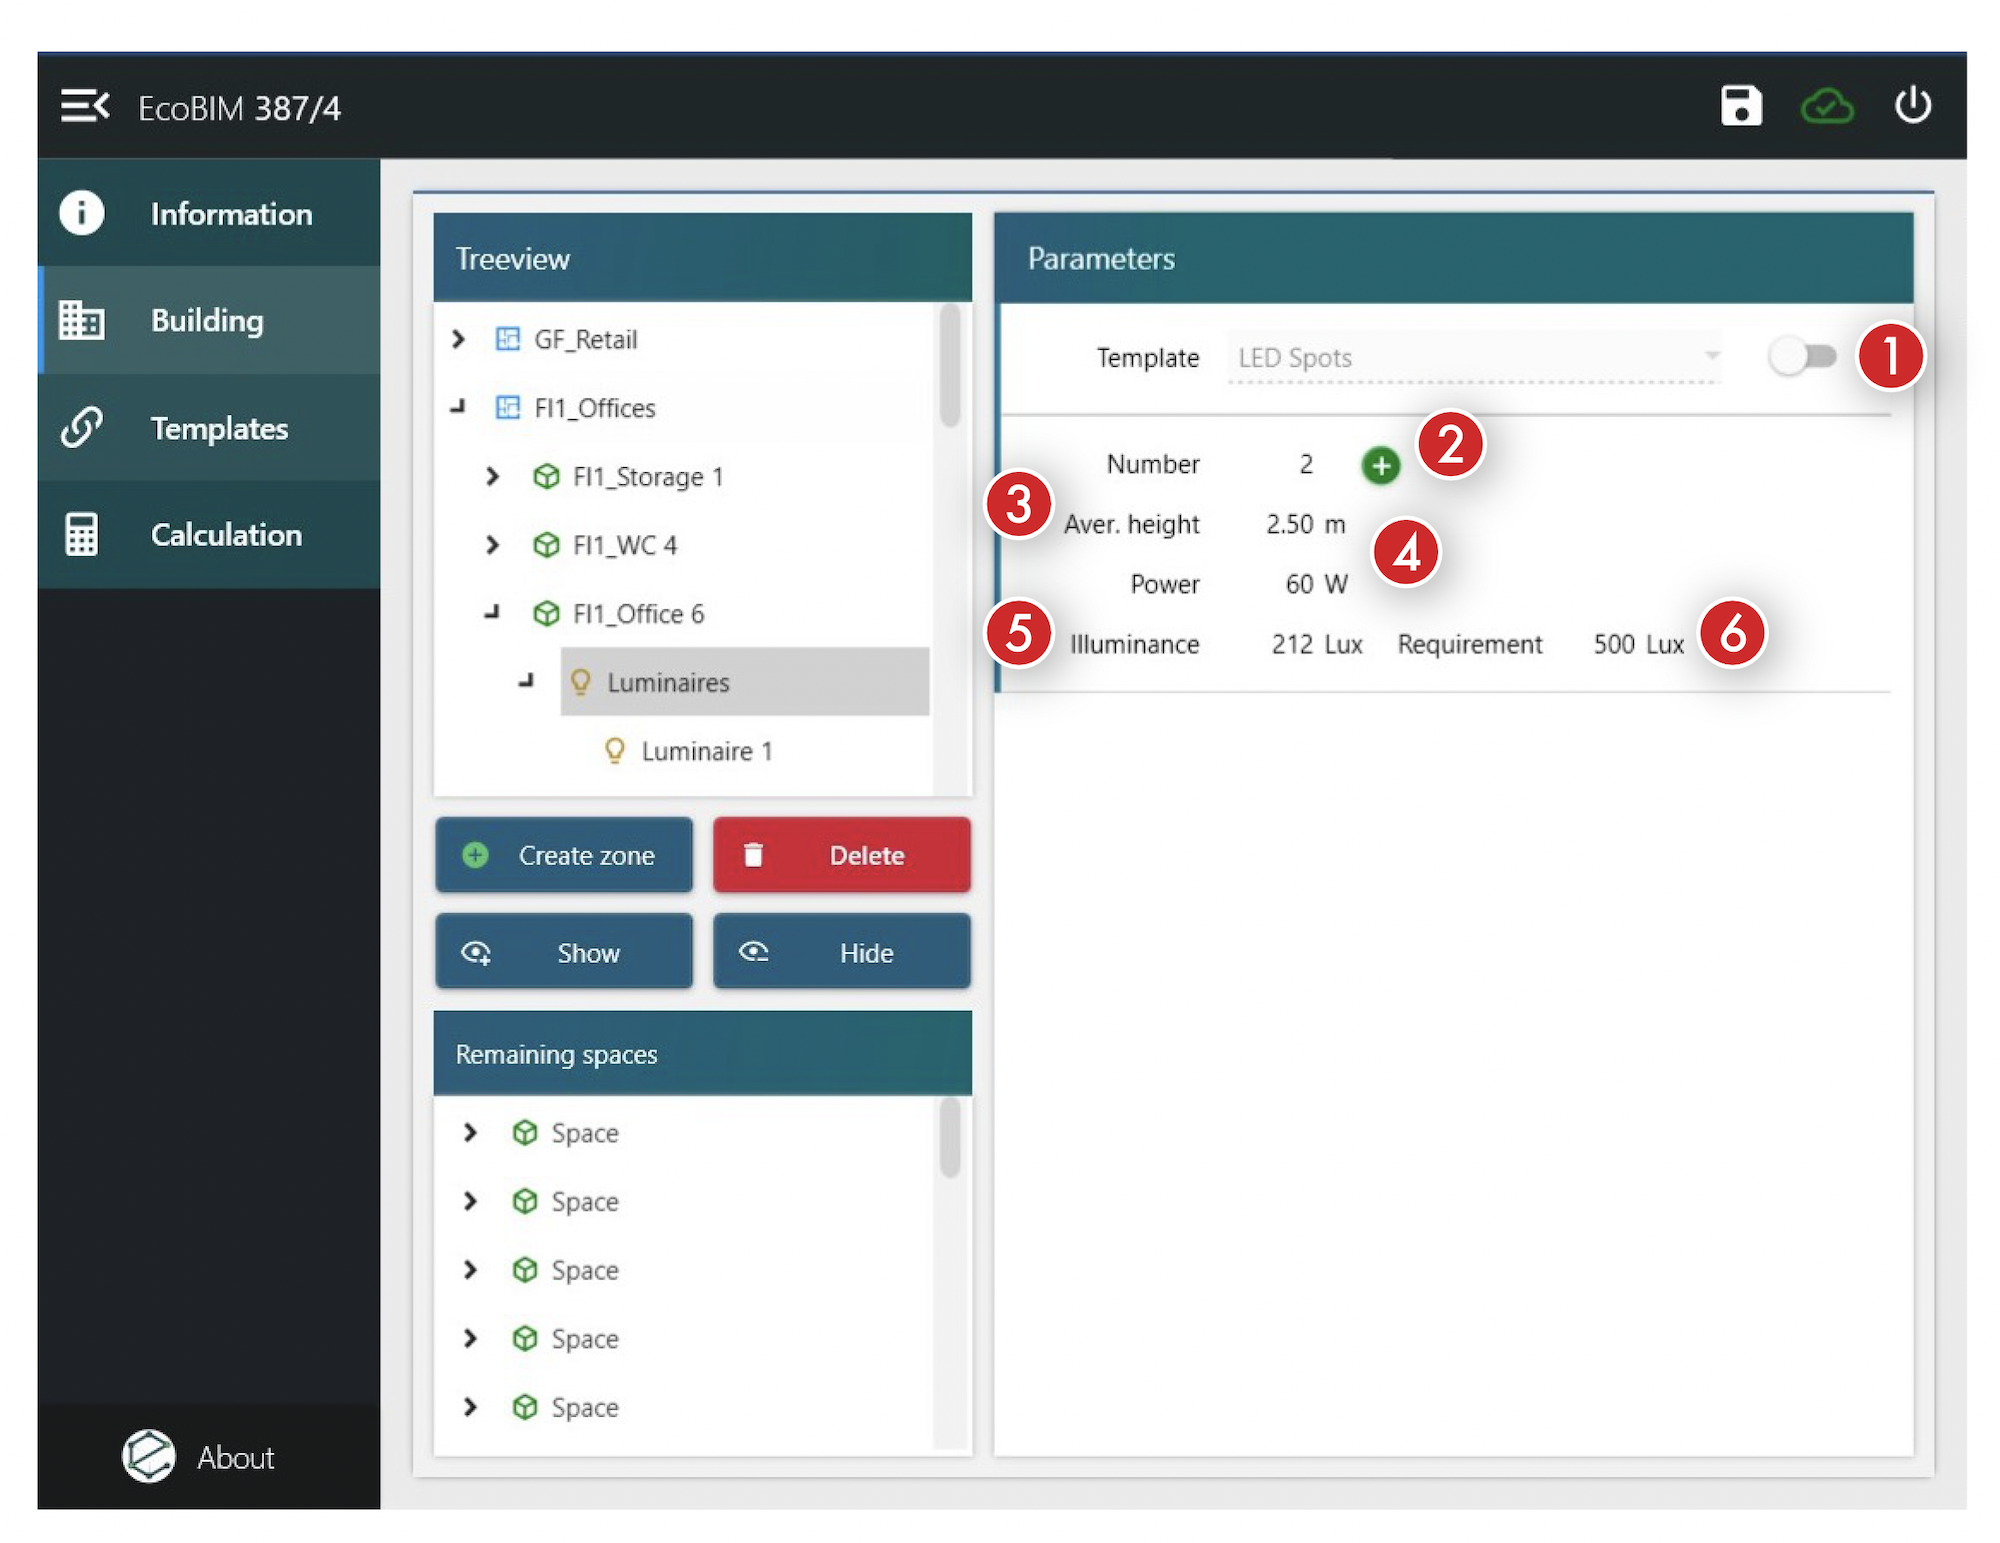
Luminaires settings
The Luminaires screen has two sub-screens: a container screen, summarising
important information for the space, and a screen for each type of luminaire in
the space.
The container screen has the following features:
- Template: Luminaire template linked to this container and its sub-elements.
- Number: Total number of luminaires in the space. Click the green
+button at the right of the field to add a new luminaire type. To delete a luminaire type, select it, and click theDeletebutton that is available under the building tree view. - Average height (in
m): Average height of the space luminaires. - Power (in
W): Total luminaire power installed in the space. - Illuminance (in
lux): Illumination obtained taking into account the luminaires in the space. - Requirement (in
lux): Illuminance requirement according to the SIA 387/4 norm.
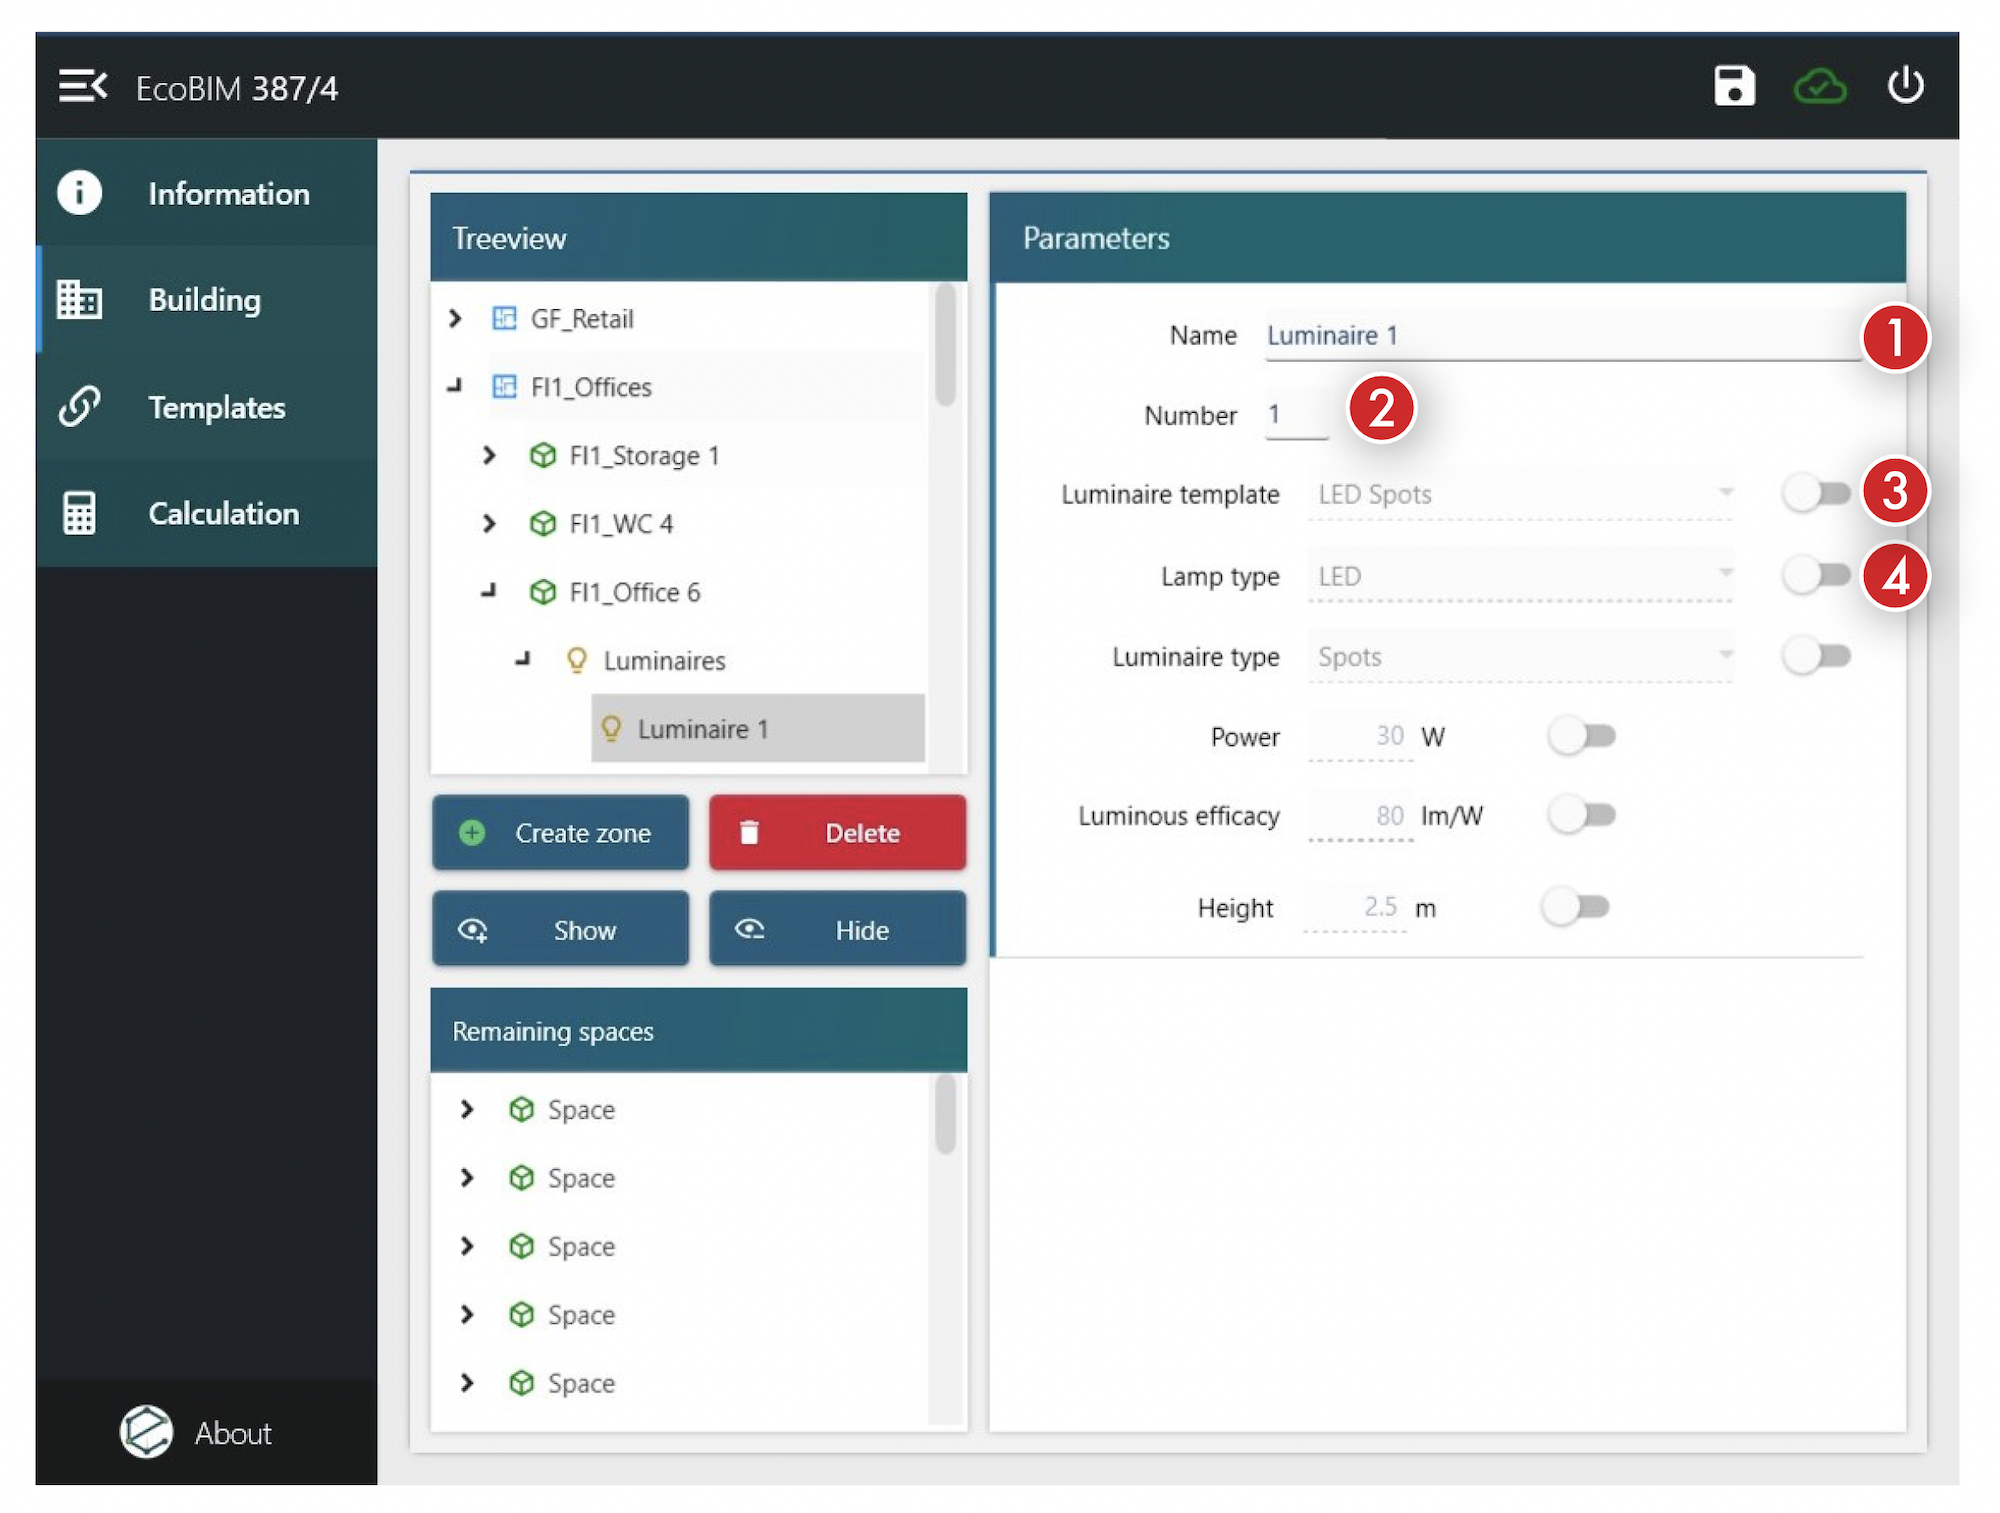
The luminaire screen has the following features:
- Name: Luminaire type name
- Number: Number of luminaires
- Luminaire template: Template linked to this luminaire type
- Luminaire type parameters, inherited from the Luminaire template. Click the toggle button at the right of each field to override each of these fields.
Windows settings
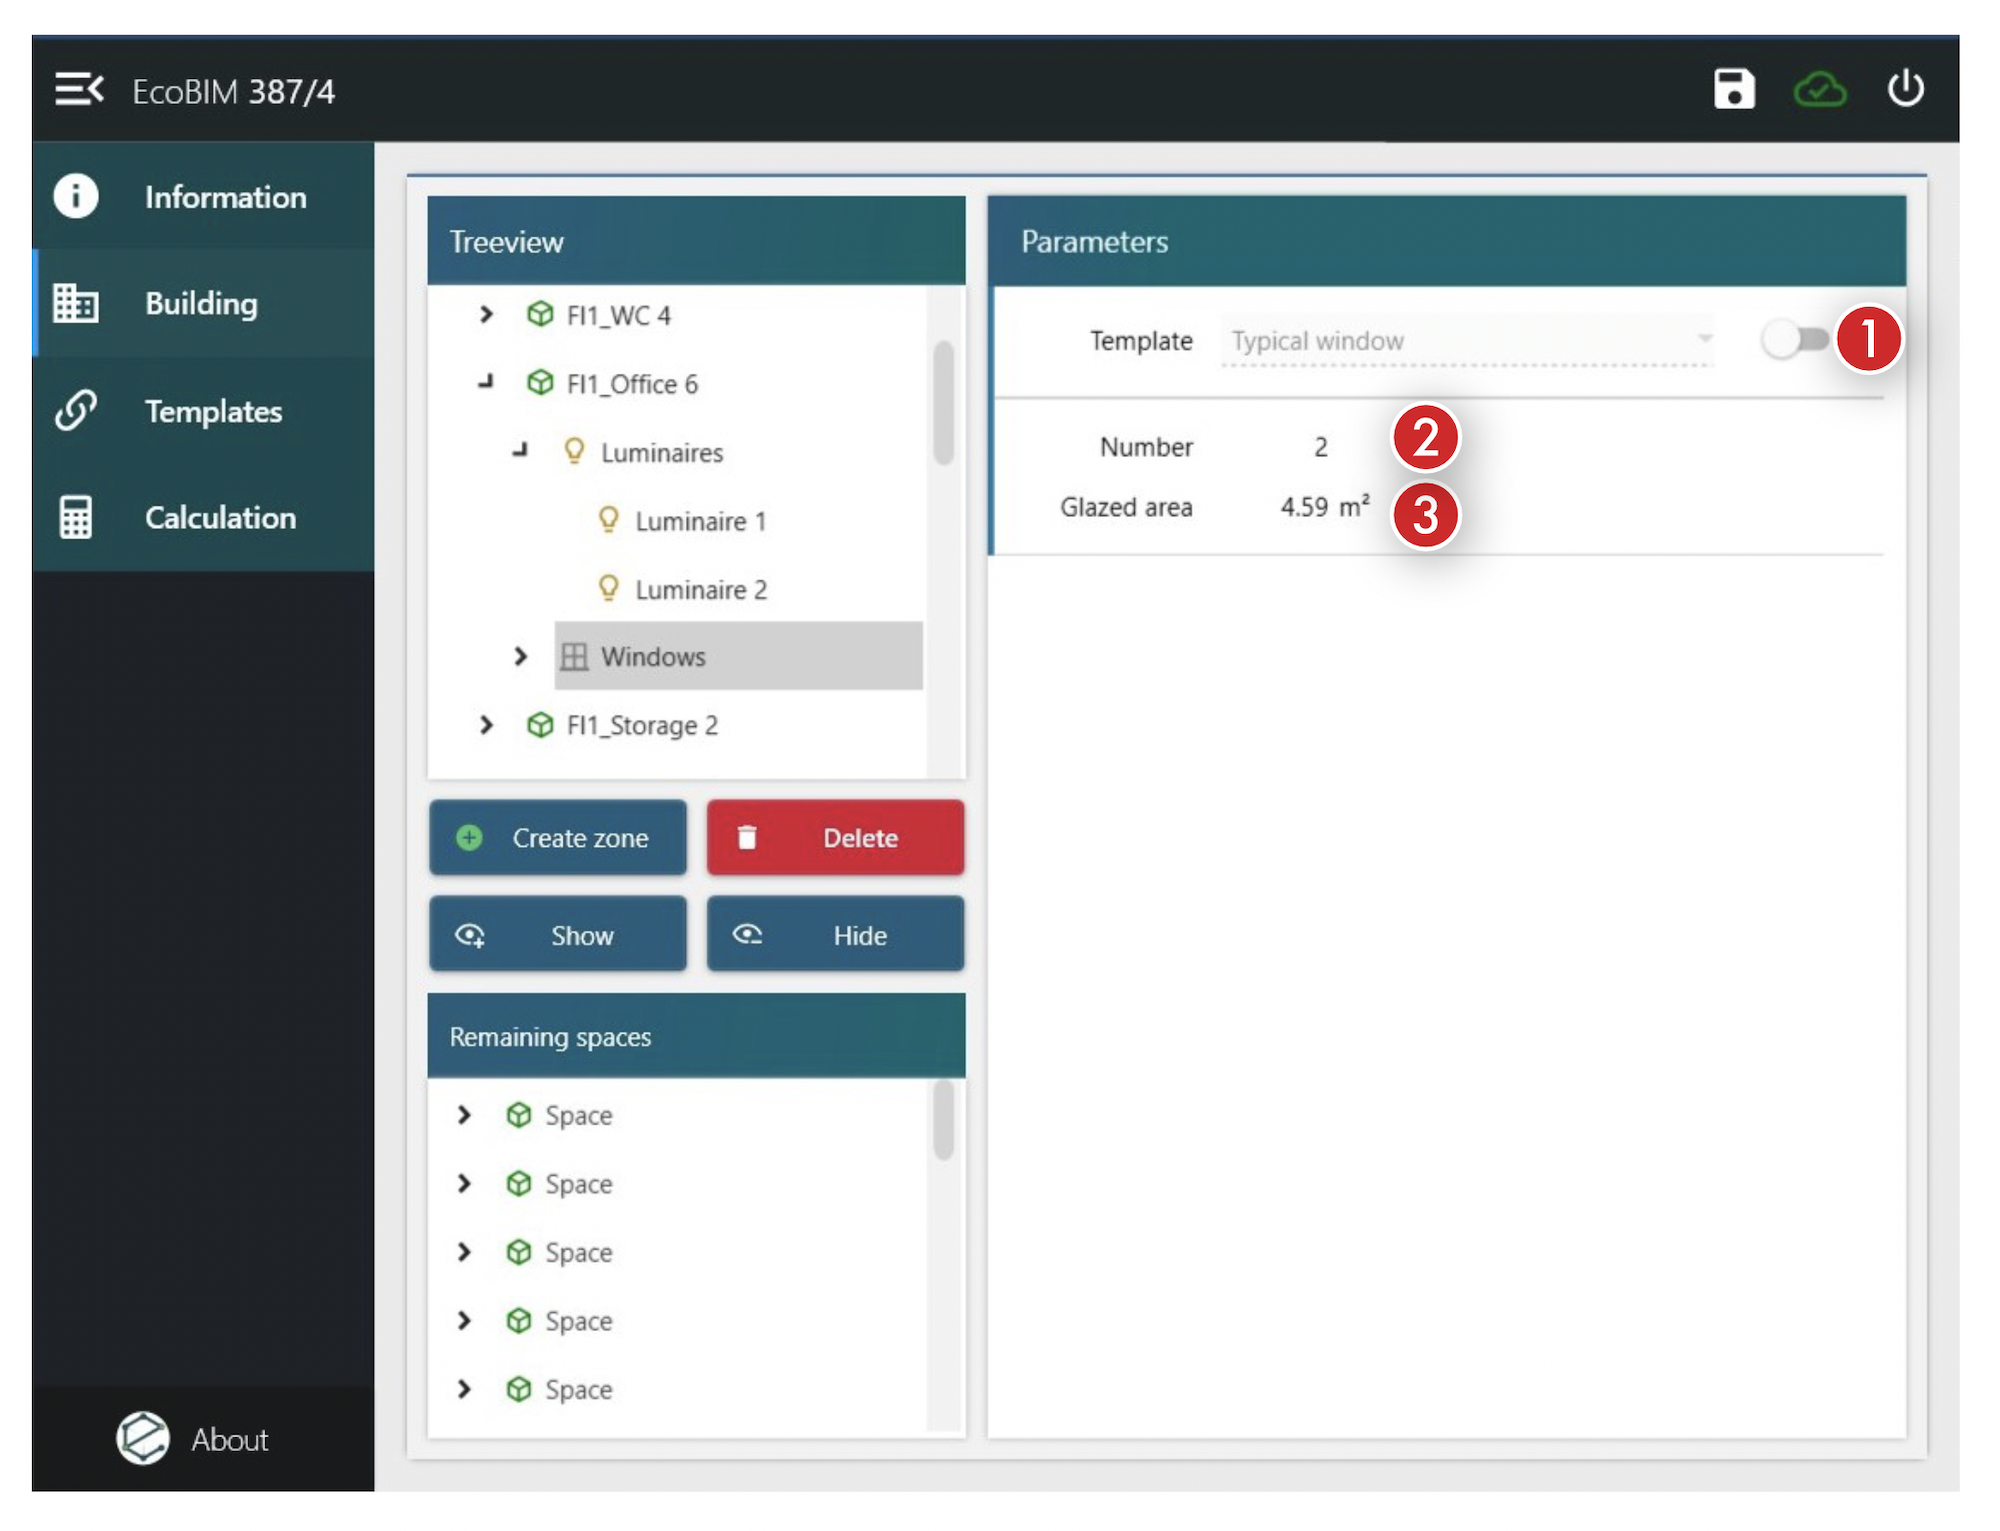
The Windows screen has two sub-screens: a container screen, summarising important
information for a space, and a screen for each window in the space.
The container screen has the following features:
- Template: Window template linked to this container and its sub-elements.
- Number: Number of windows in the space.
- Glazed area:
Net glazed areain the space.
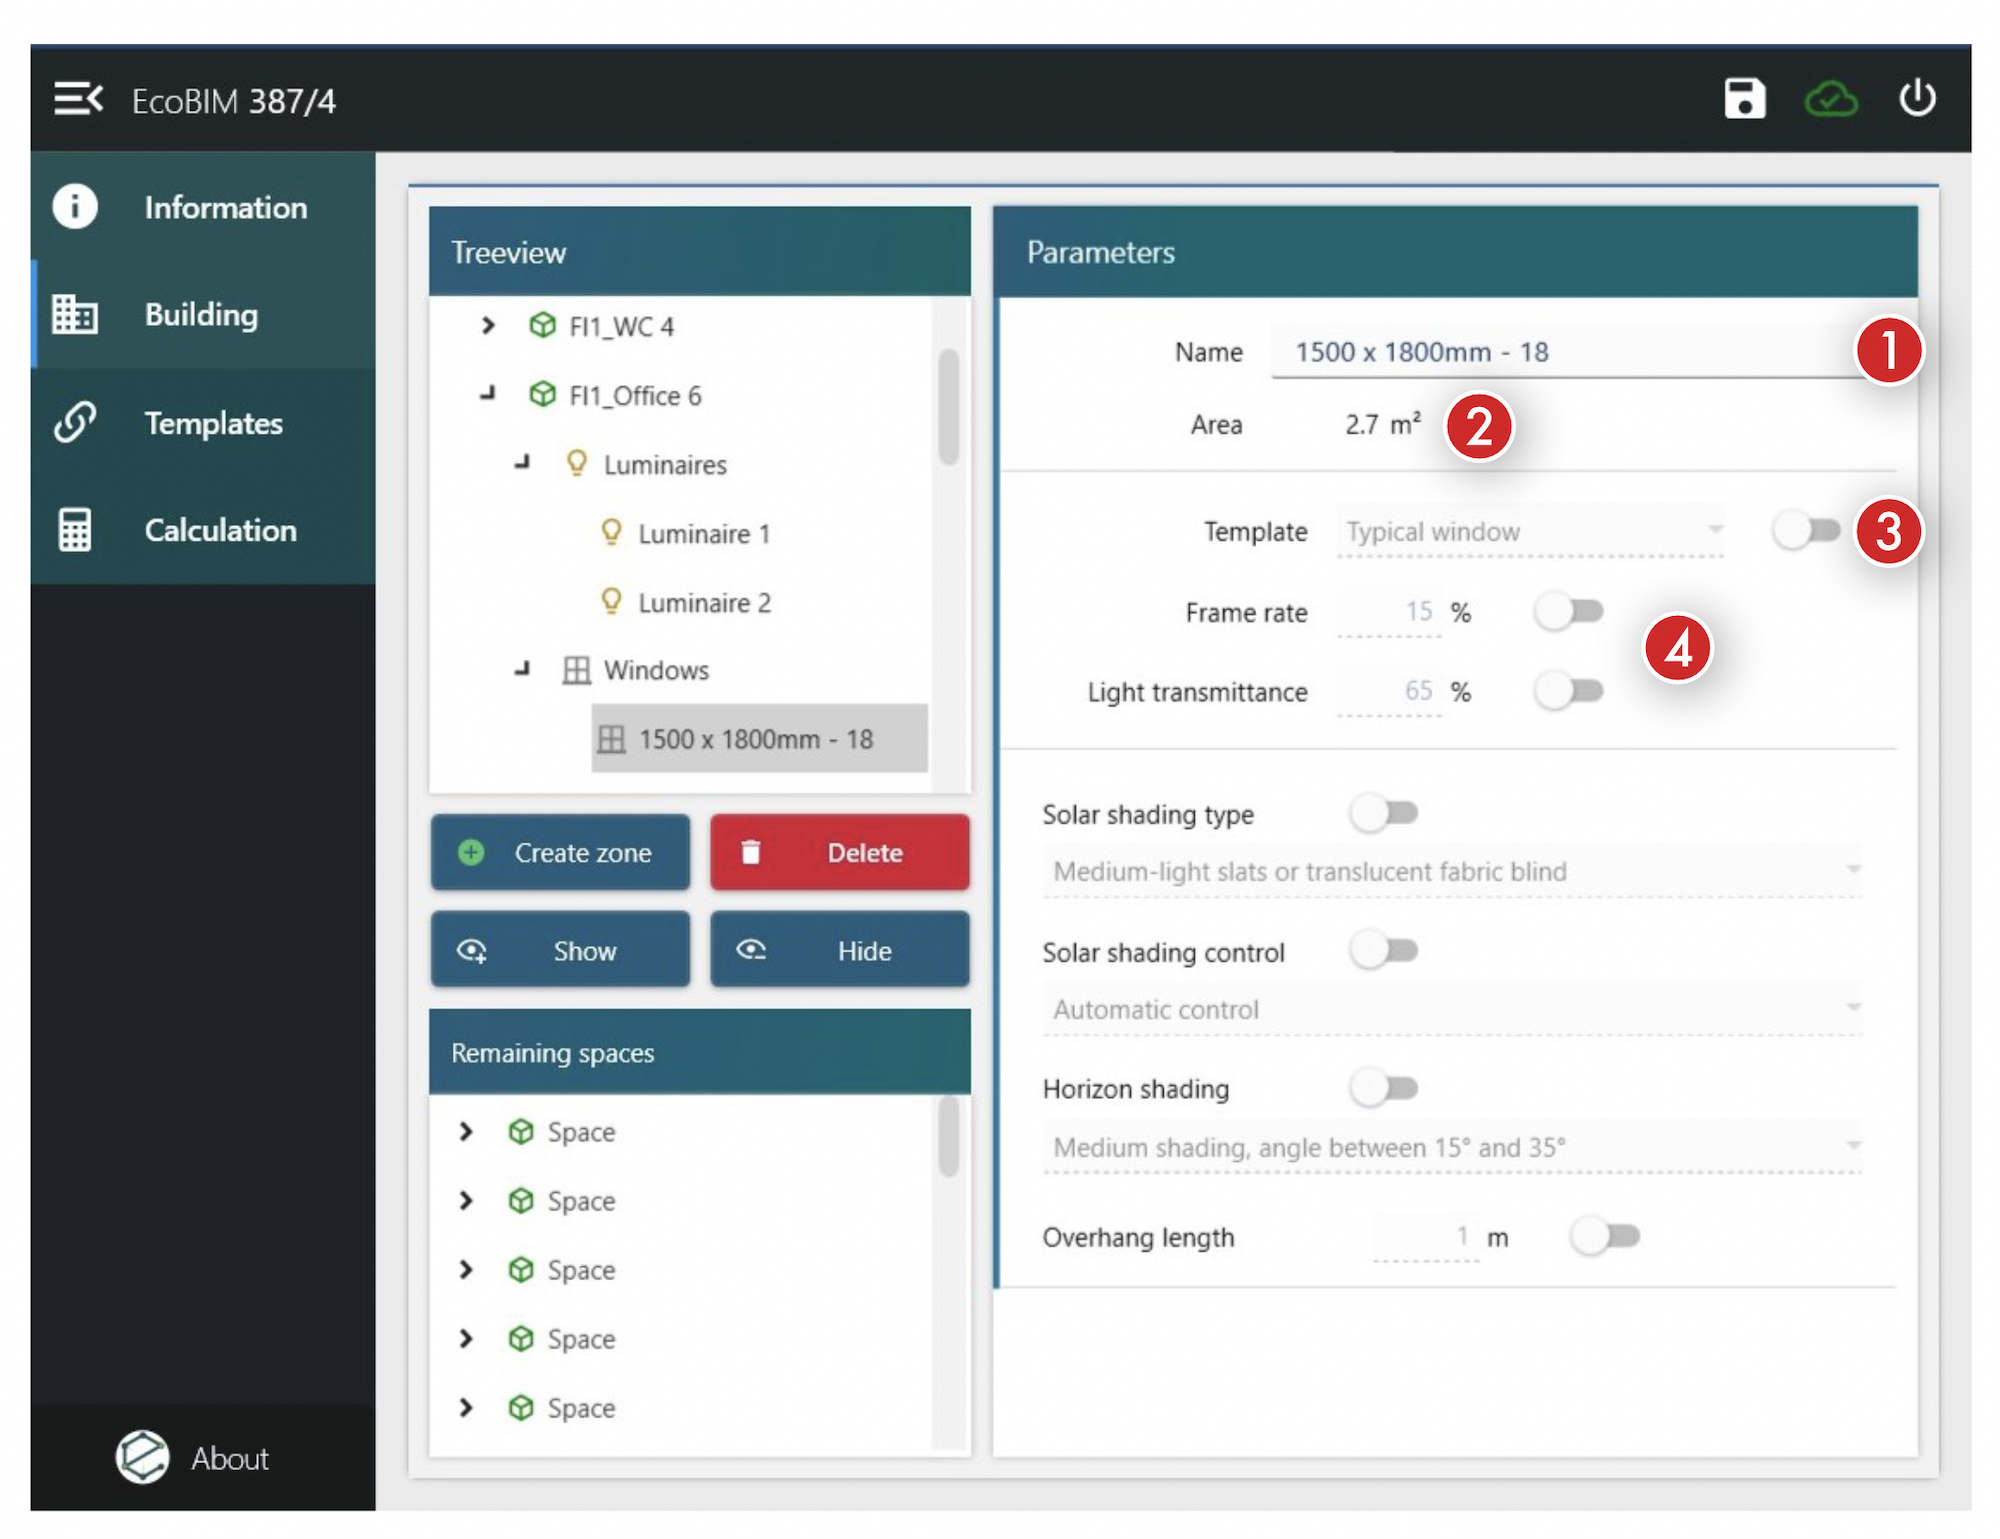
The window screen has the following features:
- Name: Name of the window as defined in the Revit model, composed of the family name and its number. Its modification is effective only in the EcoBIM interface.
- Area: Window area, including the frame.
- Template: Window template attached to this window.
- Window parameters, inherited from the Window template. You can manually override each of these fields by clicking the toggle button at the right of each field.
Calculation
The calculation method is the one presented in the SIA 387/4, method 1.
The calculation methodology of the norm is intended for a rectangular space that only has one window and a constant length overhang. This methodology is less precise for complex spaces, and it is up to the designer to design the best possible way and to allow the necessary margin for sufficient lighting while reducing electrical consumption.
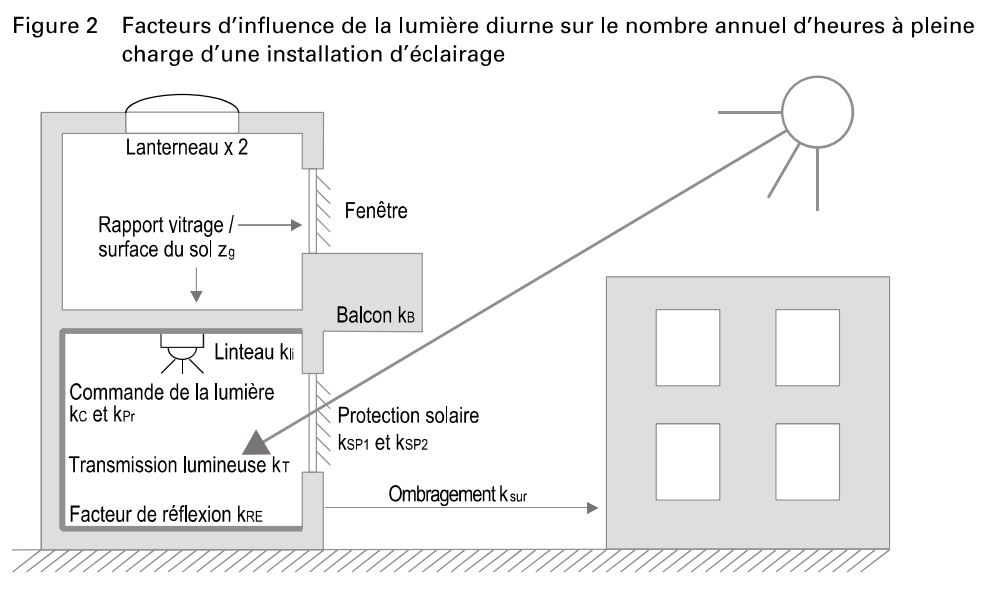
EcoBIM 387/4 takes into account the characteristics of your spaces. For this purpose, EcoBIM 387/4 combines all the space data and calculates:
- The glazing total area.
- The average lintel height: This value is calculated according to the
proportion of the surface area of each window and the respective lengths of
the lintels (
klifactor, section 3.3.2.7 of the norm). - The average overhang length: This value is calculated according to the
proportion of the surface area of each window and the respective lengths of
the overhangs (
kbfactor, section 3.3.2.8 of the norm). - The average solar shading: This value is calculated according to the
proportion of the surface area of each window and the respective solar
shading types and command (
kspfactor, section 3.3.2.9 of the norm). - The average horizon shading: This value is calculated according to the
proportion of the surface area of each window and the respective horizon
shading (
ksurfactor, section 3.3.2.10 of the norm).
Regarding the calculation of the space index kr (section 3.2.5.2 of the
norm), it is calculated in such a way as to account the geometrical
specificities of the space, as follows:
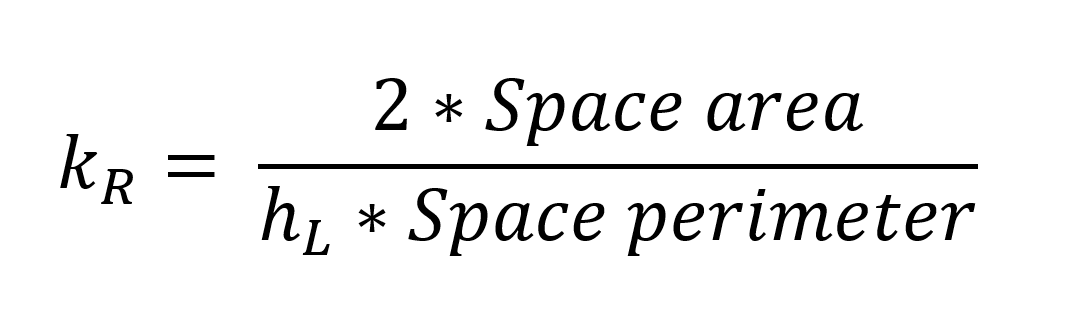
For a rectangular space, this equation is equivalent to the one described in the norm:

The results will therefore be more realistic than those of the norm in the case of complex spaces. However, it is advisable to simplify your space as much as possible, and to divide it into rectangular zones as far as possible (e.g. in the case of open space containing circulation areas or meeting spaces separated by movable partitions).
To divide your space, use the Space separators discussed in the
Official documentation.
Results
Once all the spaces are set up, you can show the total electricity consumption
of the lighting from the Calculation window.
The window shows only if all the spaces have at least a category, otherwise, a window will display, which lists all the spaces for which the category has not been defined.
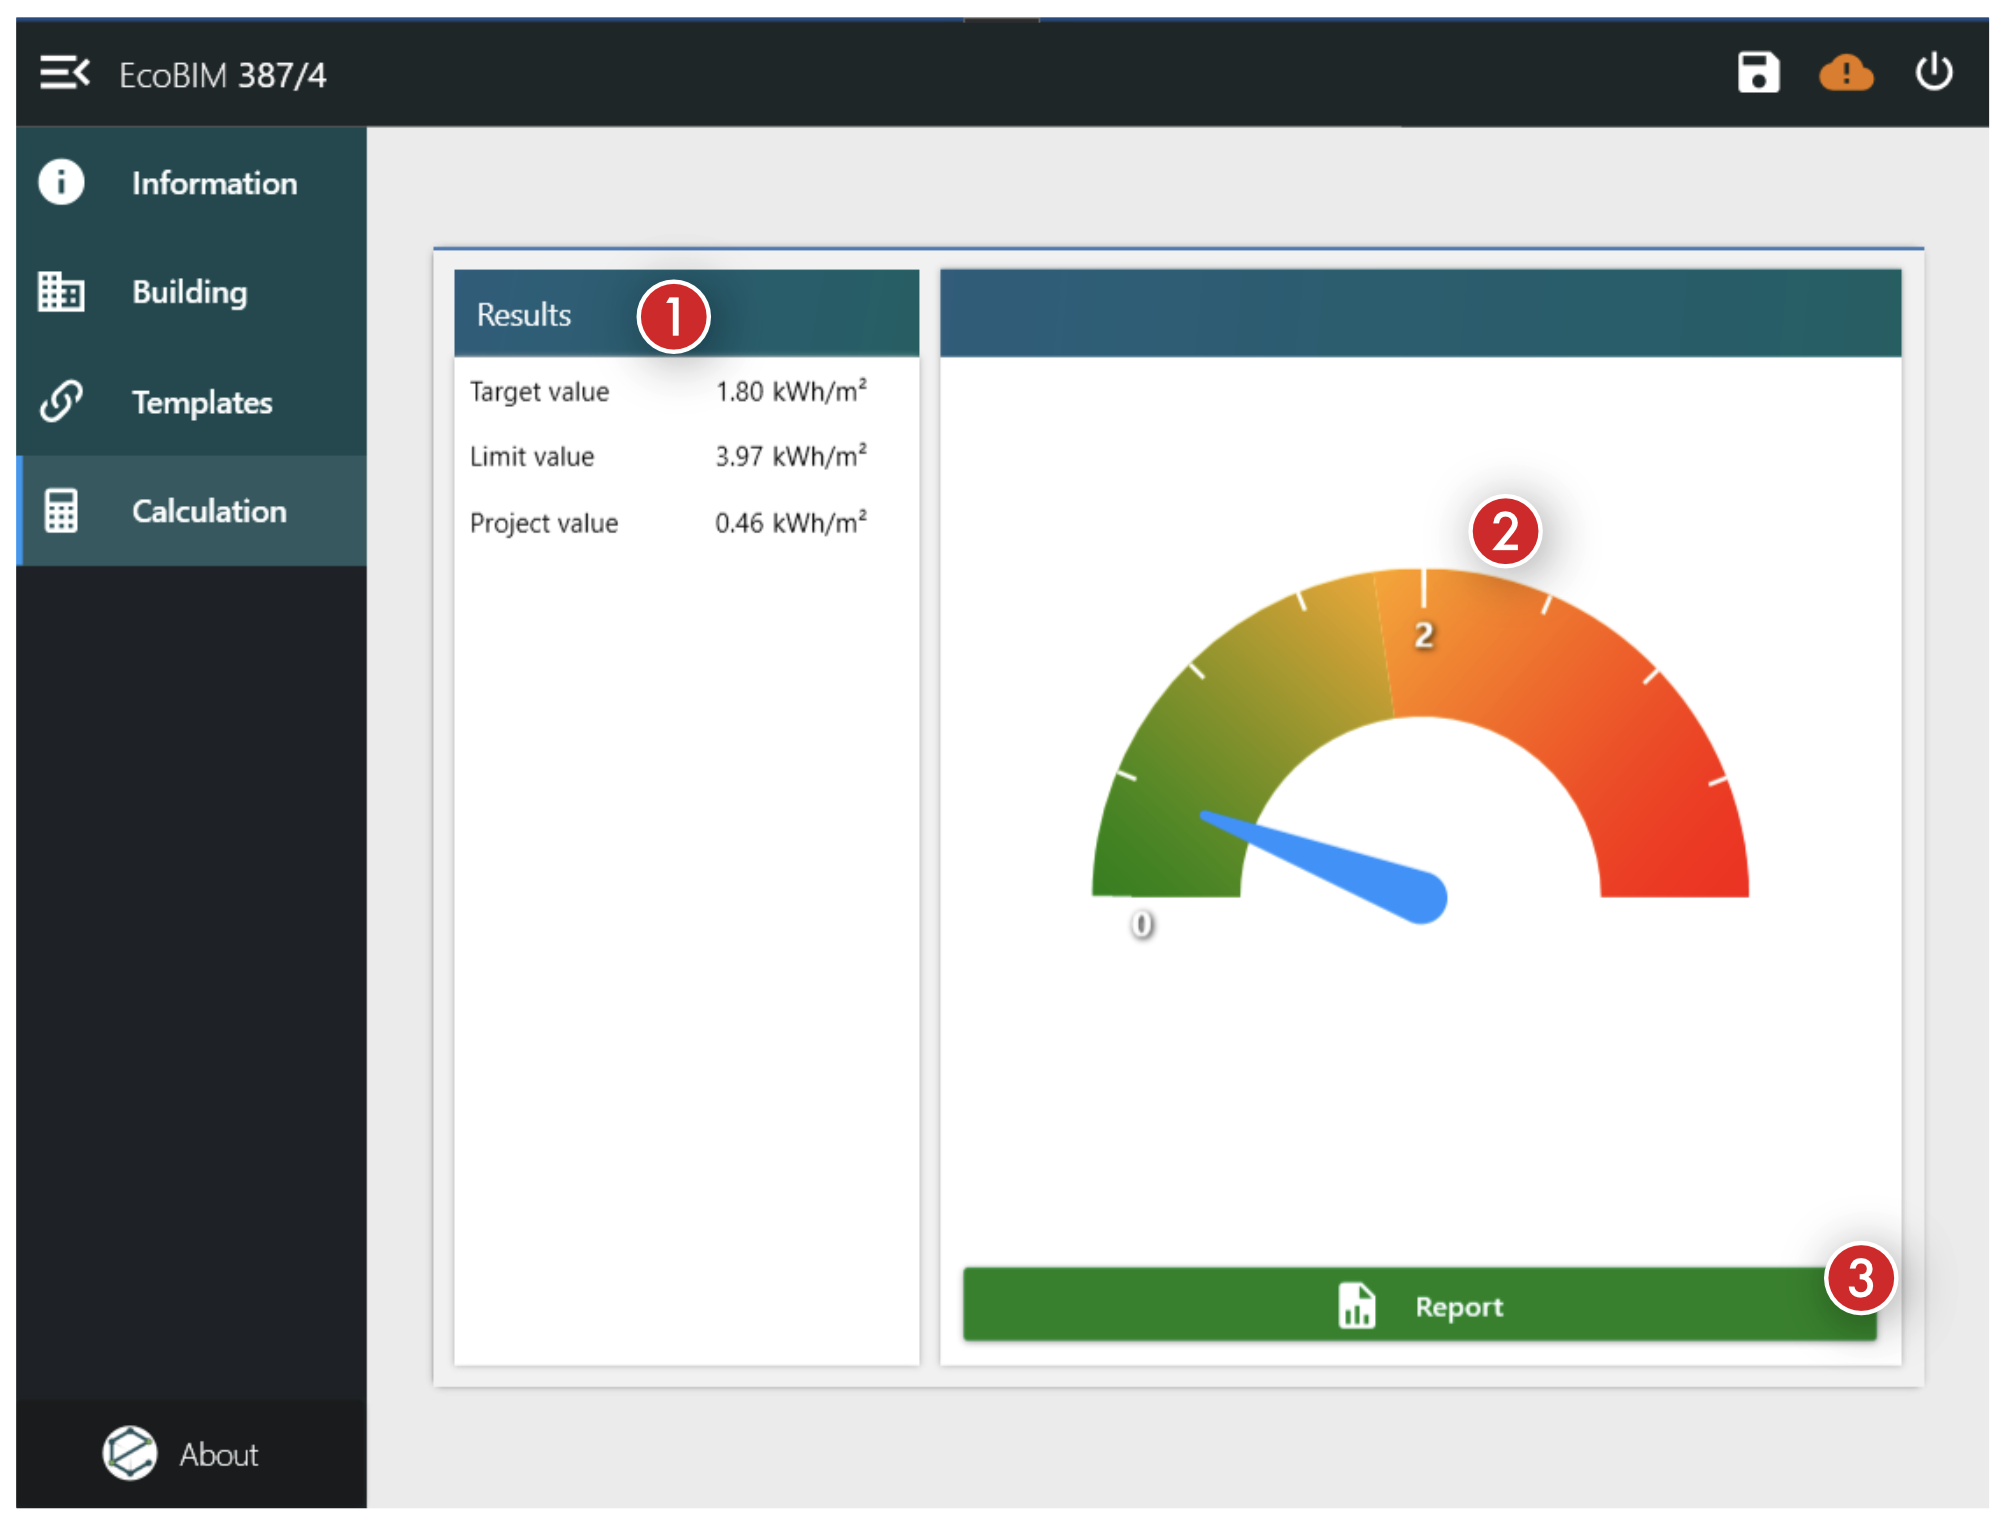
This window shows:
- The electricity consumption values (target, limit, and project values).
- A dynamic graph showing the electricity consumption.
- A
Reportbutton allowing you to export your results in.PDFformat.
These results are updated whenever a change occurs in the Building or
Templates window.
Report
Click the Report button to generate your calculation report.
A Save File dialog opens, asking you to name your file and save it in a
.PDF format.
Info
If a file with the same name exists, a confirmation dialog will open, asking if you want to replace the existing file.
Warning
When exporting your results, make sure that you do not have a file with a similar name already open. If a file with the same name is open, an error window will display and the saving process will fail.
The following pictures show some extracts of a typical report:

The following columns are presented in the Results by space page:
- Name
- Category
- Zone
- Area
- Illuminance
- Illuminance requirement
- Electricity consumption
- Electricity consumption - limit value
- Electricity consumption - target value
- Electric power
- Electric power - limit value
- Electric power - target value
- Full load hours
- Full load hours - limit value
- Full load hours - target value

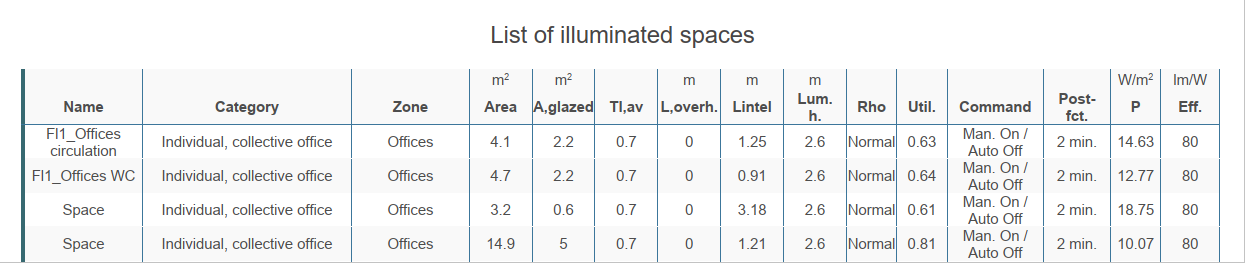
The following columns are presented in the List of illuminated spaces page:
- Name
- Category
- Zone
- Area
- Net glaze area
- Average light transmission
- Average overhang length
- Average lintel height
- Average lighting height
- Reflectivity mix
- Utilance
- Lighting command
- Occupancy sensor after-run time
- Installed lighting power
- Average luminous efficacy