Basic Features
All EcoBIM add-ins share a similar interface, which allows you to use some of the shared features in a consistent manner.
Once the installation completes, EcoBIM add-ins are available from the EcoBIM
tab of the Revit ribbon.
Click each add-in icon to start the add-in.
Info
The list of available add-ins is based on the add-ins that are installed on your system.

Input Fields & Buttons
All of the EcoBIM add-ins have the following interactive items:
- Text fields that allow you to input data, such as the name of the architect or the address of the project manager.
- Numeric fields that allow you to input project data. These fields are dynamic and display an interactive message when the value that you enter is not within the allowed range. Highlight each field to obtain more information about the values that are allowed.
Info
All fields are dynamic and automatically save your content as you type.
Main Window
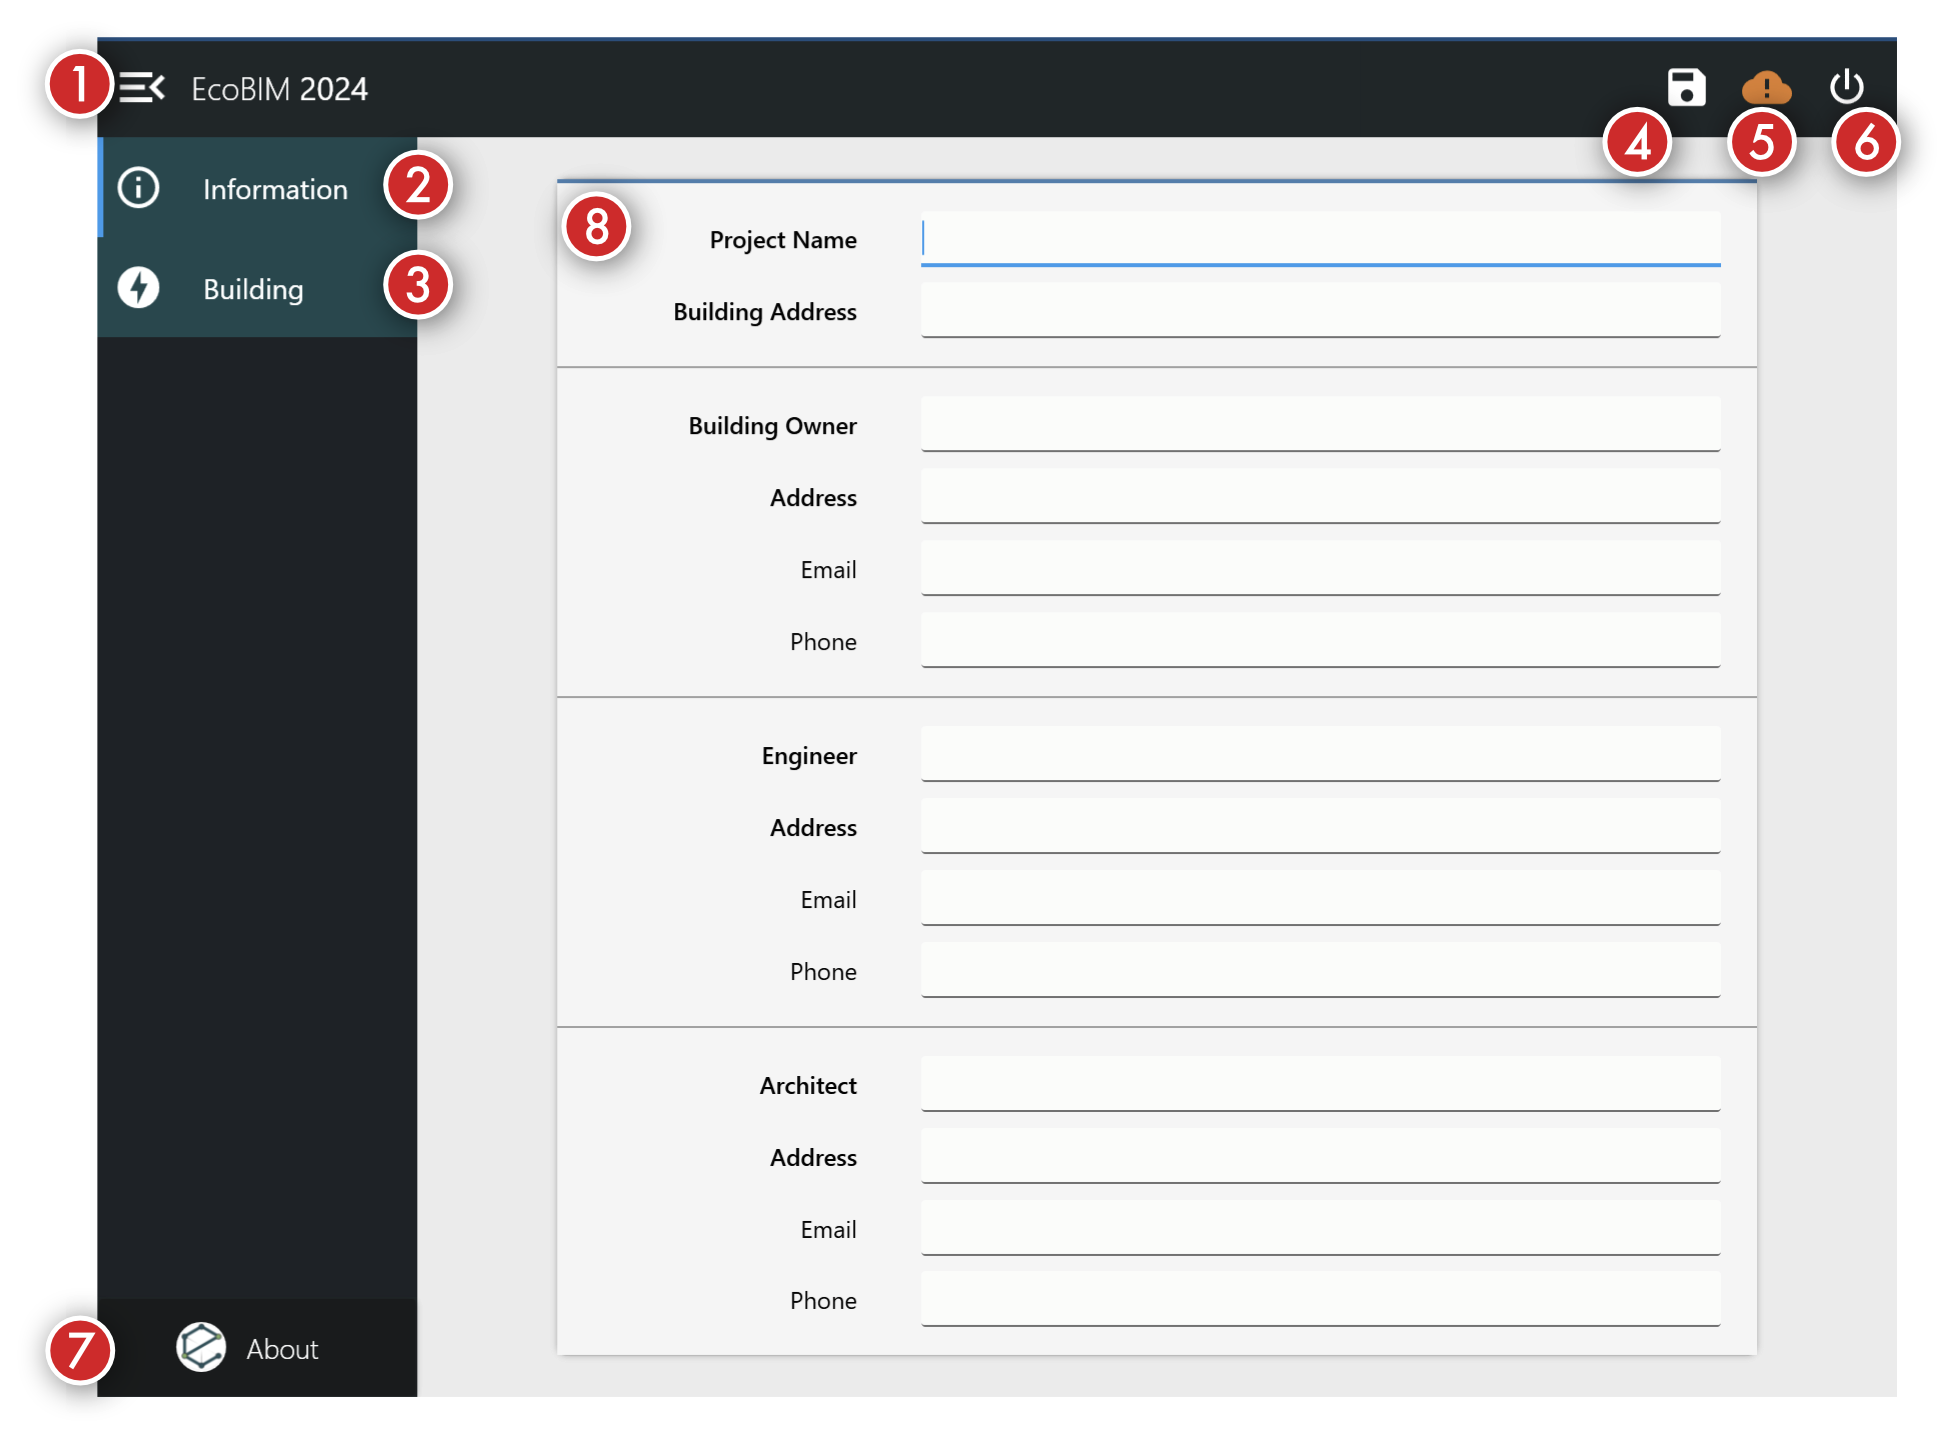
- Hamburger menu that opens and closes the sidebar. The list of available menu items varies based on the add-in in use.
- Use this icon to access the project information window, as shown on the main window.
- The
Buildinglink allows you to display the zones and spaces manager for your Revit model.- The features that comprise this window are presented later.
- Use this icon to save your work; clicking the icon instructs Revit to write the data to your model.
- This icon indicates whether a software update is available. A green icon
means that you are running the latest version of the EcoBIM add-ins, whereas
an orange icon -- as shown on the screen capture -- means that a software
update is available.
Click the icon to access the update assistant.
- The update assistant is discussed later.
- Click this icon to save your work and close the main window.
- The
Aboutlink allows you to access the following features:- License information
- Software information
- Support window
- This window is accessible from the
Infolink, as discussed in1. The screen allows you to input information about your project. The add-in uses this information to generate your reports. All add-ins use Revit schemas to write project information into your model.
Zones & Spaces Management in Revit
The official documentation describes zones and spaces as follows:
Zones: consist of one or more spaces that are controlled by equipment that maintains a common environment (temperature, humidity, and so on). You create zones to define spaces that have common environmental or design requirements. Spaces in unoccupied areas such as plenums can be added to zones. Spaces that are on different levels can be added to the same zone. You can create zone schedules and use a zone schedule to modify zones.
Spaces: contain information about the areas in which they have been placed. This space information is used to calculate the volume of the spaces and to help determine a heating and cooling loads. Each zone contains zone information, such as heating and cooling temperatures and outdoor air information. Revit uses both zone and space information during a heating and cooling loads analysis to determine the energy demands of the building.
Important
MEP projects always have at least one zone, the Default zone. When spaces
are initially placed in a project, they are added to that zone. When you
assign a space to a zone that you create, that space is removed from
the Default zone.
The management of zones and spaces and at the heart of all EcoBIM add-ins. The manager allows you to configure your spaces and assign them to zones. Depending on the add-in that you use, the list of available features for managing spaces and zones vary.
For example, the add-in EcoBIM 2024 uses the zones and
spaces for the definition of assignments according to the SIA 2024
specification, whereas the EcoBIM 382/1 add-in uses the
zones and spaces to assess the electrical consumption of your venting
installations.
Info
The features that are specific to each add-in are discussed in the sections dedicated to each add-in.
Main Window
The following section discusses the features that are common to all add-ins.
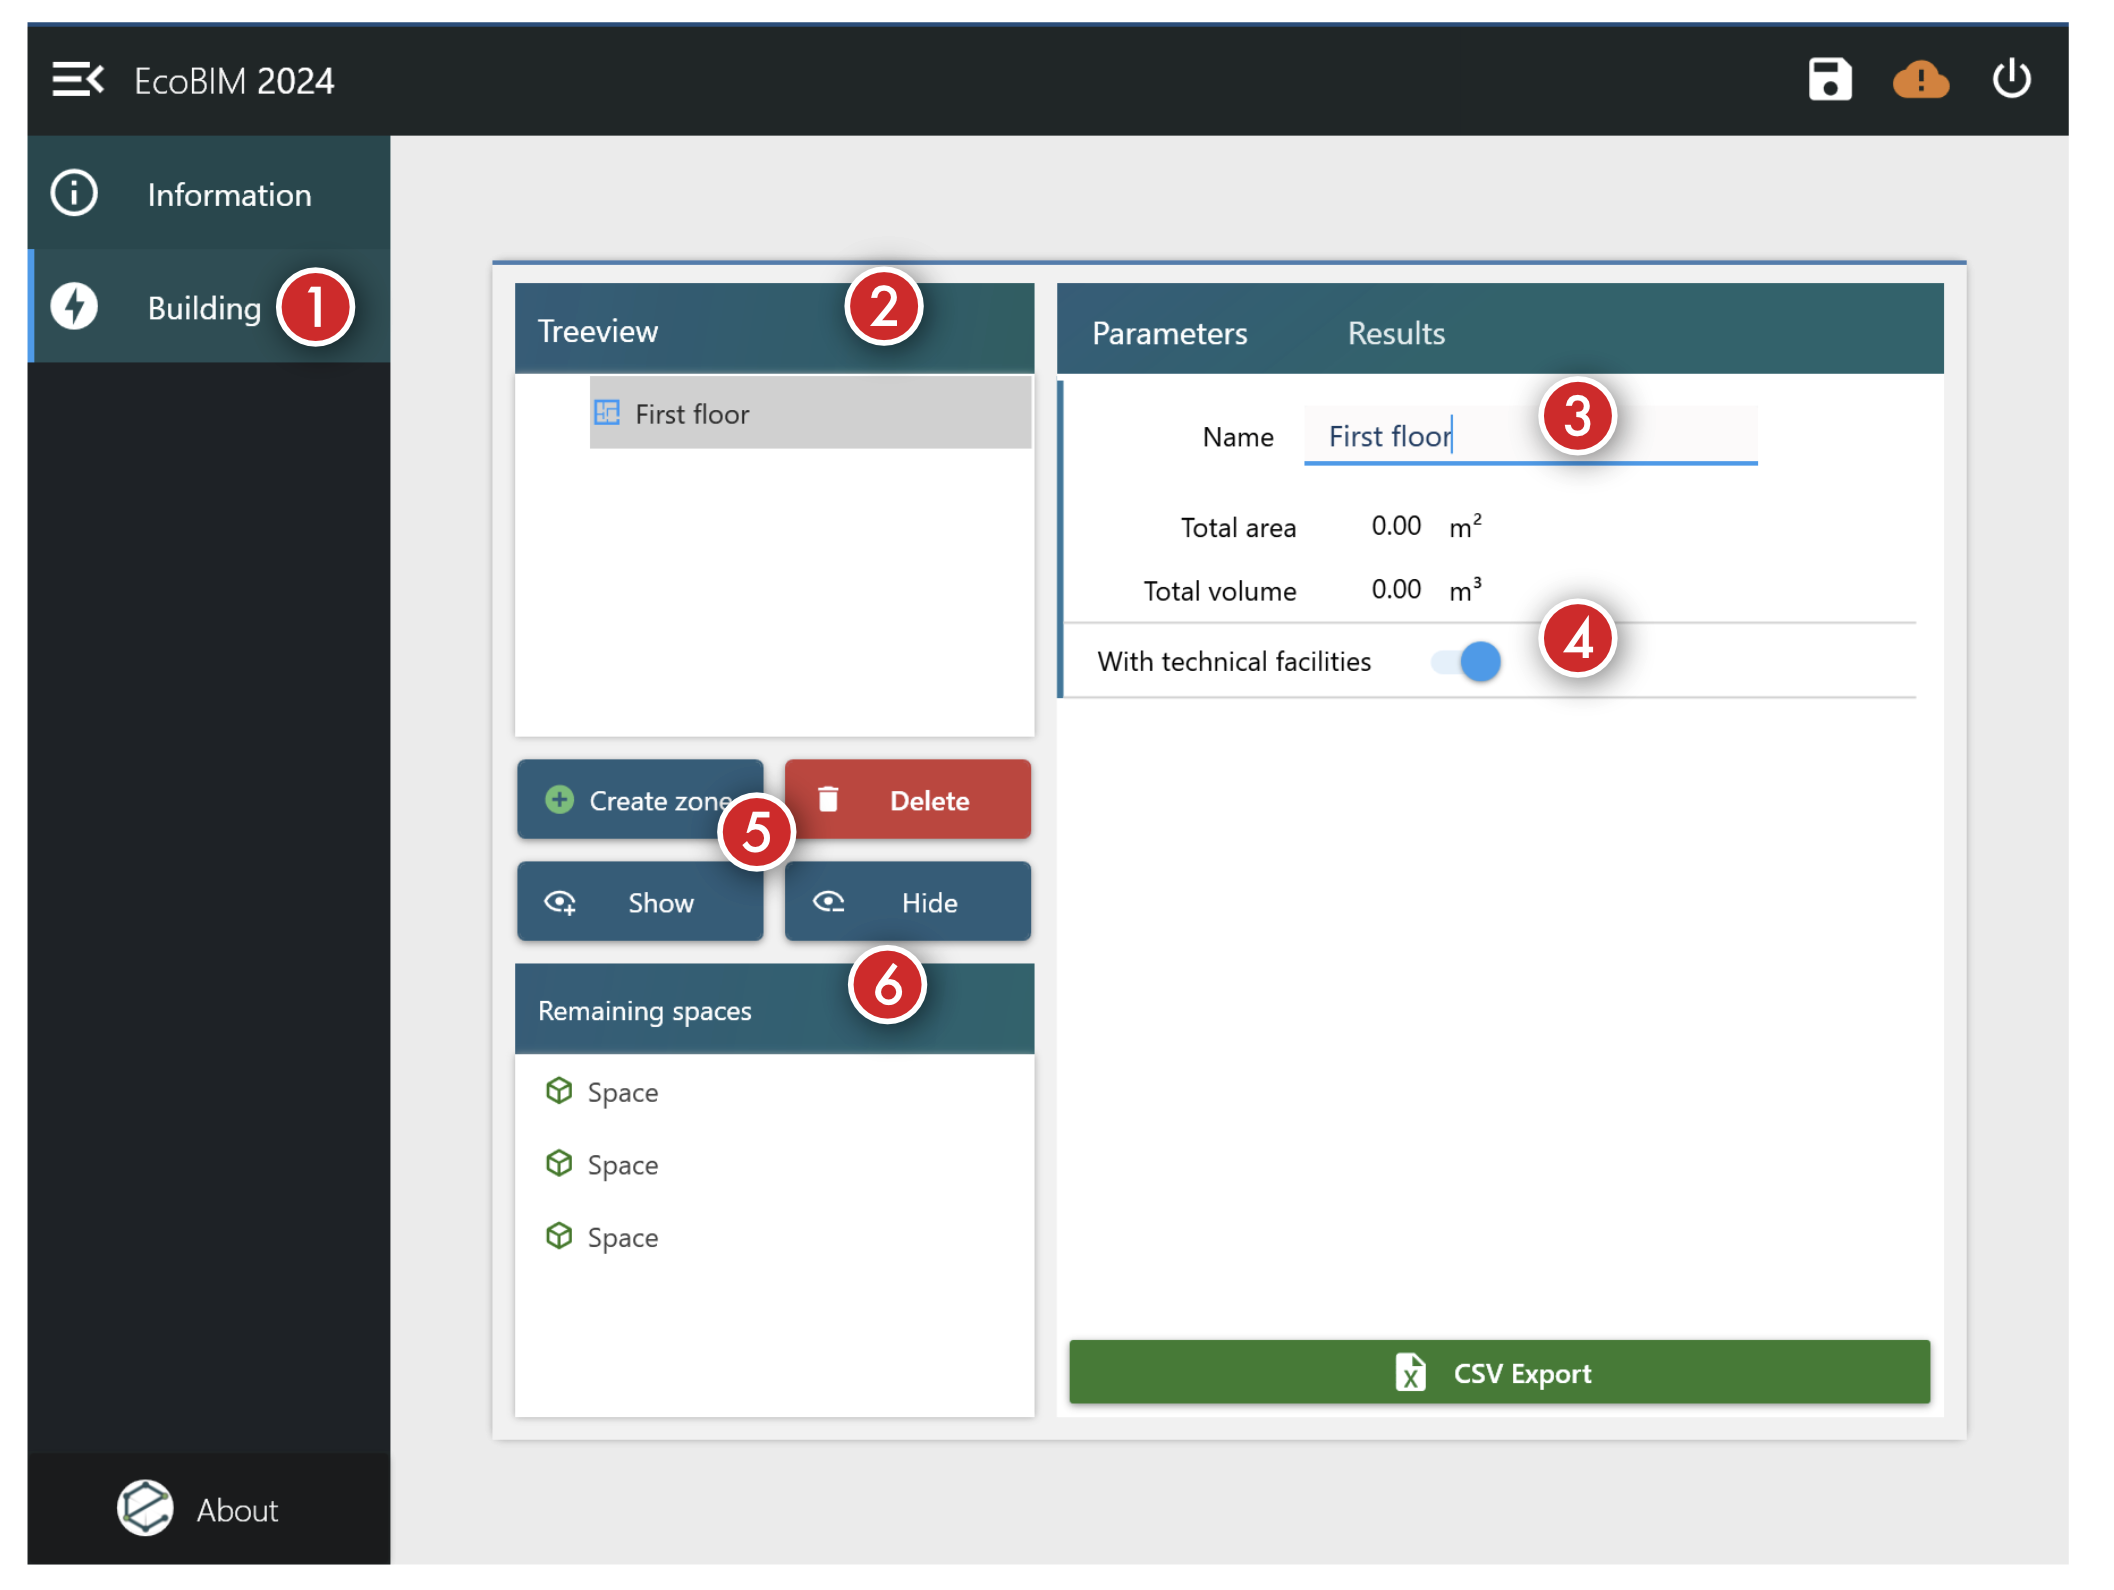
- The spaces and zones manager is available from the
Buildinglink of the sidebar. - This frame displays all the zones in your model. Click
Create zone, per the entry5, to create a new zone. - The frame on the right side of the window allows you to name or rename the zone that you select. The frame displays the surface as well as the volume of the zone; both are determined by the sum of all spaces that comprise said zone.
- Each add-in possesses a set of controls, such as a toggle button, to enable or disable a feature.
- This panel has the following four features:
- Zones creation: click
Create zoneto create a zone. The zone gets automatically added to the outline view, as discussed in2. - Zones deletion: Click
Deleteto delete the selected zone. When you delete a zone, the spaces that comprise the zone return to the list of unassigned spaces, as discussed in6. - Zones display: Click
Showto display the selected zone in your Revit model. The feature temporarily applies a transparency filter, which allows you to quickly locate the zone. You must select a zone for this feature to work, otherwise, this button does not do anything. - Zones hiding: Click
Hideto reset the display settings that got set by theShowbutton.
- Zones creation: click
- This panel lists all the available zones in your model. Click a space to manage its properties, such as its assignment to a zone. The next section discusses how to assign spaces to zones.
Spaces Management
The following section explains how to manage your Revit Spaces with EcoBIM add-ins.
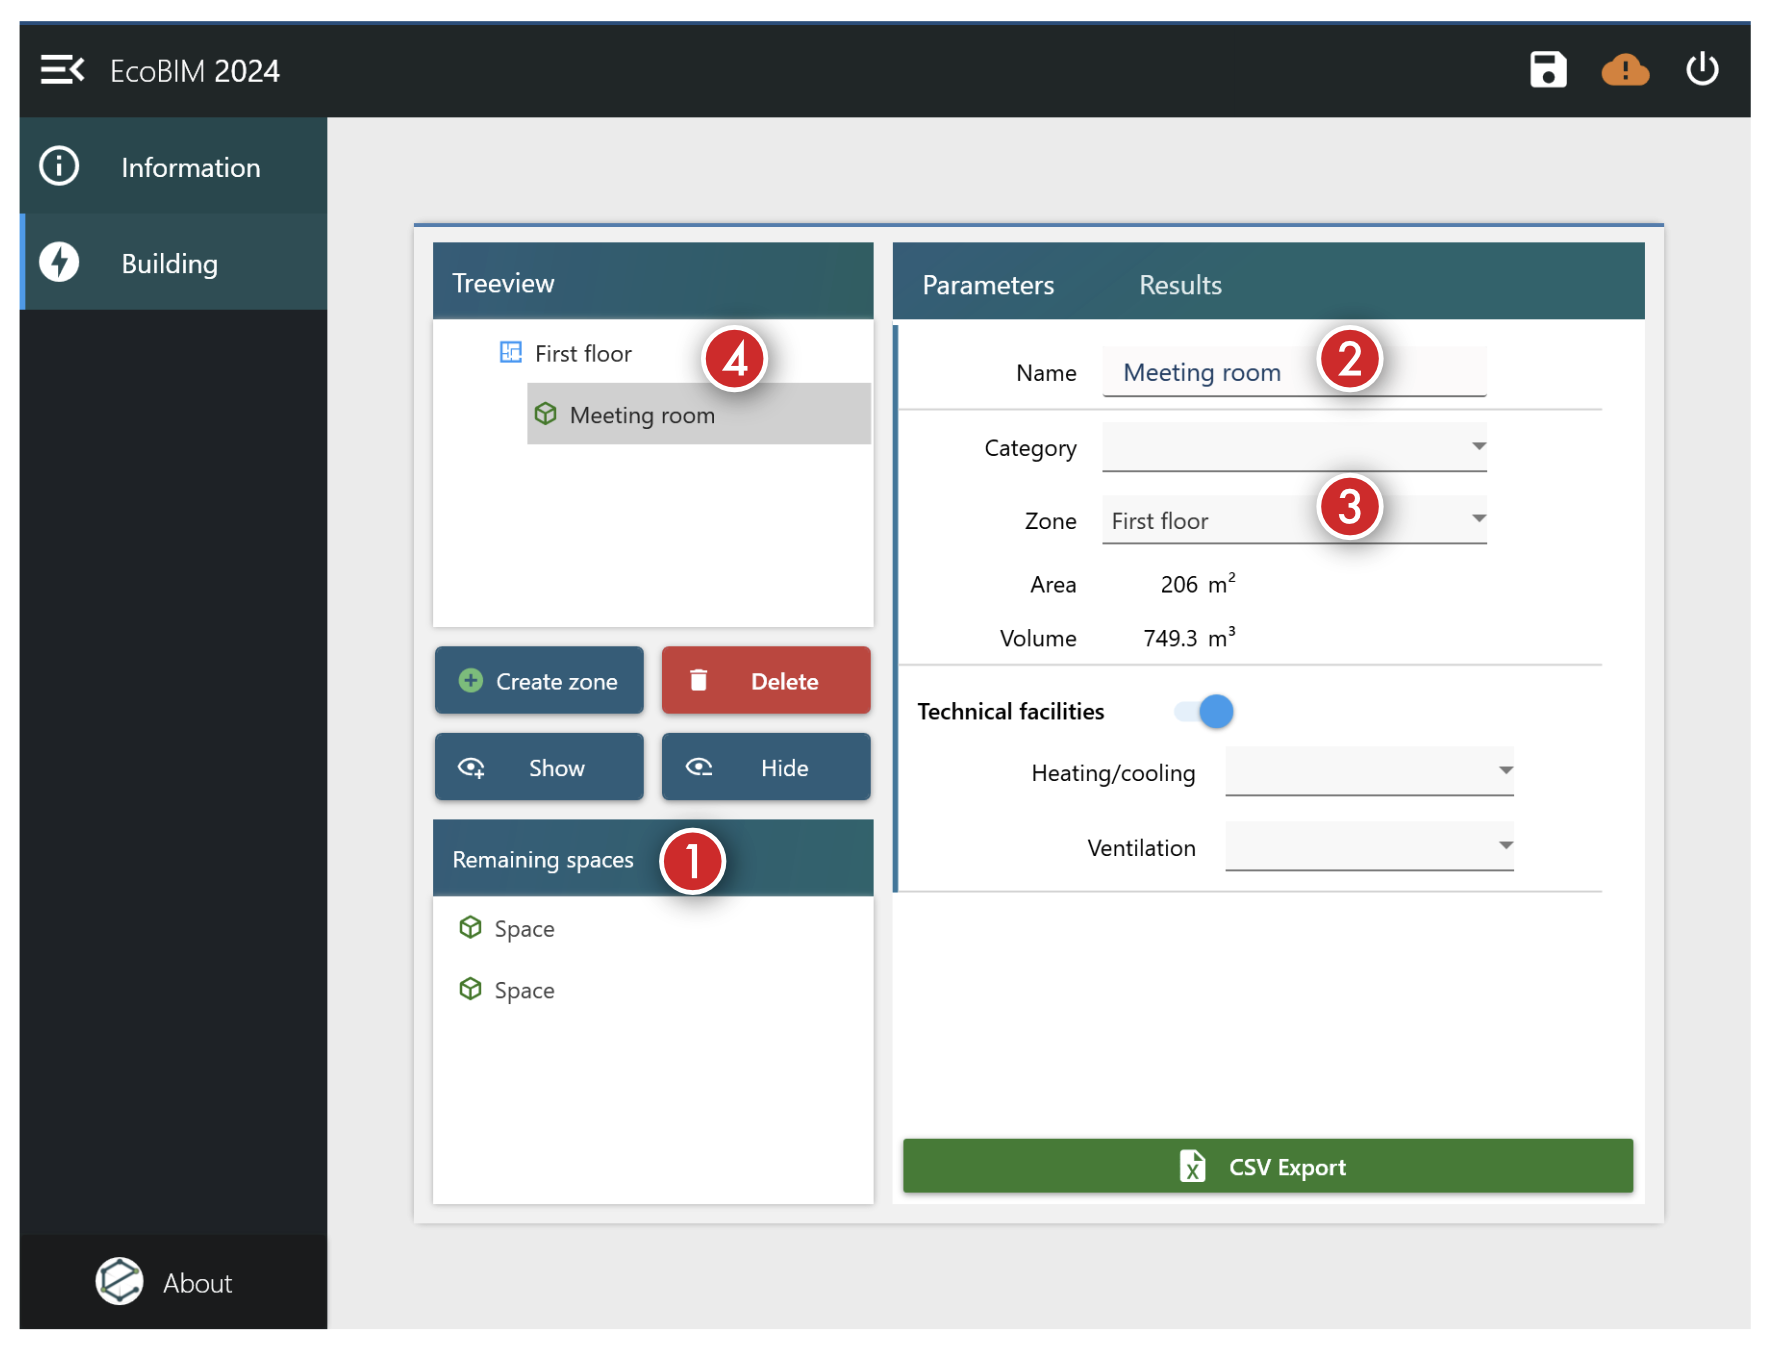
- Select a space from the list of available spaces that are not assigned to any zone to manage it. Selecting a space allows you to manage its properties, including its assignment, as shown in the right frame.
- Use this field to rename a space.
- This drop-down list displays all available zones. Select a zone to assign the space to that zone.
- After selecting a zone, the outline automatically updates.
The screen capture shows a
Meeting roomspace that belongs to aFirst floorzone. ClickDelete, as described in the Main Window section, to remove a space from a zone. Deleting a zone moves all its spaces back to the list of unassigned spaces.
"About" window
The About window is accessible from the sidebar by clicking the EcoBIM
icon, as shown in the following image.
Info
Clicking the About link temporarily deactivates other available menu
links as well as the link to the update assistant.
Click the EcoBIM one more time to close the About window and enable
back the add-in features.
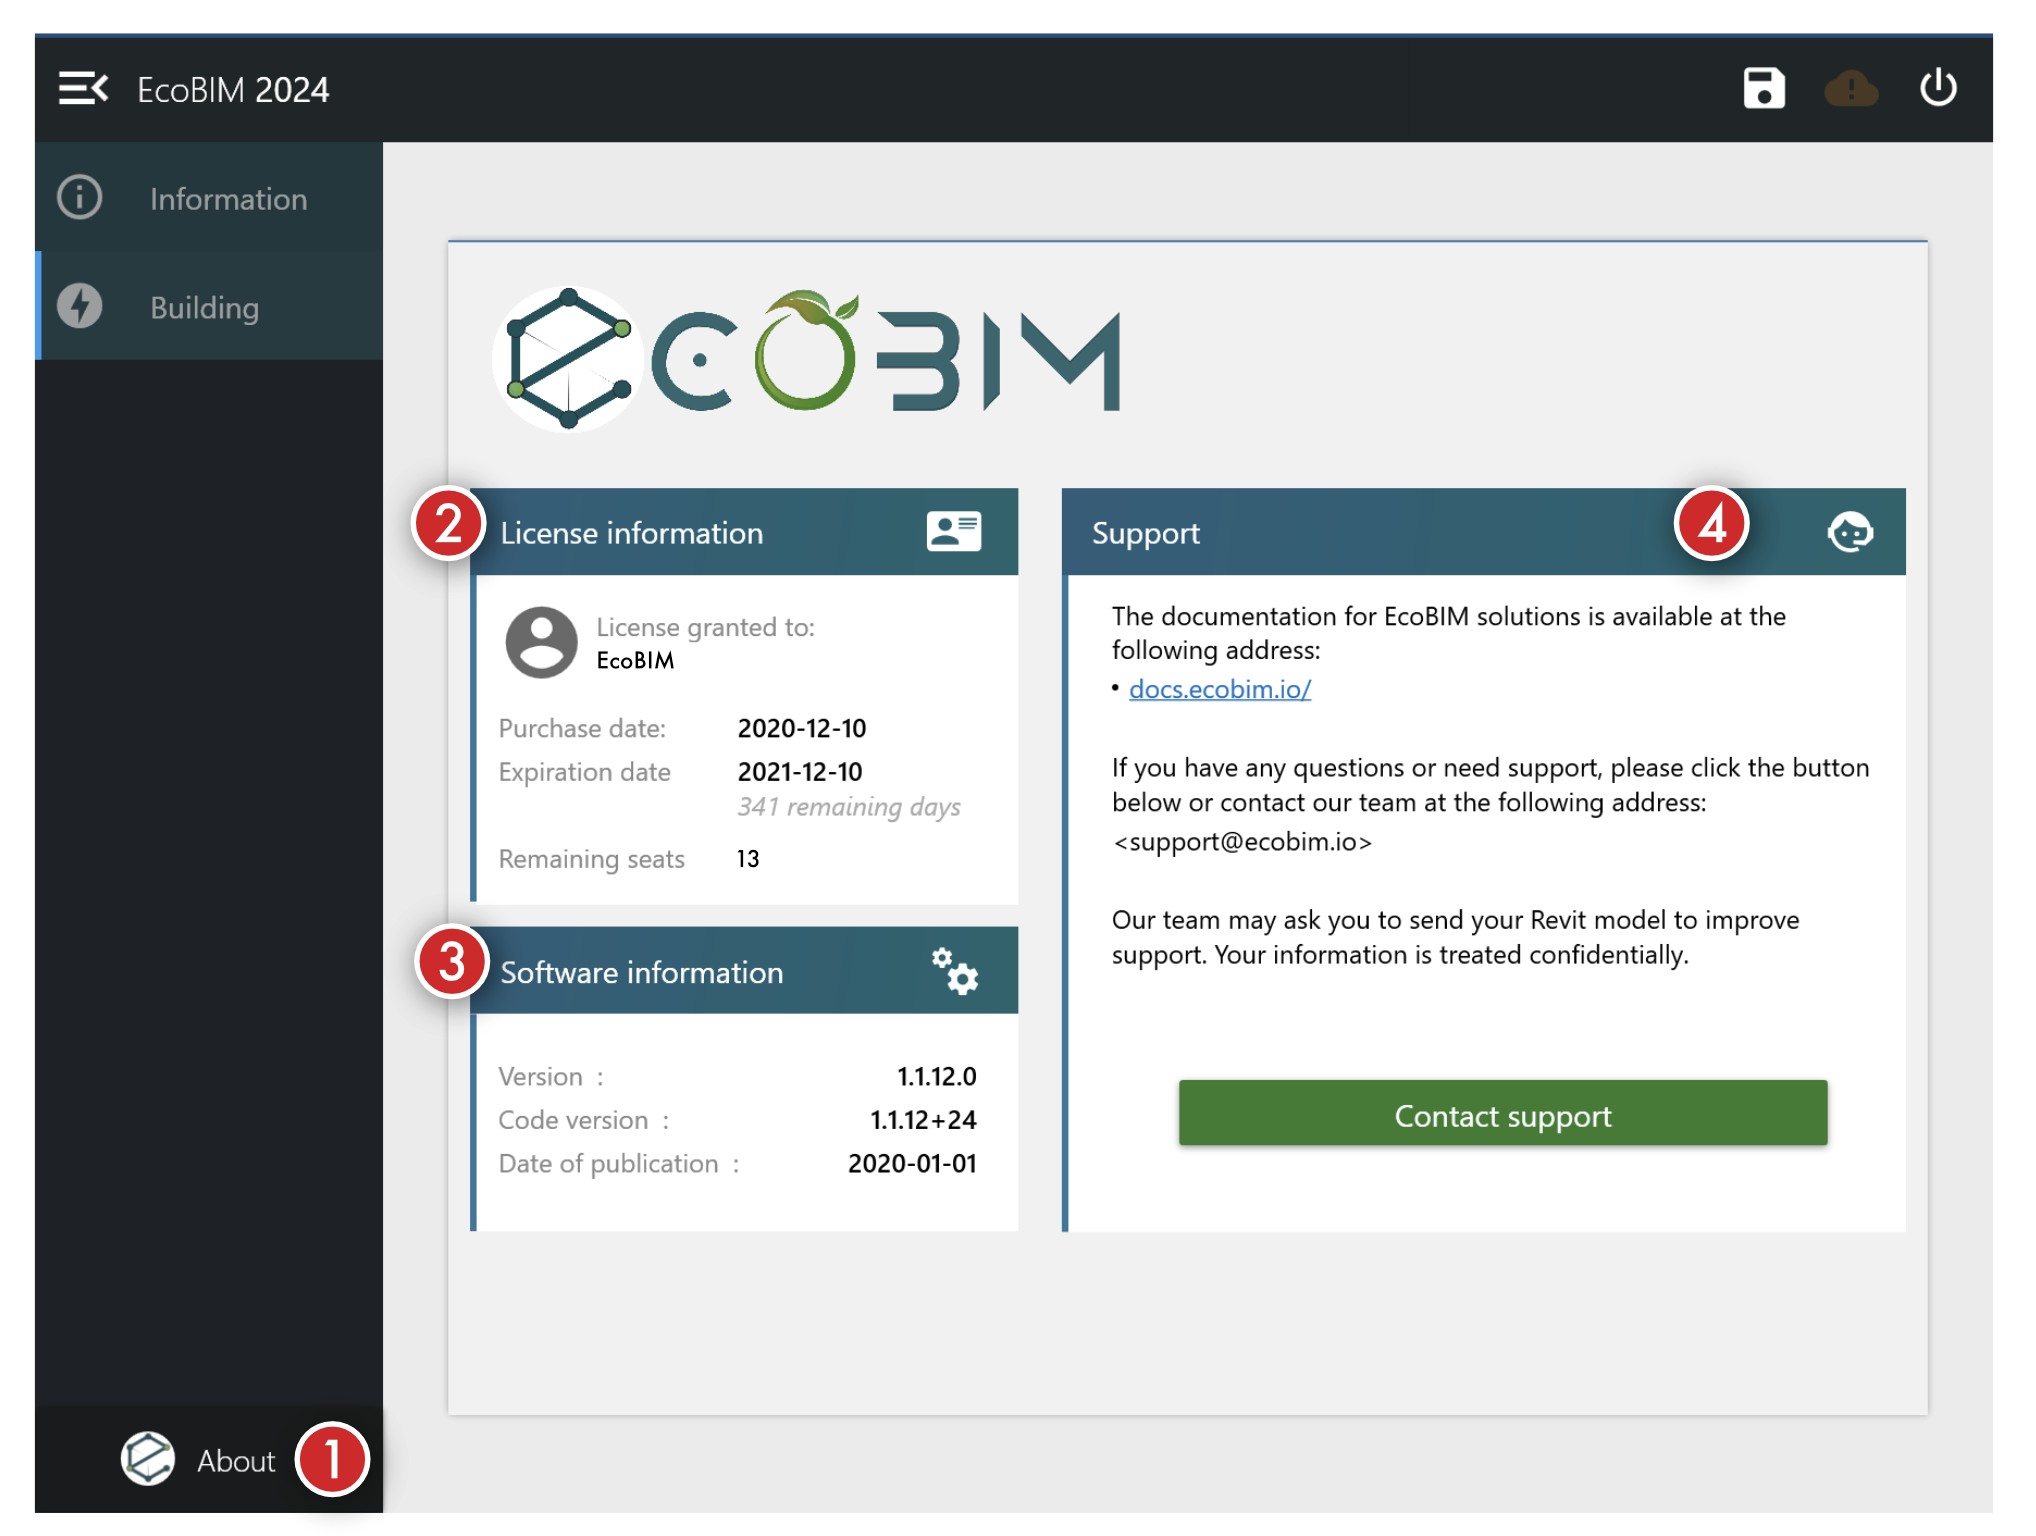
- The button allows you to display the window.
- The frame shows information about your license, including:
- The purchase date
- The expiry date
- The number of remaining days before the license expires
- The number of available seats. In this case,
13means that you can use the license on 13 supplementary computers.
- The frame displays information about the add-in, such as the release version and the release date.
- The frame allows you to access the online documentation and contact our
support by clicking the
Contact supportbutton.
Support Window
The support windows displays when you click the Contact support button, as
discussed in the previous section.
This window allows you to open a new ticket with our support team.
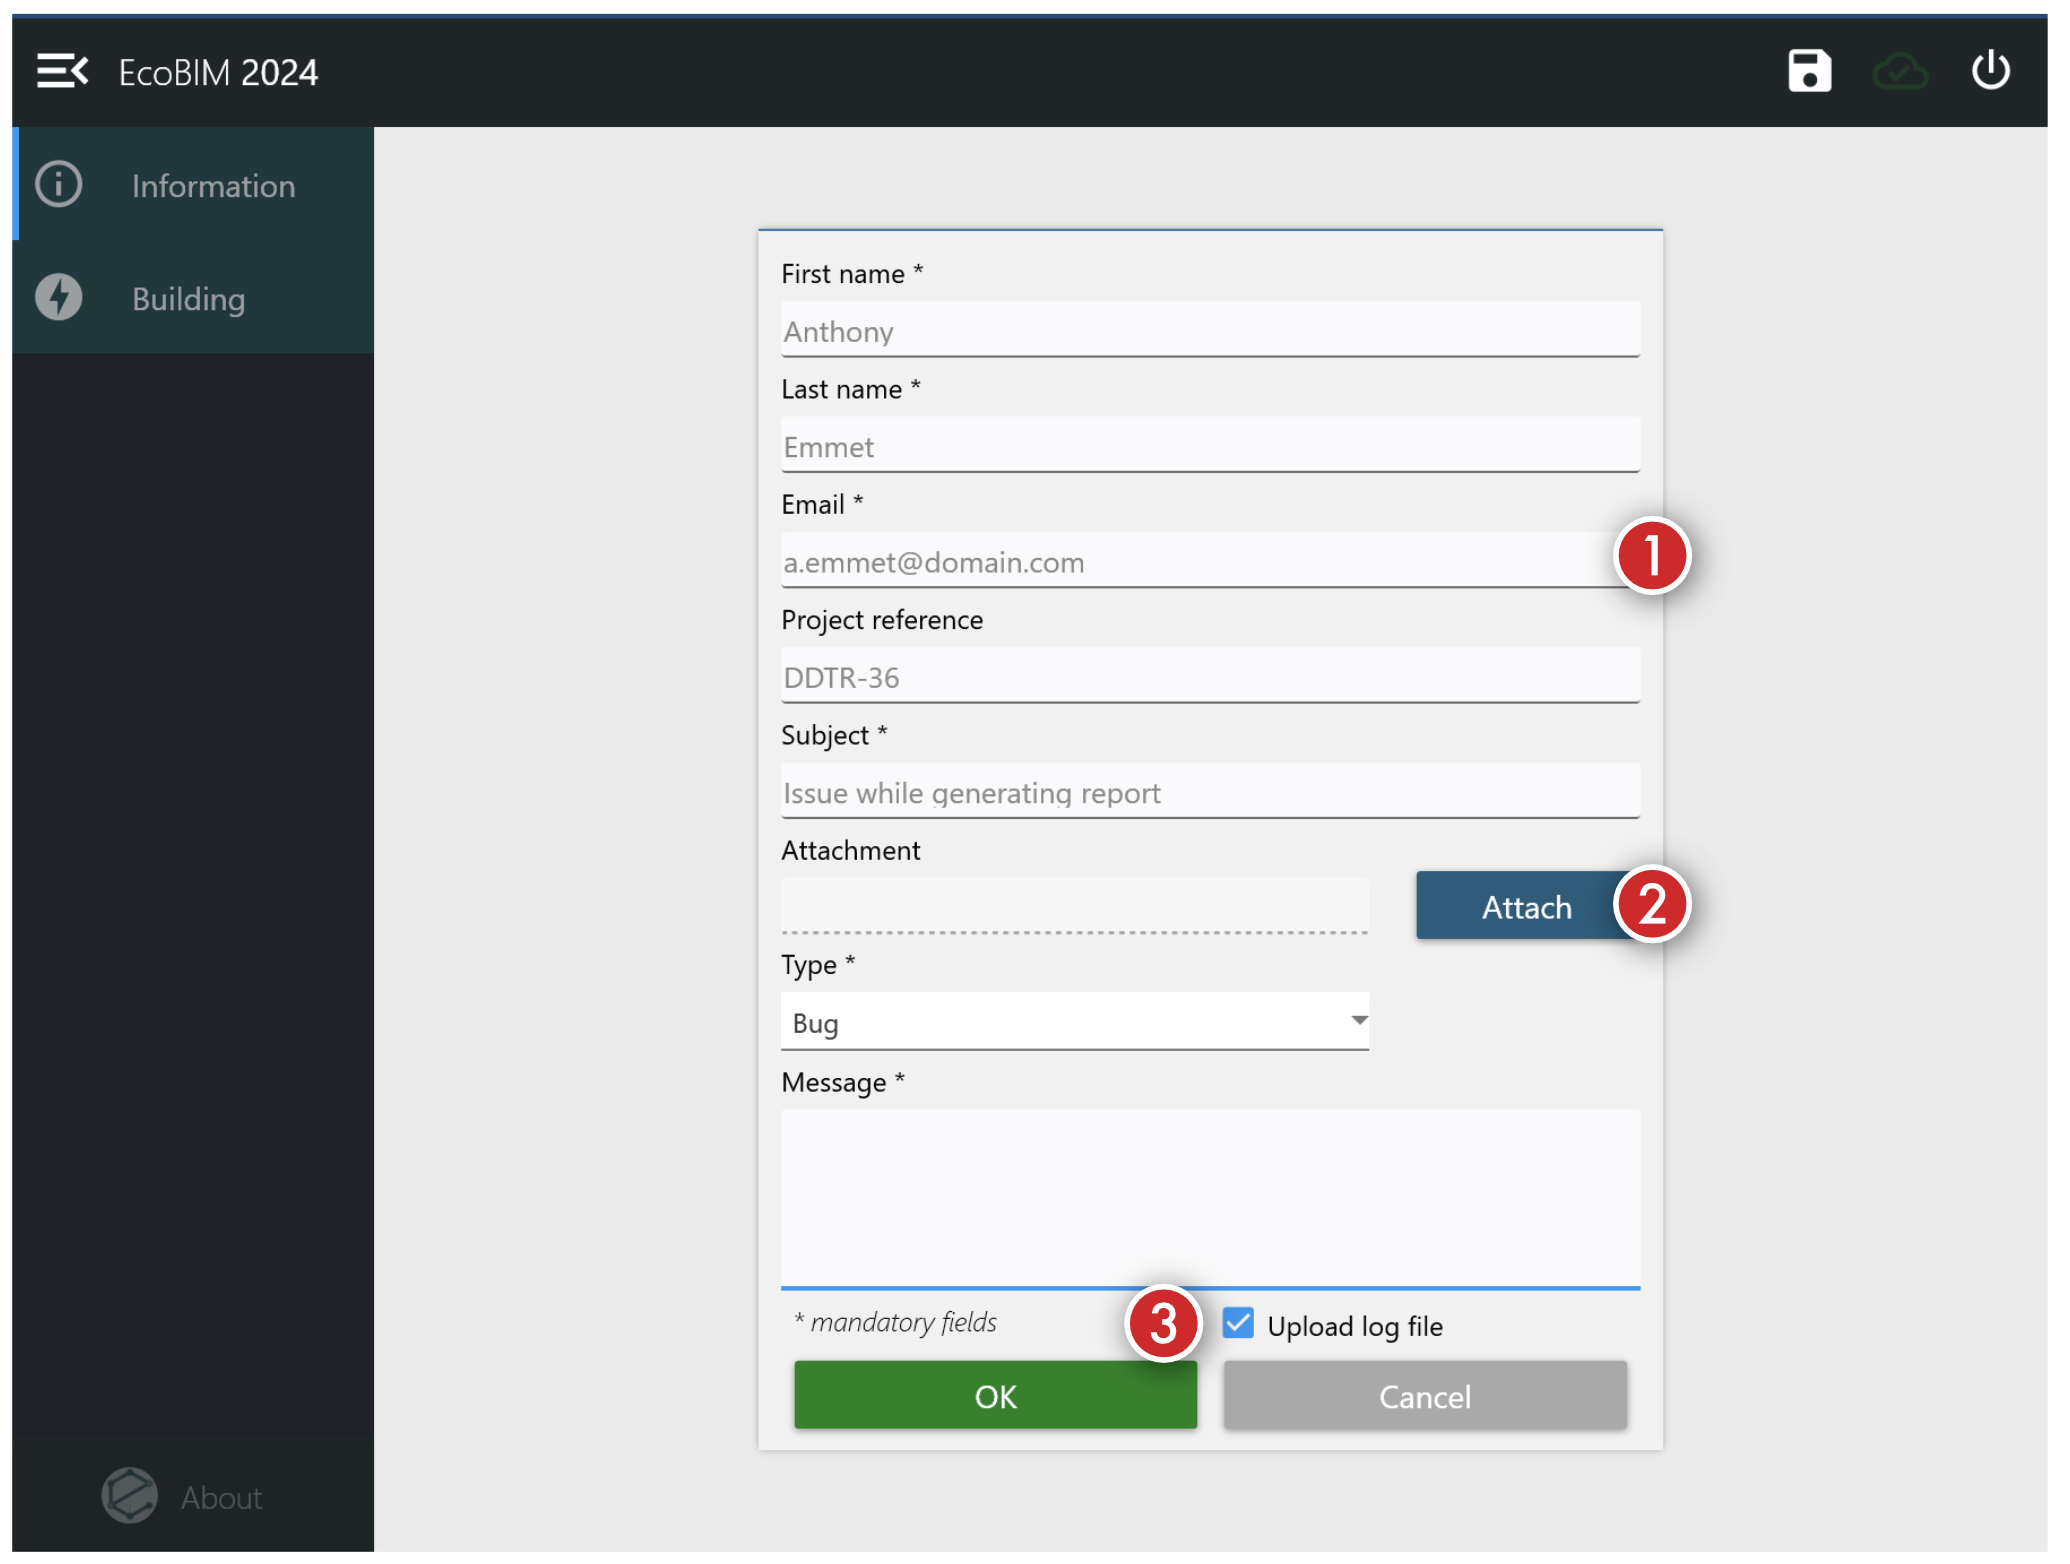
- Use these fields to provide the information to contact you back and provide context for your request.
- Click
Attachto attach a file with your message. For performance reasons, you can only upload files whose size does not exceed five megabytes. For heavier files, use the online platform that we provide when you purchase a license. - The
Upload log filecheckbox — which is selected by default —, instructs the add-in to send us a copy of your logs. Logs do not contain any private information and make it easy for our team to assist you. Clear the checkbox if you do not wish to send us a copy of your logs along your request.
Once you filled in all the fields, click OK to send your message or Cancel
to close the panel.
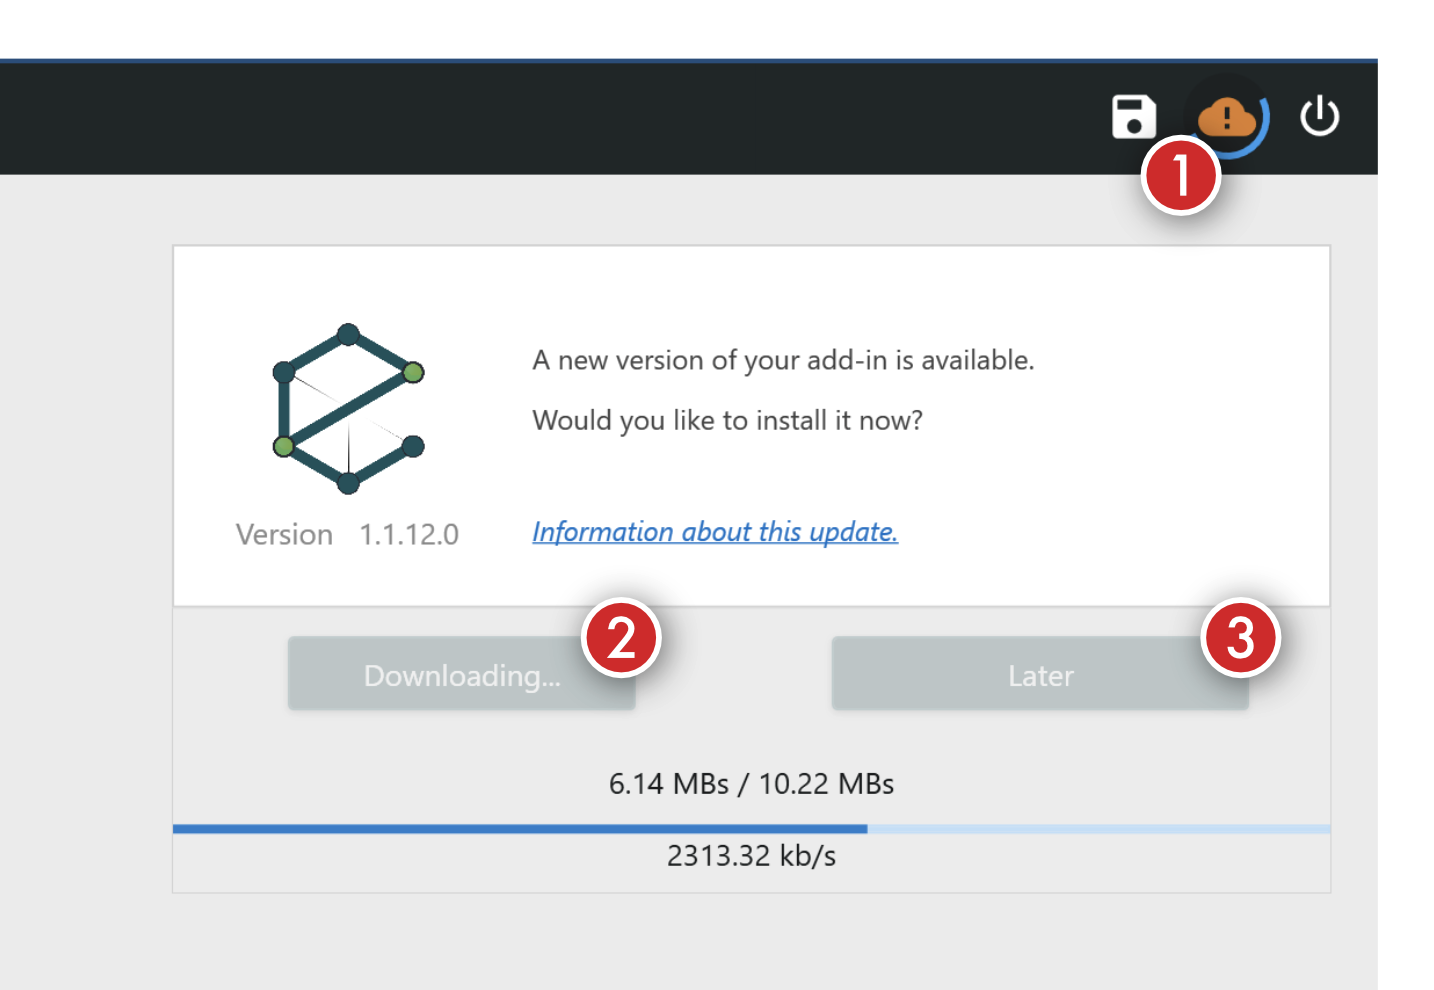
Update assistant
The update assistant is accessible by clicking the cloud icon, available in the upper-right corner. This window shows you available updates, and a link points to the changelog. All EcoBIM add-ins are delivered via a single installer. Thus, when you update a given add-in, the installer updates *all add-ins that are installed on your computer. You can decide if you want to install the latest version by reading the changelog.
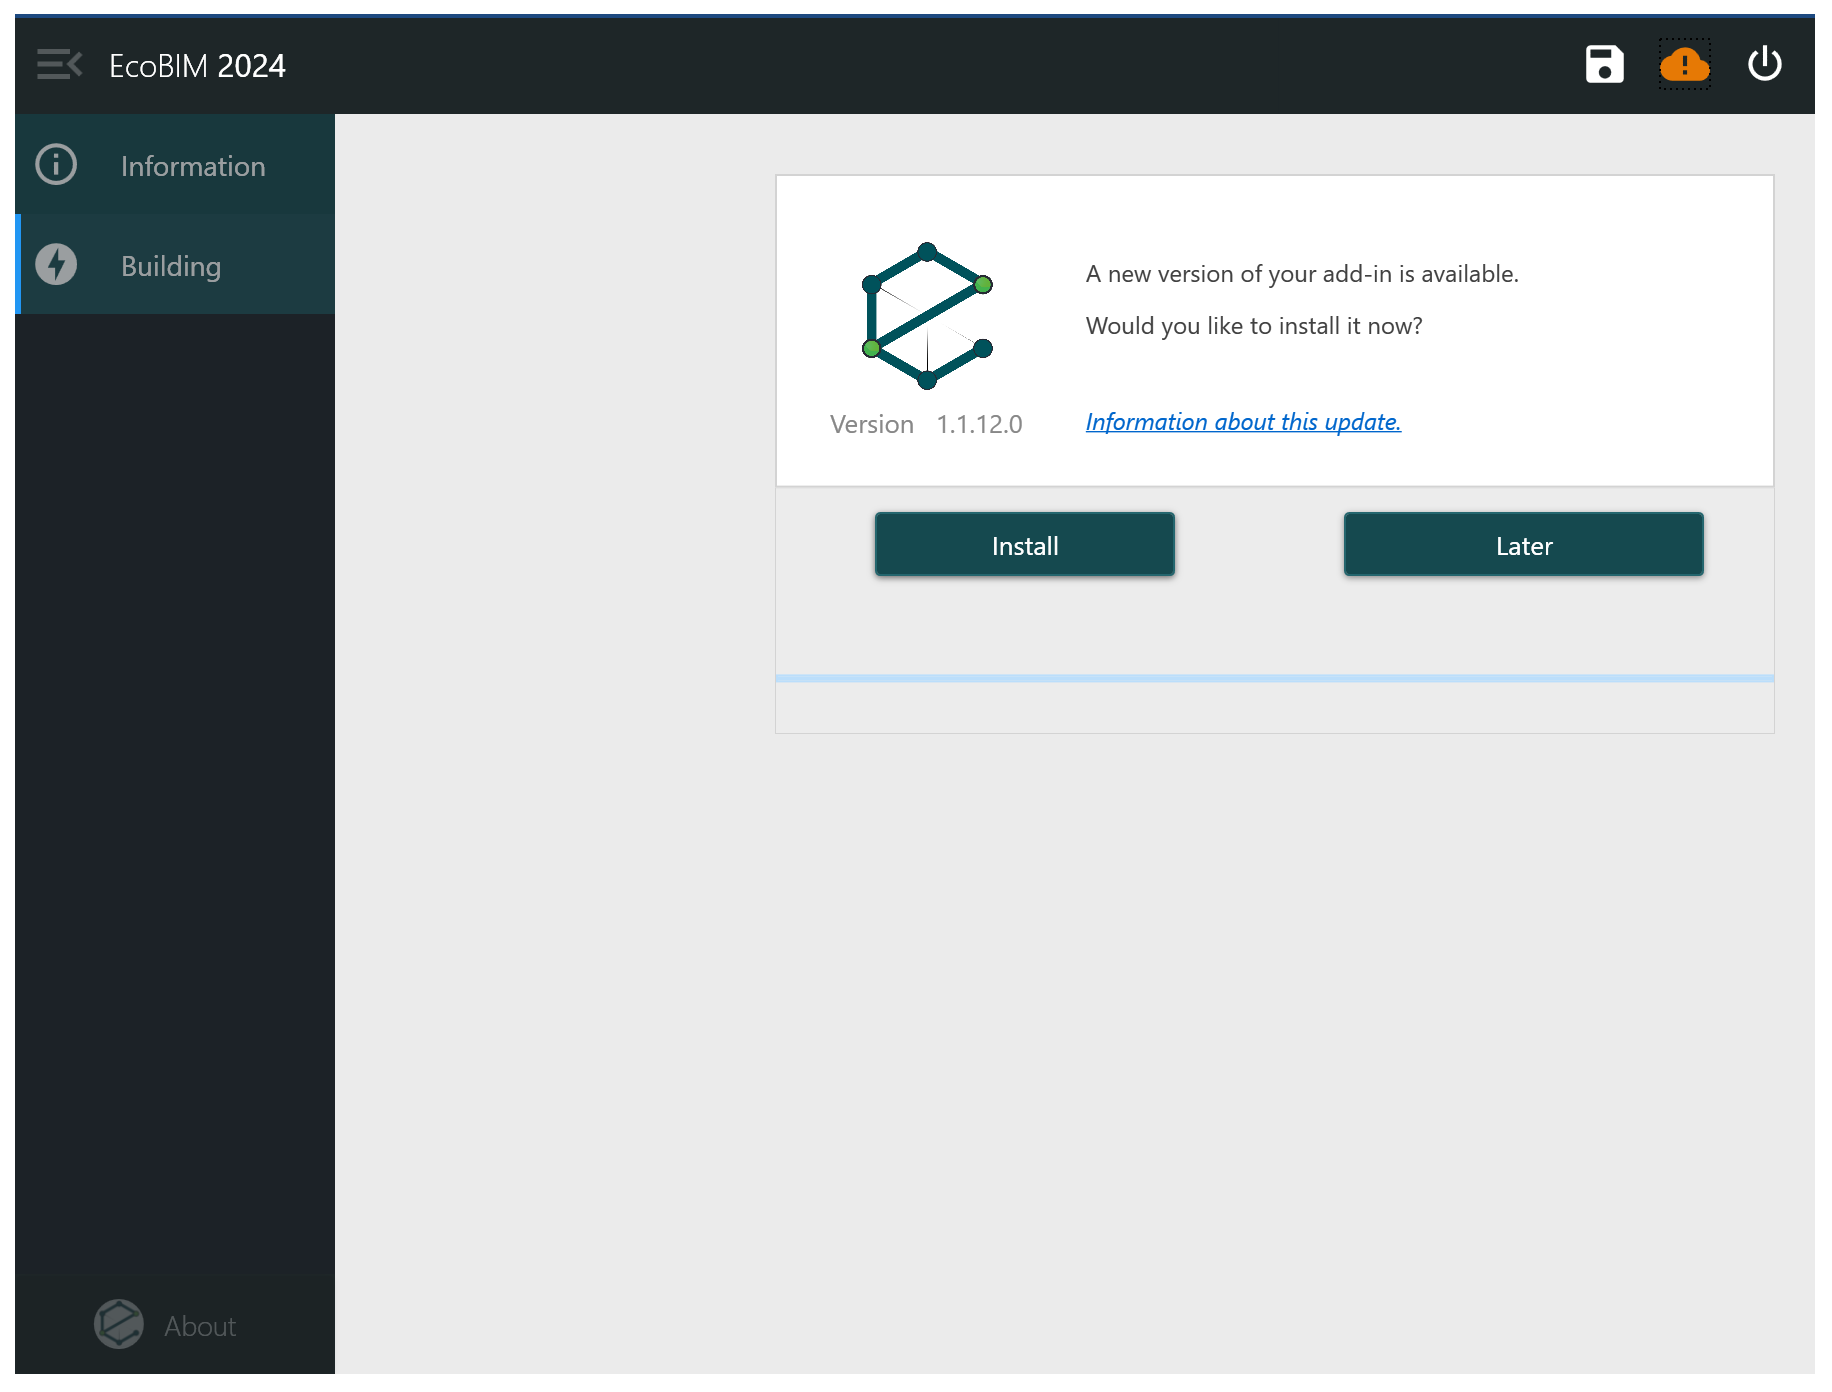
- The cloud icon has multiple states:
- A green icon indicates that the version that you are running is the latest available one.
- An orange icon, as shown on the image, means that an update is available.
- Click
Laterto close the update assistant and return to the screen that you were on before clicking the EcoBIM icon. - Click
Installto download the latest available version and run the installer. Make sure to save your work and restart Revit after installing the latest version.
Important
Clicking the Install button deactivates the add-ins and proceeds to the
downloading and launching of the installer.
After clicking Install, you will no longer be able to cancel the
download of the file.
Après avoir cliqué Installer, il ne vous sera plus possible d'annuler
le téléchargement.
You must not interrupt the operation. If you have any issues while the
installer downloads the latest version (for instance, due to a
disconnection), restart Revit, and click Install to restart the update
process.
Important
We keep a copy of all published version on our servers to give you the ability to roll-back to an earlier version, should your Revit model present compatibility issues with an update. See the dedicated support page for more information about our support matrix. As mentioned, EcoBIM add-ins are delivered via a unique installer, therefore, running an older version of the installer will revert all your add-ins to an earlier version.